SIGN IN YOUR ACCOUNT TO HAVE ACCESS TO DIFFERENT FEATURES

FORGOT YOUR PASSWORD?

FORGOT YOUR DETAILS?

AAH, WAIT, I REMEMBER NOW!
(858) 842-4595
  • Policies
  • My Account
  • LOGIN

Norton Motorsports

Menu
  • Shop by Bike
    • Aprilia
      • RS 660 2021-
      • Close
    • KTM
      • RC390 / Duke 390
      • Close
    • Kawasaki
      • Ninja 250 / 300
      • Ninja 400 2018-
      • Z400 2019-
      • Close
    • Ohvale
      • GP-0
      • Close
    • Yamaha
      • FZ-07 / MT-07 2015-2017
      • MT-03 2020-
      • R3 2015-2018
      • R3 2019-
      • Close

    • View All
    • Close
  • Norton Built Motorcycles
    • Norton Racing Hotbodies GP Spec Race Bodywork Kit - Kawasaki Ninja 400 Z400 Ninja400R main Norton Motorsports GP Spec Kawasaki Ninja400R
    • 2019-04-28 18_00_05-2018 Ninja 400 Race Motorcycle from Ninja400R.com Norton Motorsports Kawasaki Ninja400R
    • 2019 yamaha yzf-r3 race bodywork Hotbodies Racing Norton Motorsports Norton Motorsports Race Spec Yamaha R3
    • Close
  • Apparel, Gear, & Tools
    • Apparel
    • Riding Gear
    • Tools
    • Close
  • How To
    • Kawasaki Ninja 400 2018-
      • featured image Install an R6 Throttle Tube – How to install an R6 throttle tube to shorten the throttle throw on your Ninja 400.
      • open clutch Install race spec clutch upgrade kit – Clutch slipping, poor shifting, false neutrals, and dropping gears fixed and explained!
      • IMG_4330_2 Remove OEM Bodywork – How to remove the OEM bodywork of the Kawasaki Ninja 400
      • 2019-02-07 10_57_46-Clipboard Remove the Gas Tank – How to remove the gas tank on the Kawasaki Ninja 400
      • 49899087_301487663905591_4918556926305894400_n Remove the front and rear fenders – How to remove the front and rear fender of the Kawasaki Ninja 400
      • Close
    • Yamaha R3
      • img_6102 Install a Yoyodyne Slipper Clutch – How to Install a Yoyodyne Slipper Clutch in the 2015 Yamaha R3
      • IMG_4189 Install Race Bodywork – How to Install Hotbodies Race Bodywork on the 2015 Yamaha R3
      • IMG_3927 Remove the kickstand and bypass the switch – How to remove the kickstand and bypass the kickstand switch on the 2015 Yamaha R3
      • topdown vortex clipons Install aftermarket clipons – How to install aftermarket clipons on the the 2015 Yamaha R3
      • IMG_3985 Replace the fork seals and oil – How to replace the fork seals and fork oil in the 2015 Yamaha R3
      • IMG_3965 Install Cartridge Emulators – How to install the Traxxion Dynamics Damper Rod Kit w/ Cartridge Emulators in the 2015 Yamaha R3
      • IMG_3630 Install a BMC Race Air Filter – How to install a BMC or other high flow air filter in the 2015 Yamaha R3
      • IMG_3896 Change the Front Brake Pads – How to remove and replace the front brake pads on the Yamaha R3 2015
      • IMG_3869 Bleed the Brakes or Flush the Brake Fluid – How to bleed the brakes or flush the brake fluid on the Yamaha R3 2015
      • IMG_3846 Install a SS Superbike Front Brake Line – How to replace the front brake line with a stainless steel superbike brake line on the Yamaha R3 2015
      • R3GPShift Change to GP Shift Without Rearsets or Risers – Here’s a quick and dirty way to switch to GP Shift without changing the rearsets or using a riser plate on the Yamaha R3 2015
      • IMG_3857 Get More Clearance to Install Lower Clipons – How to get more clearance between the dash and your banjo bolt with aftermarket clipons on the Yamaha R3 2015
      • DSCN2608_zpsqza81eb3 Change the Motor Oil and Filter – How to do change the motor oil and oil filter on the Yamaha R3 2015
      • IMG_4511 featured Remove the Emissions System and Install a Block Off Plate – How to remove the emissions system and install a smog block off plate on the Yamaha R3 2015
      • DSCN2484_zpsuqljyccu Remove the Front Wheel – How to remove the front wheel from the Yamaha R3 2015
      • DSCN2189_zpsg2hs8ooe Remove the Rear Wheel – How to remove the rear wheel from the Yamaha R3 2015
      • how to remove the windscreen yamaha r3 Remove the Windscreen and Upper Fairing – How to remove the windscreen and upper fairing from the Yamaha R3 2015
      • How to remove the fuel tank from the yamaha R3 Remove the Gas Tank – How to remove the gas tank from the Yamaha R3 2015
      • Remove Side Fairings Yamaha R3 Remove the Side Fairings – How to remove the side fairings from the Yamaha R3 2015
      • IMG_0167 Remove the Tail Section and Tail Light – How to take apart the tail section and how to remove the taillight of the Yamaha R3 2015
      • Close
    • Close
  • All Blog Posts
  • MY CART
    No products in cart.
  • Kawasaki Ninja 400 2018-
    • *Disassembly Instructions*
    • Bodywork, Lights, & Aesthetics
    • Brakes
    • Chain and Sprockets
    • Clip-ons, Rearsets, Levers, and Throttle
    • Crash, Bike, and Rider Protection
    • Dyno Testing and Tuning
    • Electronics
    • Engine and Transmission
    • How To
    • Intake and Exhaust
    • Race Bike Designs
    • Race/Ride Reports
    • Suspension
    • Stands
    • Tire Warmers
    • Wheels and Tires
  • Yamaha R3 2015-2018
    • *Disassembly Instructions*
    • Bodywork, Lights, & Aesthetics
    • Brakes
    • Chain and Sprockets
    • Clip-ons, Rearsets, Levers, and Throttle
    • Crash, Bike, and Rider Protection
    • Dyno Testing and Tuning
    • Electronics
    • Engine and Transmission
    • How To
    • Intake and Exhaust
    • Race Bike Designs
    • Race/Ride Reports
    • Suspension
    • Wheels and Tires
  • Miscellaneous
  • Updates and Events
  • All Blog Posts

How to get more dash clearance for your clipons and brake line

by Norton Racing / 2015, August 28 / Published in Clip-ons, Rearsets, Levers, and Throttle, How To

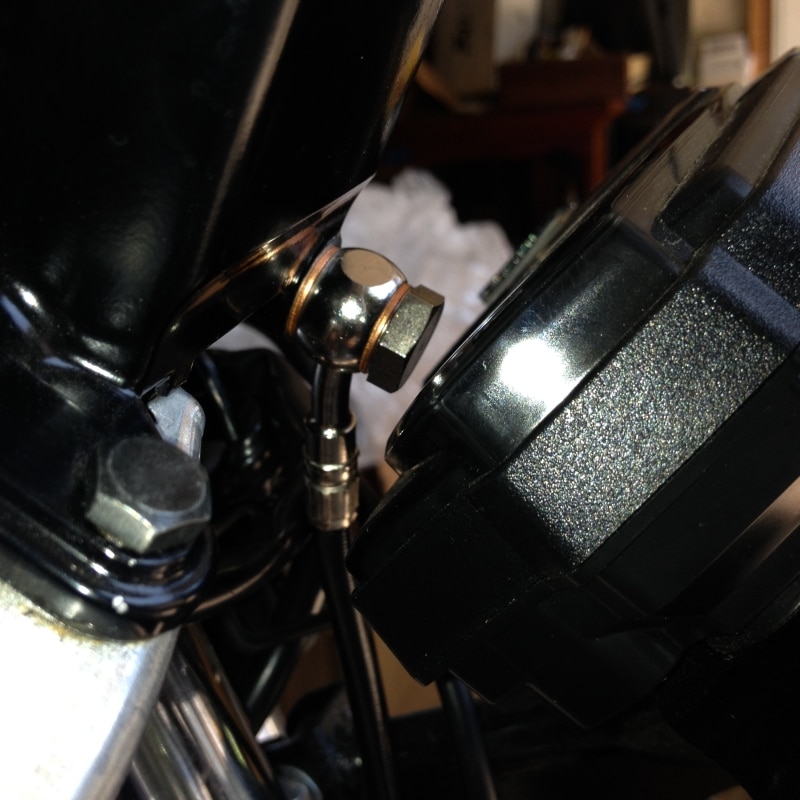
One of the main issues so far with adding aftermarket clipons and lowering the bars on the R3 is that it creates interference between the banjo bolt on the front brake master cylinder and the dash display when turning the bars all the way to the left.  You have to either deal with the interference, modify the stops to limit the steering range, or rotate the bars back toward the tank a little more than desirable.  Here’s a simple and easy solution for this.


Tools Needed

8mm Socket

A pair of Pliers


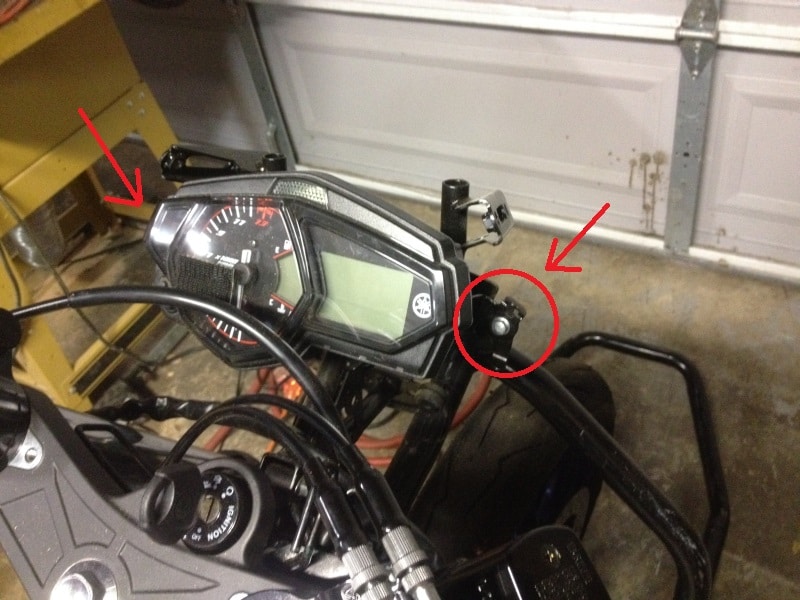
I’m not 100% sure how much of the OEM fairings need to be removed to do this, since mine now has race bodywork on it.  But you just need to expose these two 8mm bolts that hold on the dash display:

IMG_3819

Maybe you can do this without removing anything.  Here’s instructions for removing the side fairings and upper fairing in case you need to:

How to Remove the Side Fairings from the Yamaha R3

How to Remove the Windscreen and Upper Fairing from the Yamaha R3


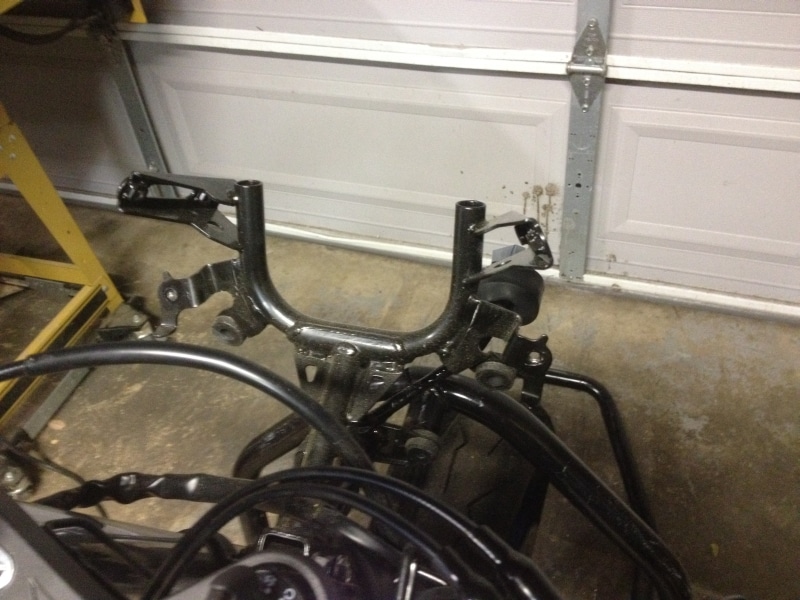
Step 1:  Remove the dash display and unhook the cable from the back.

IMG_3820


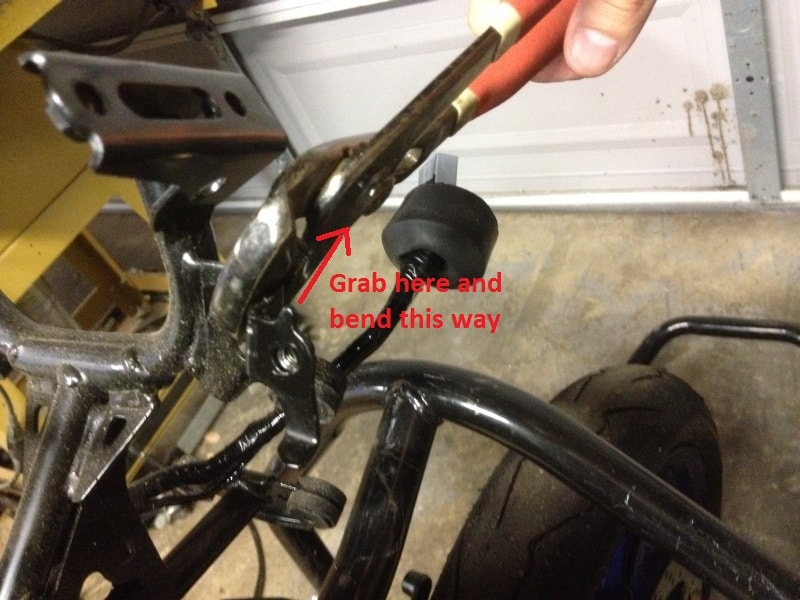
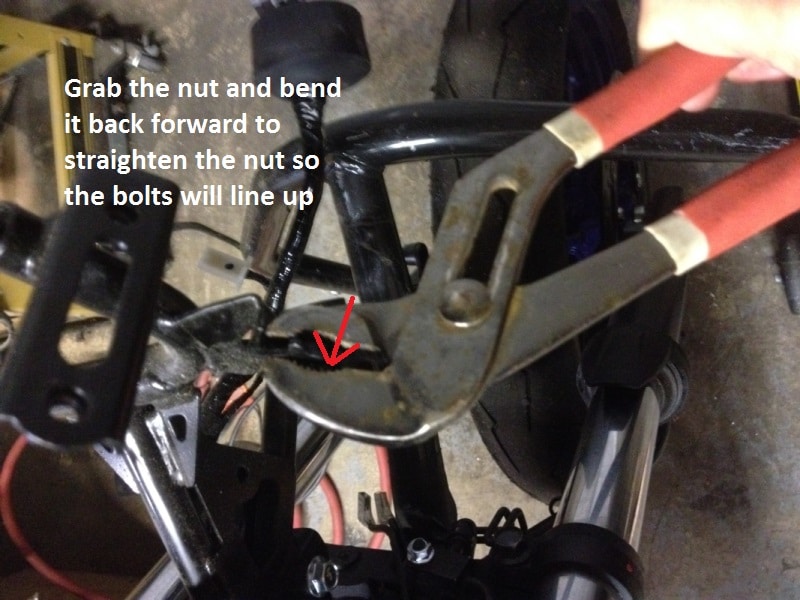
Step 2:  Locate the two tabs sticking out that the dash was bolted to.  Get a pair of pliers and carefully bend the part of the tab closest to the fairing stay toward the front of the bike.  Then bend the part of the tab with the welded nut back straight so the bolt holes will still line up.  Do this to the bracket on the right side and left side of the dash.

IMG_3822 IMG_3824


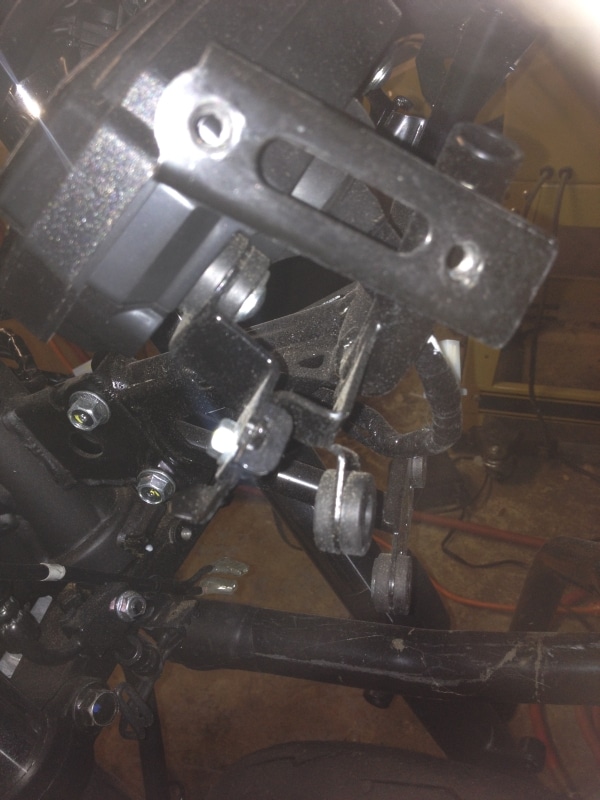
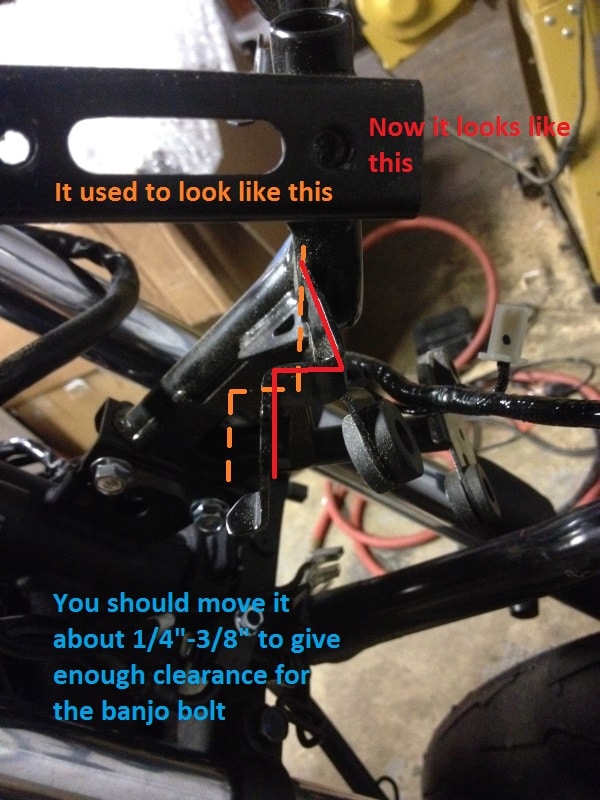
Here’s what the bracket used to look like stock:

IMG_3792


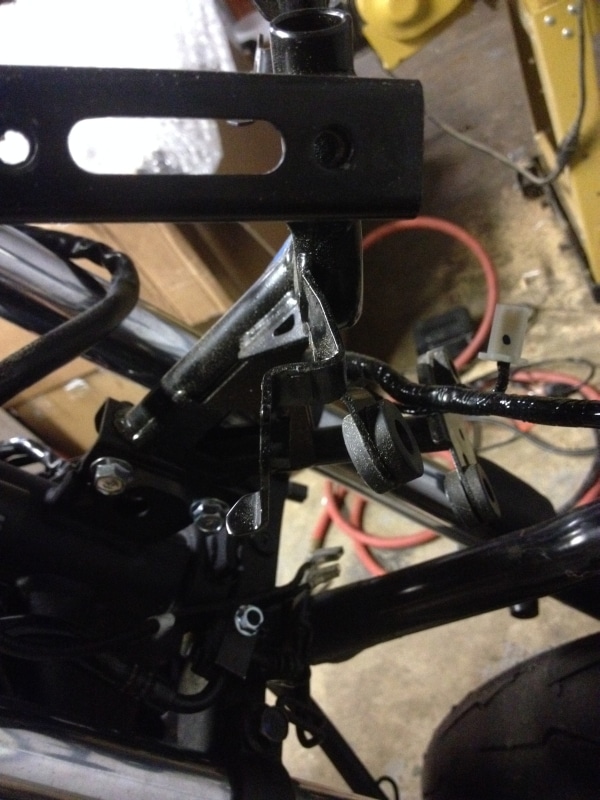
It should now look like this from the side:

IMG_3826

IMG_3826 text


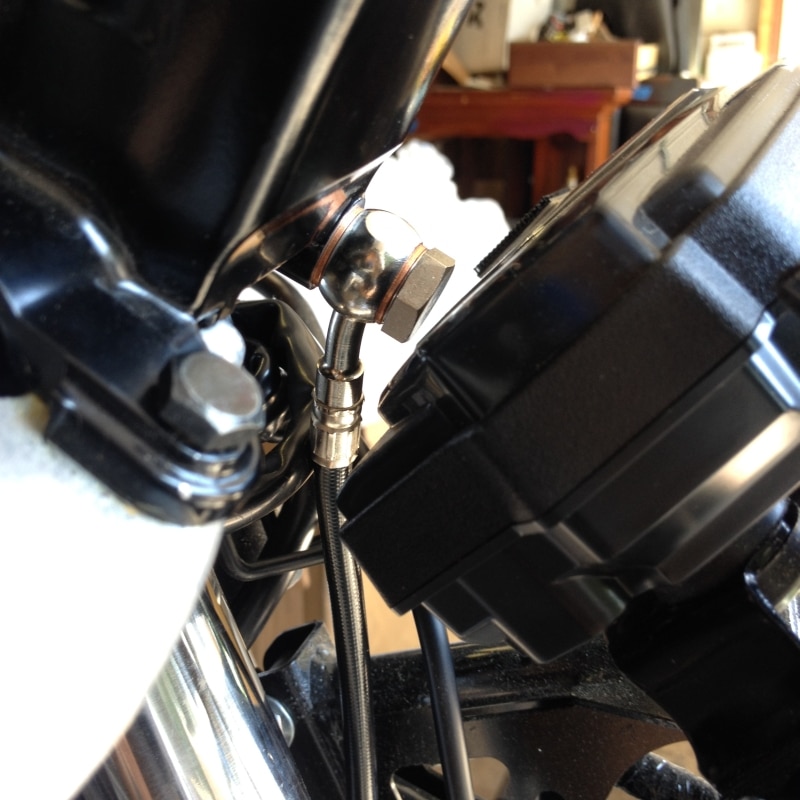
Now mount the dash back in and put it all back together.  This will provide adequate clearance between your banjo bolt and the dash and full lock to the left:

IMG_3857 IMG_3858

  • Tweet

About Norton Racing

What you can read next

How to take apart the tail section and how to remove the taillight of the Yamaha R3
How to remove the fuel tank from the yamaha R3
How to remove the gas tank from the Yamaha R3
how to remove the windscreen yamaha r3
How to remove the windscreen and upper fairing from the Yamaha R3

2 Comments to “ How to get more dash clearance for your clipons and brake line”

  1. Jonathon Kovatch says :Reply
    August 21, 2017 at 12:05 PM

    Do you only recommend this modification if you’re running the clip-on’s VERY low, or do you recommend it with the Woodcraft Universals regardless of low or high?

    1. jbluetooth@gmail.com says :Reply
      August 21, 2017 at 3:18 PM

      Only if you are having an issue with the front brake master cylinder banjo bolt or clutch cable adjuster contacting the dash and you want to have more clearance.

Leave a Reply Cancel reply

Your email address will not be published. Required fields are marked *

Search All Posts

Post Categories

  • Kawasaki
    • Kawasaki Ninja 400 2018-
      • *Disassembly Instructions*
      • Bodywork, Lights, & Aesthetics
      • Clip-ons, Rearsets, Levers, and Throttle
      • Dyno Testing and Tuning
      • Electronics
      • Engine and Transmission
      • How To
      • Intake and Exhaust
      • Race/Ride Reports
  • Miscellaneous
  • Updates and Events
  • Yamaha R3 2015-2018
    • *Disassembly Instructions*
    • Bodywork, Lights, & Aesthetics
    • Brakes
    • Chain and Sprockets
    • Clip-ons, Rearsets, Levers, and Throttle
    • Dyno Testing and Tuning
    • Electronics
    • Engine and Transmission
    • How To
    • Intake and Exhaust
    • Race Bike Designs
    • Race/Ride Reports
    • Suspension
    • Wheels and Tires

Contact Information

Email: sales@norton-motorsports.com
Telephone: (858) 842-4595

Address

Norton Motorsports
12925 Brookprinter Place, Suite 200
Poway, CA 92064

© Copyright Norton Motorsports. All rights reserved.

TOP