SIGN IN YOUR ACCOUNT TO HAVE ACCESS TO DIFFERENT FEATURES

FORGOT YOUR PASSWORD?

FORGOT YOUR DETAILS?

AAH, WAIT, I REMEMBER NOW!
(858) 842-4595
  • Policies
  • My Account
  • LOGIN

Norton Motorsports

Menu
  • Shop by Bike
    • Aprilia
      • RS 660 2021-
      • Close
    • KTM
      • RC390 / Duke 390
      • Close
    • Kawasaki
      • Ninja 250 / 300
      • Ninja 400 2018-
      • Z400 2019-
      • Close
    • Ohvale
      • GP-0
      • Close
    • Yamaha
      • FZ-07 / MT-07 2015-2017
      • MT-03 2020-
      • R3 2015-2018
      • R3 2019-
      • Close

    • View All
    • Close
  • Norton Built Motorcycles
    • Norton Racing Hotbodies GP Spec Race Bodywork Kit - Kawasaki Ninja 400 Z400 Ninja400R main Norton Motorsports GP Spec Kawasaki Ninja400R
    • 2019-04-28 18_00_05-2018 Ninja 400 Race Motorcycle from Ninja400R.com Norton Motorsports Kawasaki Ninja400R
    • 2019 yamaha yzf-r3 race bodywork Hotbodies Racing Norton Motorsports Norton Motorsports Race Spec Yamaha R3
    • Close
  • Apparel, Gear, & Tools
    • Apparel
    • Riding Gear
    • Tools
    • Close
  • How To
    • Kawasaki Ninja 400 2018-
      • featured image Install an R6 Throttle Tube – How to install an R6 throttle tube to shorten the throttle throw on your Ninja 400.
      • open clutch Install race spec clutch upgrade kit – Clutch slipping, poor shifting, false neutrals, and dropping gears fixed and explained!
      • IMG_4330_2 Remove OEM Bodywork – How to remove the OEM bodywork of the Kawasaki Ninja 400
      • 2019-02-07 10_57_46-Clipboard Remove the Gas Tank – How to remove the gas tank on the Kawasaki Ninja 400
      • 49899087_301487663905591_4918556926305894400_n Remove the front and rear fenders – How to remove the front and rear fender of the Kawasaki Ninja 400
      • Close
    • Yamaha R3
      • img_6102 Install a Yoyodyne Slipper Clutch – How to Install a Yoyodyne Slipper Clutch in the 2015 Yamaha R3
      • IMG_4189 Install Race Bodywork – How to Install Hotbodies Race Bodywork on the 2015 Yamaha R3
      • IMG_3927 Remove the kickstand and bypass the switch – How to remove the kickstand and bypass the kickstand switch on the 2015 Yamaha R3
      • topdown vortex clipons Install aftermarket clipons – How to install aftermarket clipons on the the 2015 Yamaha R3
      • IMG_3985 Replace the fork seals and oil – How to replace the fork seals and fork oil in the 2015 Yamaha R3
      • IMG_3965 Install Cartridge Emulators – How to install the Traxxion Dynamics Damper Rod Kit w/ Cartridge Emulators in the 2015 Yamaha R3
      • IMG_3630 Install a BMC Race Air Filter – How to install a BMC or other high flow air filter in the 2015 Yamaha R3
      • IMG_3896 Change the Front Brake Pads – How to remove and replace the front brake pads on the Yamaha R3 2015
      • IMG_3869 Bleed the Brakes or Flush the Brake Fluid – How to bleed the brakes or flush the brake fluid on the Yamaha R3 2015
      • IMG_3846 Install a SS Superbike Front Brake Line – How to replace the front brake line with a stainless steel superbike brake line on the Yamaha R3 2015
      • R3GPShift Change to GP Shift Without Rearsets or Risers – Here’s a quick and dirty way to switch to GP Shift without changing the rearsets or using a riser plate on the Yamaha R3 2015
      • IMG_3857 Get More Clearance to Install Lower Clipons – How to get more clearance between the dash and your banjo bolt with aftermarket clipons on the Yamaha R3 2015
      • DSCN2608_zpsqza81eb3 Change the Motor Oil and Filter – How to do change the motor oil and oil filter on the Yamaha R3 2015
      • IMG_4511 featured Remove the Emissions System and Install a Block Off Plate – How to remove the emissions system and install a smog block off plate on the Yamaha R3 2015
      • DSCN2484_zpsuqljyccu Remove the Front Wheel – How to remove the front wheel from the Yamaha R3 2015
      • DSCN2189_zpsg2hs8ooe Remove the Rear Wheel – How to remove the rear wheel from the Yamaha R3 2015
      • how to remove the windscreen yamaha r3 Remove the Windscreen and Upper Fairing – How to remove the windscreen and upper fairing from the Yamaha R3 2015
      • How to remove the fuel tank from the yamaha R3 Remove the Gas Tank – How to remove the gas tank from the Yamaha R3 2015
      • Remove Side Fairings Yamaha R3 Remove the Side Fairings – How to remove the side fairings from the Yamaha R3 2015
      • IMG_0167 Remove the Tail Section and Tail Light – How to take apart the tail section and how to remove the taillight of the Yamaha R3 2015
      • Close
    • Close
  • All Blog Posts
  • MY CART
    No products in cart.
  • Kawasaki Ninja 400 2018-
    • *Disassembly Instructions*
    • Bodywork, Lights, & Aesthetics
    • Brakes
    • Chain and Sprockets
    • Clip-ons, Rearsets, Levers, and Throttle
    • Crash, Bike, and Rider Protection
    • Dyno Testing and Tuning
    • Electronics
    • Engine and Transmission
    • How To
    • Intake and Exhaust
    • Race Bike Designs
    • Race/Ride Reports
    • Suspension
    • Stands
    • Tire Warmers
    • Wheels and Tires
  • Yamaha R3 2015-2018
    • *Disassembly Instructions*
    • Bodywork, Lights, & Aesthetics
    • Brakes
    • Chain and Sprockets
    • Clip-ons, Rearsets, Levers, and Throttle
    • Crash, Bike, and Rider Protection
    • Dyno Testing and Tuning
    • Electronics
    • Engine and Transmission
    • How To
    • Intake and Exhaust
    • Race Bike Designs
    • Race/Ride Reports
    • Suspension
    • Wheels and Tires
  • Miscellaneous
  • Updates and Events
  • All Blog Posts

How to change the front brake pads on the Yamaha R3

by Norton Racing / 2015, September 11 / Published in Brakes, How To

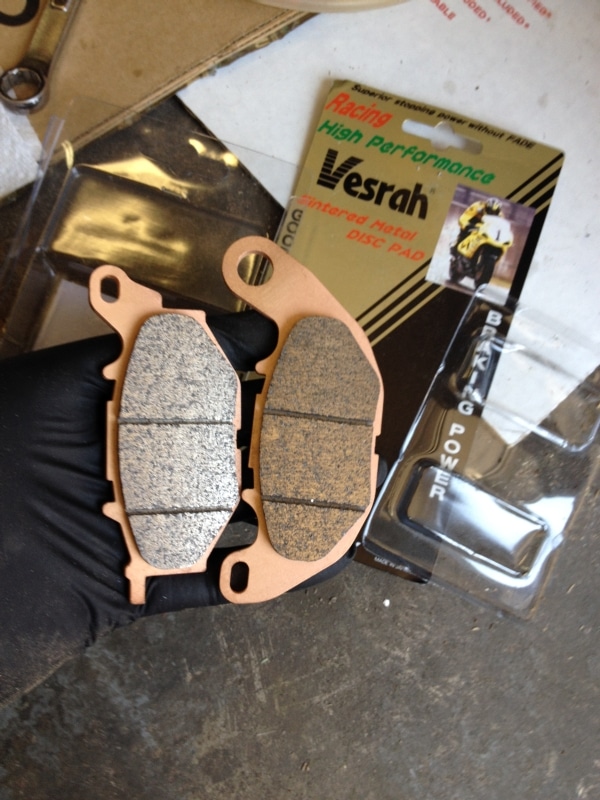
This post will show you how to remove and change the front brake pads on the Yamaha R3 2015.  Changing the brake pads is pretty simple, there are just a couple small details you don’t want to miss.


Tools Needed:

T50 Torx driver

torque wrench

Small pick or flat blade screwdriver

Cleaner for the caliper pistons, I use acetone, but other cleaners such as brake cleaner or denatured alcohol should work fine

a few Q-tips or other cotton swabs

Small pliers to insert the small retaining clips, needle nose or smaller regular pliers should work ok


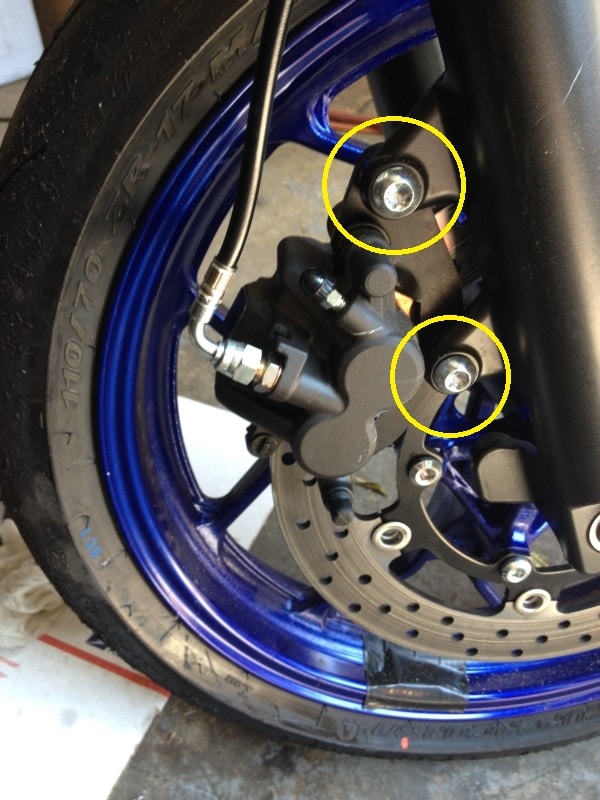
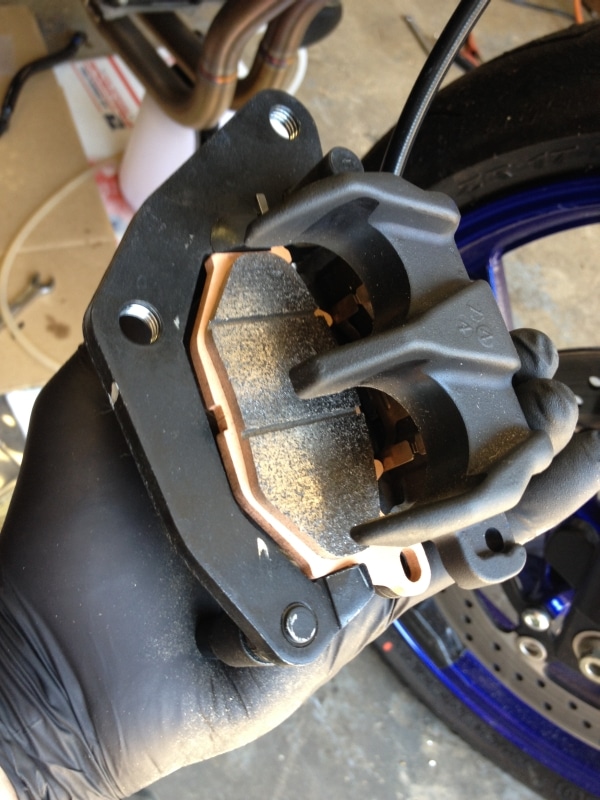
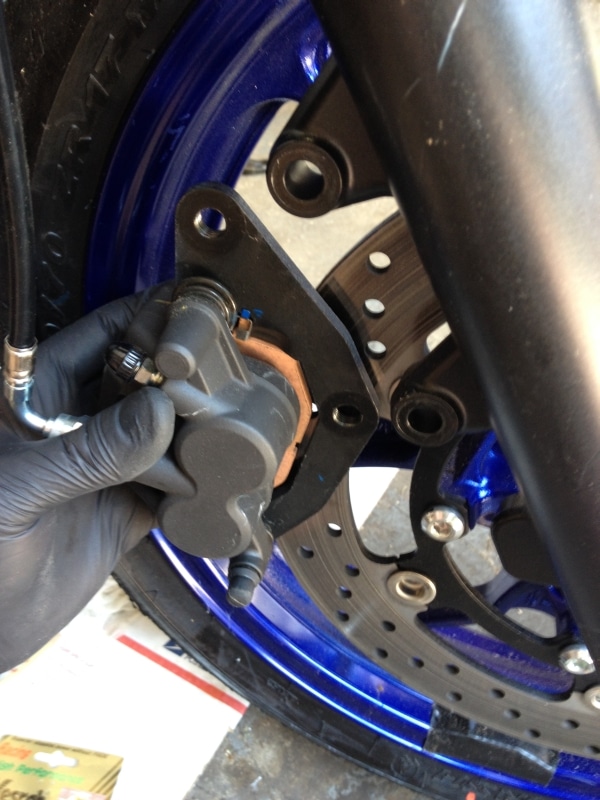
Step 1:  Use a T50 Torx to remove the two front brake caliper bolts.  Then CAREFULLY slide the caliper off the rotor so you don’t bang it against the rim and scratch your pretty rims.

IMG_3882


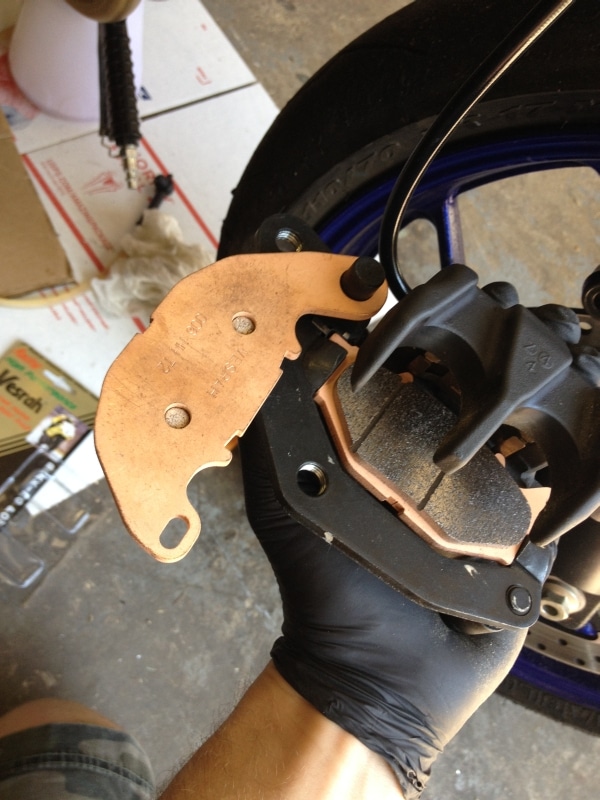
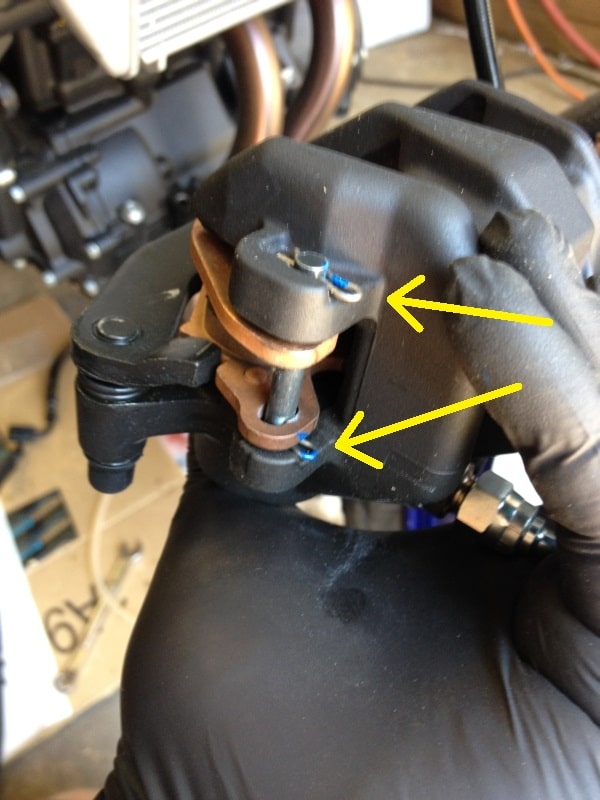
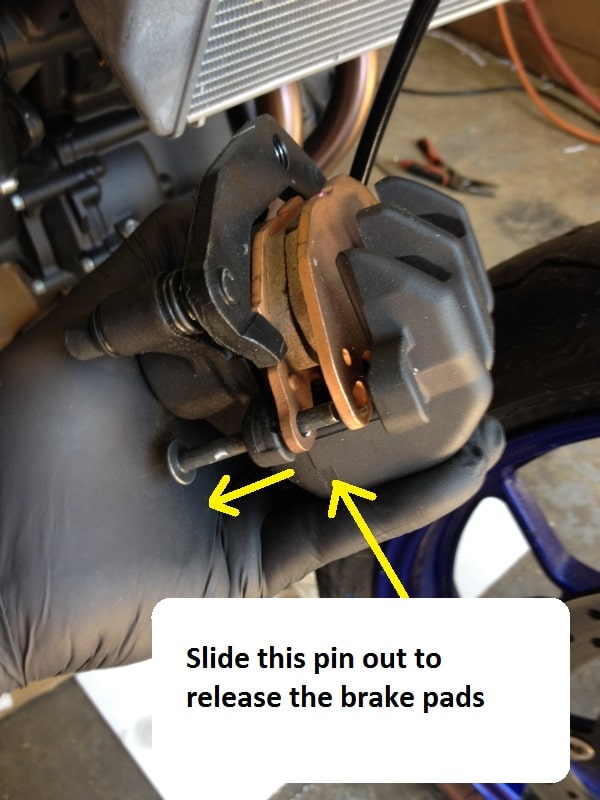
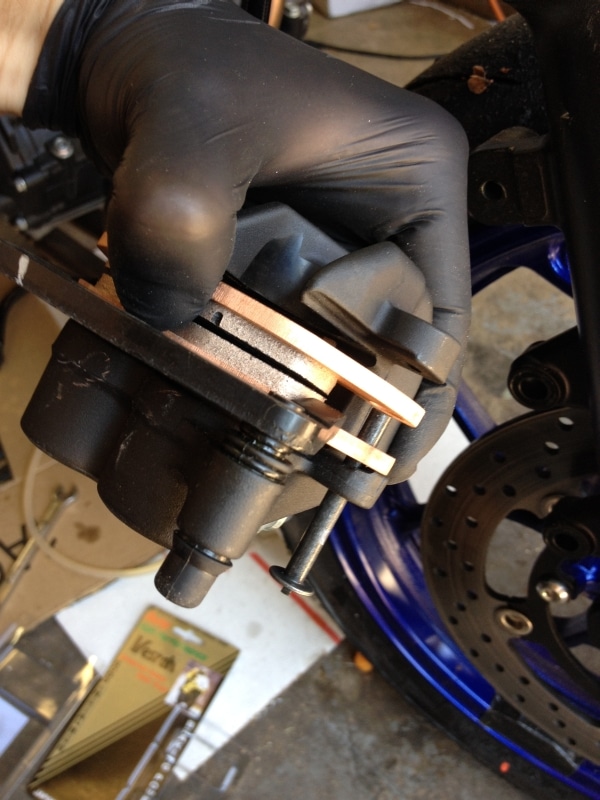
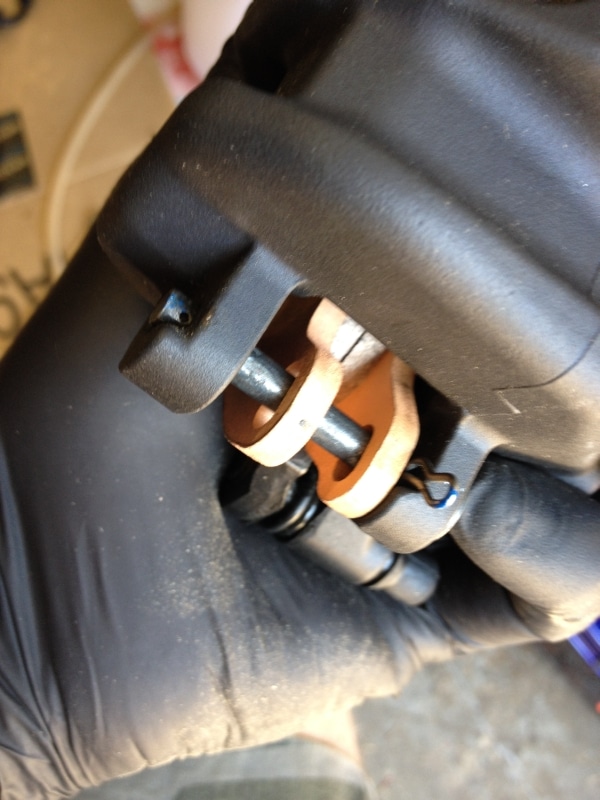
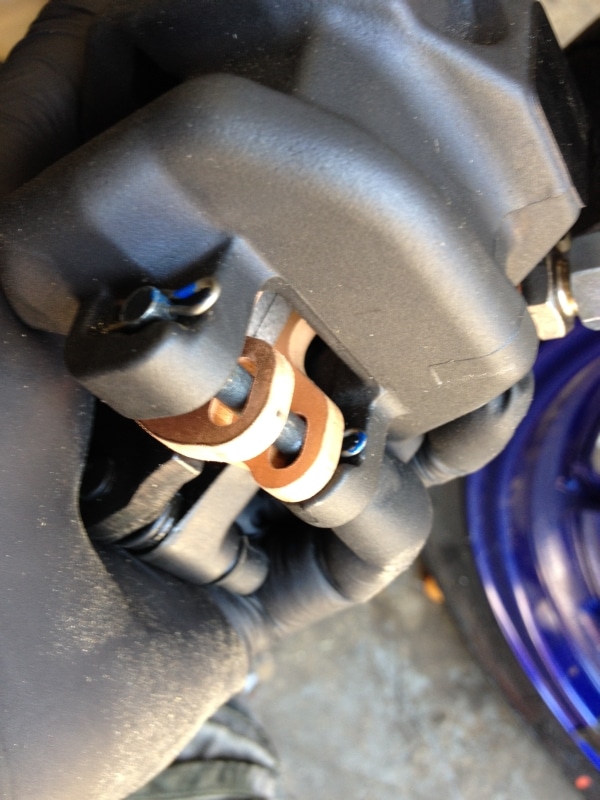
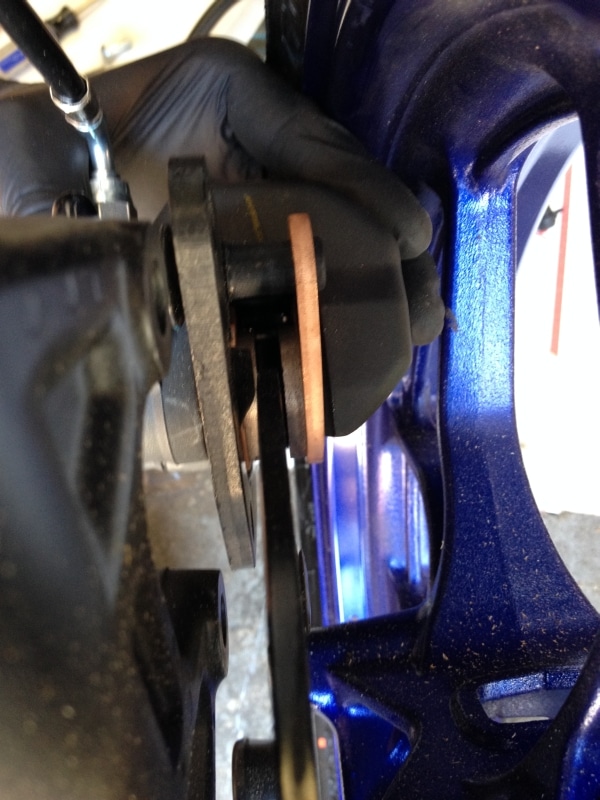
Step 2:  While holding the caliper in your hand, rotate it so you can see the two retainer clips in the bottom pin that holds the brake pads in place.  Gently pry these pins out in a slow controlled motion with a pick or small flat blade screwdriver.  Be careful not to send them flying.  Then slide the pin out and remove the old pads.

IMG_3888 IMG_3889 IMG_3890


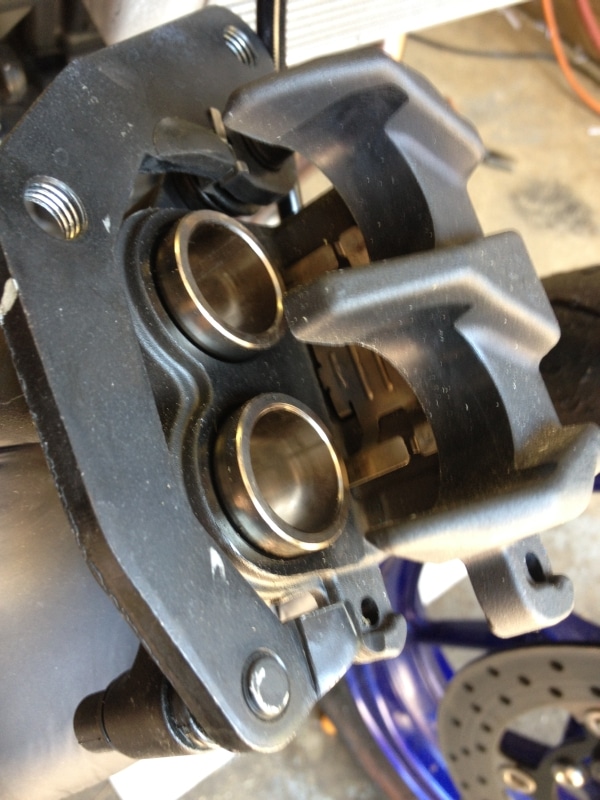
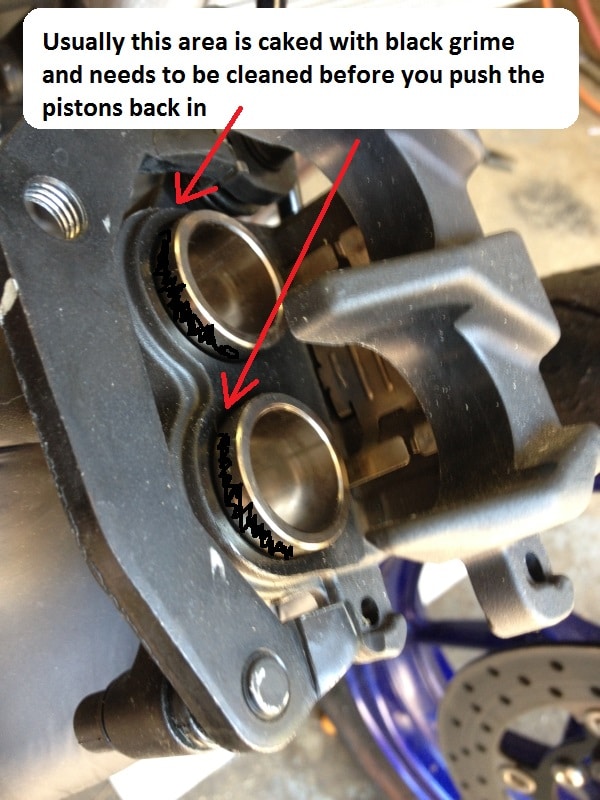
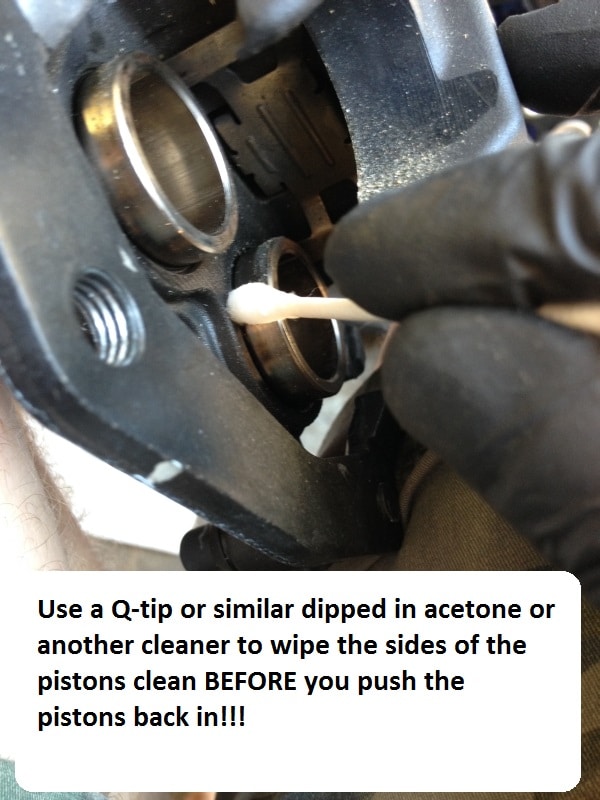
Step 3:  ***IMPORTANT***  This step often gets skipped but in my opinion, it’s the most important step.  DO NOT push the pistons back into the caliper without cleaning them!!!  My bike is almost new, so the brake calipers and caliper pistons are very clean.  Usually when you change the pads, it’s because the old ones have been in the bike for awhile and are worn down and the pistons are extended most of the way out and caked with black grime.  Use a Q-tip, cotton swab, or similar dipped in acetone or another cleaner to wipe ALL of the black grime off the sides of the pistons all the way around each piston BEFORE you push the pistons back in.

If you skip this step, when you push the pistons back in to make room for the new pads, you force all of that grime across the seals and back into the brake fluid cavity.  Not only will this prematurely wear out the seals or cause them to leak because there won’t be a smooth surface for them to seal against, but it will also contaminate your brake fluid.  Also, remember when you push the pistons back in, a lot of brake fluid will be forced back into the reservoir, so make sure there is room for it.

If you get one piston clean but are having trouble with the other one, you can gently press the clean one in with your fingers and the other one will be forced out farther, making it easier to clean.  BE CAREFUL not to press the piston out all the way or you will have a brake fluid mess and need to refill and re-bleed the brakes.  Both pistons are easy to access all the way around on the R3 so you shouldn’t have any trouble cleaning them.

IMG_3890 grime IMG_3892


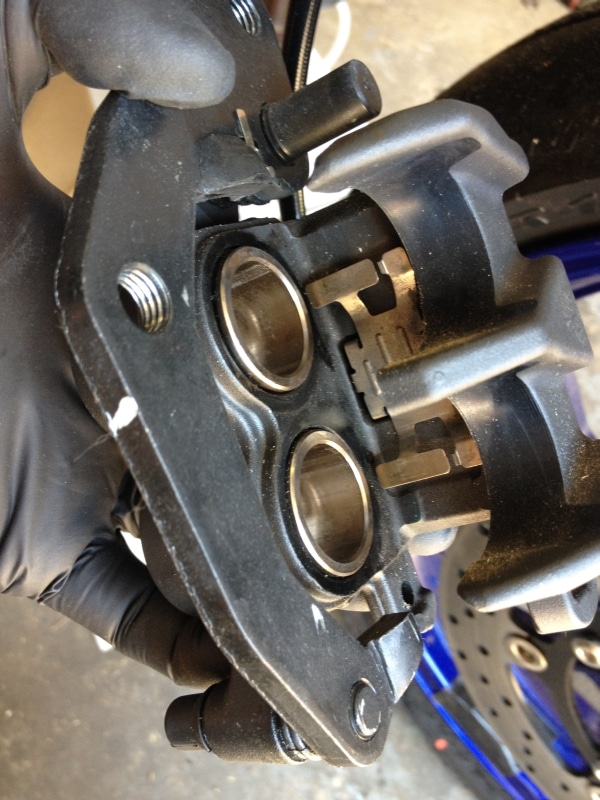
Step 4:  Make sure there is room in the fluid reservoir for the displaced fluid, and gently force the 2 pistons back into the caliper until they are flush.  Only use your hand or something plastic so you don’t scratch the pistons and try to press them evenly so they move in together.

IMG_3893


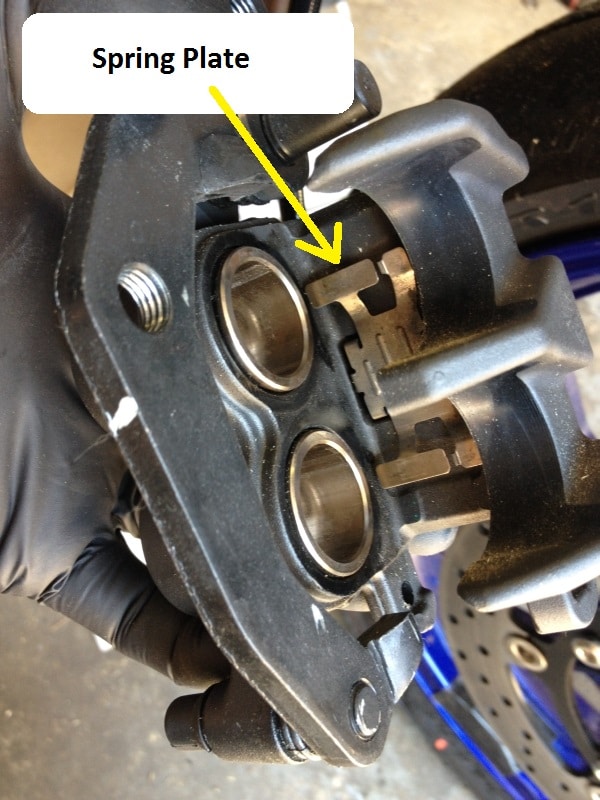
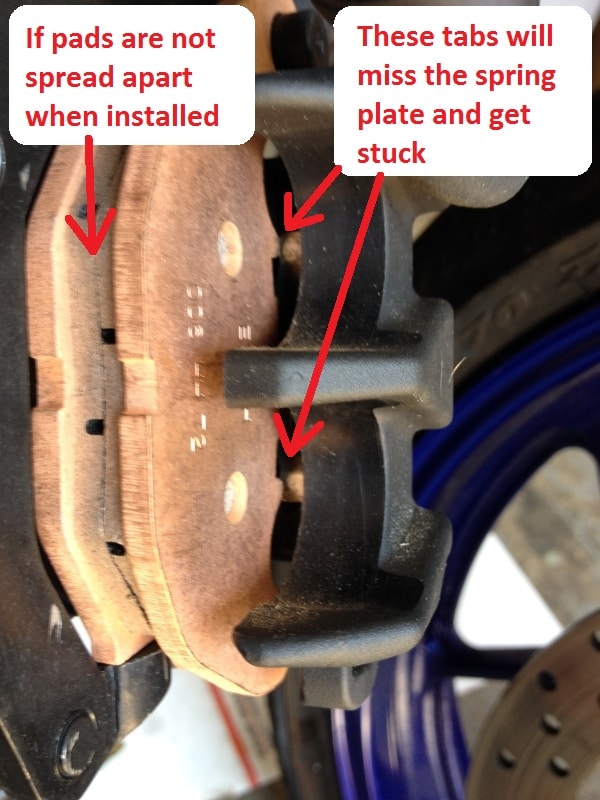
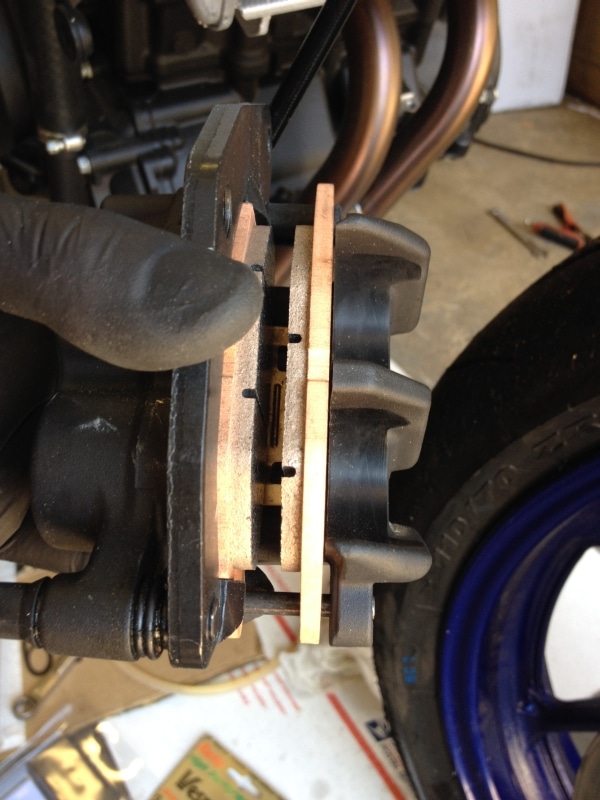
Step 5:  Insert the new pads into the caliper, insert the pad against the pistons first, hooking the end under the tab, then setting it in place.  Next, insert the second pad by looping it over the pin and setting it in place.  Try to hold the pads spread apart as you insert the second pad so it seats properly against the spring plate.  If the pads are not spread wide when you insert them, the pad on the fixed side can miss the spring plate and get stuck.

IMG_3894 IMG_3895 IMG_3896   IMG_3893 spring IMG_3901


Step 6:  Press both pads against the spring plate and slide the pin through the hole in the caliper and the slot in both pads.  Then use some small pliers to carefully slide both retaining clips back into place.

IMG_3897   IMG_3899 IMG_3900 IMG_3903


Step 7:  Carefully slide the caliper back over the rotor paying extra attention not to scratch the rim.  Then insert the T50 torx bolts and tighten to 25 ft lbs (35 Nm).  Remember to pump your brake lever a few times to be sure the pads are seated against the rotor before you ride the bike.

IMG_3904 IMG_3905 IMG_3882 final

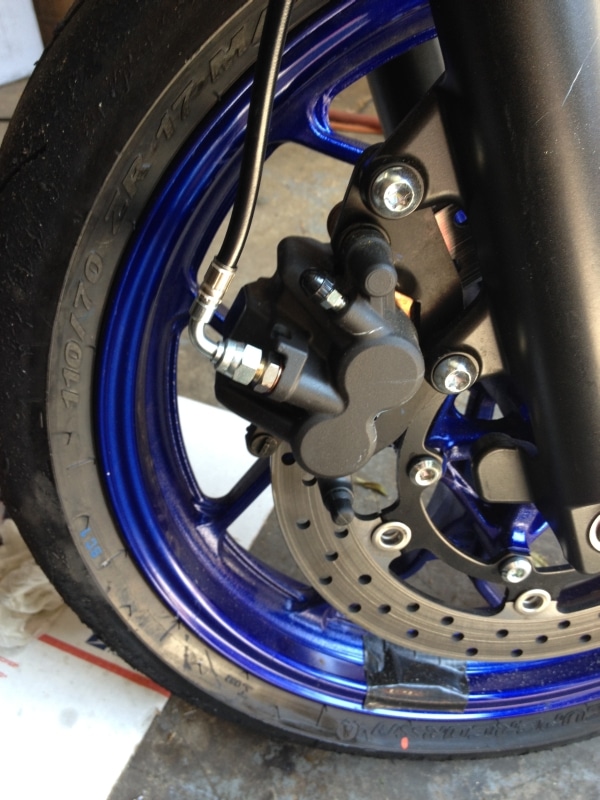
That’s it, you’re all done!


  • Tweet

About Norton Racing

What you can read next

Kawasaki Ninja 300r vs. KTM RC390 – Video Review
How to take apart the tail section and how to remove the taillight of the Yamaha R3
How to remove the fuel tank from the yamaha R3
How to remove the gas tank from the Yamaha R3

8 Comments to “ How to change the front brake pads on the Yamaha R3”

  1. steve says :Reply
    October 9, 2015 at 7:53 PM

    Thanks bro that was very helpful…

  2. Steven says :Reply
    April 8, 2017 at 1:21 AM

    And this is on stock brake calipers ?

    1. jbluetooth@gmail.com says :Reply
      April 11, 2017 at 9:17 PM

      yes, stock calipers

  3. Neil says :Reply
    March 12, 2018 at 2:46 AM

    Thanks for the write up. I just used it to replace my pads. Super easy to do, and a well written guide. Thanks.

  4. John says :Reply
    June 23, 2018 at 5:04 PM

    Pls do rear brake too.

    1. Jesse Norton says :Reply
      July 18, 2018 at 2:46 PM

      it’s the same basic procedure, just pumping the foot brake instead of lever.

  5. Philip Lee says :Reply
    January 22, 2020 at 11:28 AM

    Any need to use silicone grease (like Permatex Extreme Silicone Brake Parts Lubricant) on the pins, back of the brake pads, etc?

    1. Jesse Norton says :Reply
      January 22, 2020 at 12:03 PM

      It’s a good idea to lubricate the pins.

Leave a Reply Cancel reply

Your email address will not be published. Required fields are marked *

Search All Posts

Post Categories

  • Kawasaki
    • Kawasaki Ninja 400 2018-
      • *Disassembly Instructions*
      • Bodywork, Lights, & Aesthetics
      • Clip-ons, Rearsets, Levers, and Throttle
      • Dyno Testing and Tuning
      • Electronics
      • Engine and Transmission
      • How To
      • Intake and Exhaust
      • Race/Ride Reports
  • Miscellaneous
  • Updates and Events
  • Yamaha R3 2015-2018
    • *Disassembly Instructions*
    • Bodywork, Lights, & Aesthetics
    • Brakes
    • Chain and Sprockets
    • Clip-ons, Rearsets, Levers, and Throttle
    • Dyno Testing and Tuning
    • Electronics
    • Engine and Transmission
    • How To
    • Intake and Exhaust
    • Race Bike Designs
    • Race/Ride Reports
    • Suspension
    • Wheels and Tires

Contact Information

Email: sales@norton-motorsports.com
Telephone: (858) 842-4595

Address

Norton Motorsports
12925 Brookprinter Place, Suite 200
Poway, CA 92064

© Copyright Norton Motorsports. All rights reserved.

TOP