SIGN IN YOUR ACCOUNT TO HAVE ACCESS TO DIFFERENT FEATURES

FORGOT YOUR PASSWORD?

FORGOT YOUR DETAILS?

AAH, WAIT, I REMEMBER NOW!
(858) 842-4595
  • Policies
  • My Account
  • LOGIN

Norton Motorsports

  • Shop by Bike
    • Aprilia
      • Tuono 660 2021+
      • RS 660 2021+
      • Close
    • KTM
      • RC390 / Duke 390
      • Close
    • Kawasaki
      • Ninja 500 2024+
      • Ninja 250 / 300
      • Ninja 400 2018+
      • Ninja ZX-4RR 2023+
      • Z400 2019+
      • Close
    • Ohvale
      • GP-0
      • GP-2
      • Close
    • Yamaha
      • MT-03 2020+
      • MT-07 / FZ-07 2015-2017
      • MT-07 2018-2020
      • MT-07 2021+
      • R3 2015-2018
      • R3 2019+
      • R7 2021+
      • Close
    • Suzuki
      • Suzuki GSX-8R
      • Close

    • View All
    • Close
  • Norton Built Motorcycles
    • Norton Racing Hotbodies GP Spec Race Bodywork Kit - Kawasaki Ninja 400 Z400 Ninja400R main Norton Motorsports GP Spec Kawasaki Ninja400R
    • 2019-04-28 18_00_05-2018 Ninja 400 Race Motorcycle from Ninja400R.com Norton Motorsports Kawasaki Ninja400R
    • 2019 yamaha yzf-r3 race bodywork Hotbodies Racing Norton Motorsports Norton Motorsports Race Spec Yamaha R3
    • IMG 2548 Edit Norton Motorsports Kawasaki Ninja ZX4RR Race Motorcycle
    • Close
  • Apparel, Gear, & Tools
    • Apparel
    • Riding Gear
    • Tools
    • Close
  • MY CART
    No products in cart.
  • Bike Build Write-ups
    • Aprilia RS 660 2021-
    • Kawasaki Ninja 400 2018- / Z400 2019-
      • Important ** Kawasaki Ninja 400 / Z400 Critical Issues
      • Top5 *** Top 5 Kawasaki Ninja 400 / Z400 Mods and Upgrades
      • Do you need a fuel controller with full exhaust ninja 400 Do you need a Power Commander for full exhaust on the Kawasaki Ninja 400?
      • featured image How to install an R6 throttle tube in the Kawasaki Ninja 400 / Z400
      • 49899087_301487663905591_4918556926305894400_n How to remove the front fender and rear fender of the Kawasaki Ninja 400
      • 2019-02-07 10_57_46-Clipboard How to remove the gas tank on the Kawasaki Ninja 400
      • IMG_4330_2 How to remove the OEM bodywork of the Kawasaki Ninja 400
      • open clutch Kawasaki Ninja 400 / Z400 (Ninja 500 / Z500) Clutch Slipping, Poor Shifting, False Neutrals, and Dropping Gears – Explained and Fixed!
      • Kawasaki Ninja 400 dyno horsepower Kawasaki Ninja 400 Exhaust Dyno Shootout!
      • CVR_3132_Sep1519_CaliPhoto Ninja 400 Electronics and GP Bodywork Test
      • Traxxion Dynamics Omni Fork Spring Kit Yamaha R3 2015-2018 Suspension Spring Rate Chart for Kawasaki Ninja 400 / Z400
      • Braketech Vs Galfer Rotor Brake Test Rocco Landers What’s up with the Kawasaki Ninja 400 / Z400 brakes?
      • Close
    • Ohvale GP-0 / GP-2
      • Important ** Ohvale GP-0 / GP-2 Critical Issues
      • OV001 Ohvale 190 5 Speed Shift Star Cap Ohvale 190 False Neutral and Miss Shift Problems – FIXED!
      • Close
    • Yamaha R3 2015-2018
      • Important ** Yamaha R3 / MT-03 Critical IssuesJanuary 24, 2021
      • Top5 *** Top 5 Yamaha R3 / MT-03 Mods and UpgradesJanuary 24, 2021
      • Yamaha R3 Annitori Quickshifter QS Pro Annitori Quickshifter QS Pro installed and beta tested on Yamaha R3June 24, 2015
      • Yamaha R3 415 chain kit horsepower Dyno tested: 520 vs. 415 chain and sprockets – Yamaha R3February 14, 2016
      • IMG_3869 How to bleed the brakes or flush the brake fluid on the Yamaha R3 / MT-03September 7, 2015
      • IMG_3896 How to change the front brake pads on the Yamaha R3 / MT-03September 11, 2015
      • R3GPShift How to change the Yamaha R3 / MT-03 to GP ShiftSeptember 7, 2015
      • DSCN2608_zpsqza81eb3 How to do an oil and filter change on the Yamaha R3 / MT-03August 16, 2015
      • IMG_3857 How to get more dash clearance for your clipons and brake line – Yamaha R3August 28, 2015
      • IMG_3630 How to install a BMC Race Air Filter in the Yamaha R3 / MT-03August 8, 2015
      • IMG_3846 How to install a stainless steel braided front brake line on the Yamaha R3 / MT-03September 7, 2015
      • img_6102 How to install a Yoyodyne slipper clutch in the Yamaha R3 / MT-03December 10, 2016
      • topdown vortex clipons How to install aftermarket clipons on the Yamaha R3 / MT-03March 26, 2016
      • IMG_4189 How to Install Hotbodies Race Bodywork on the Yamaha R3May 7, 2016
      • IMG_3965 How to install the Traxxion Dynamics Fork Damper Rod kit with Cartridge Emulators in the Yamaha R3 2015-2018January 16, 2016
      • IMG_4511 featured How to remove the emissions systems and install a block off plate on the Yamaha R3 / MT-03August 16, 2015
      • DSCN2484_zpsuqljyccu How to remove the front wheel from the Yamaha R3 / MT-03August 2, 2015
      • How to remove the fuel tank from the yamaha R3 How to remove the gas tank from the Yamaha R3April 23, 2015
      • IMG_3927 How to remove the kickstand from the Yamaha R3May 7, 2016
      • DSCN2189_zpsg2hs8ooe How to remove the rear wheel from the Yamaha R3 / MT-03August 2, 2015
      • Remove Side Fairings Yamaha R3 How to remove the side fairings from the Yamaha R3May 23, 2015
      • IMG_0167 How to remove the tail and taillight of the Yamaha R3April 21, 2015
      • how to remove the windscreen yamaha r3 How to remove the windscreen and upper fairing from the Yamaha R3May 4, 2015
      • IMG_3985 How to replace the fork seals on the Yamaha R3January 16, 2016
      • IMG_3719 Installed: Hotbodies Color Form Race Bodywork – Yamaha R3 2015-2018August 26, 2015
      • Yamaha R3 Modified rear brake rotor, lightened machined rotor Lightweight Rear Brake Rotor for Yamaha R3October 1, 2015
      • IMG_4463 Paint is done, heading to 5zero4 Designs next weekend to install the graphicsDecember 14, 2015
      • Traxxion Dynamics Omni Fork Spring Kit Yamaha R3 2015-2018 Suspension Spring Rate Chart for Yamaha R3 / MT-03January 24, 2021
      • Yamaha R3 Woodcraft 1.5 rise clipons What are the best clipons for the Yamaha R3?March 24, 2016
      • yamahaR3_raceconcept_rearsets_gold_fitR1 What are the best rearsets for the Yamaha R3?March 26, 2016
      • Yamaha R3 Exhaust Test Superbike Dyno horsepower Norton Motorsports Yamaha R3 / MT03 Exhaust Dyno Test and Superbike BuildJune 6, 2019
      • 2015 yamaha r3 exhaust header muffler weight Yamaha R3 OEM exhaust weight, headers, muffler, slip-on, heat shieldJuly 3, 2015
      • Close
    • Close
  • Dyno Testing
    • Aprilia RS660 Dyno Testing
    • Kawasaki Ninja 400 / Z400
      • Kawasaki Ninja 400 dyno horsepower Kawasaki Ninja 400 Exhaust Dyno Shootout!September 2, 2019
      • Do you need a fuel controller with full exhaust ninja 400 Do you need a Power Commander for full exhaust on the Kawasaki Ninja 400?September 2, 2019
      • Close
    • Yamaha R3 / MT-03
      • Yamaha R3 415 chain kit horsepower Dyno tested: 520 vs. 415 chain and sprockets – Yamaha R3February 14, 2016
      • Yamaha R3 Exhaust Test Superbike Dyno horsepower Norton Motorsports Yamaha R3 / MT03 Exhaust Dyno Test and Superbike BuildJune 6, 2019
      • Close
    • Yamaha R7 / MT-07
    • Close
  • Other Cool Stuff
    • Power Commander vs Bazzaz vs ECU Flash vs aRacer Race ECU Power Commander vs. Bazzaz vs. ECU Flash vs. aRacer Race ECU
    • Woodcraft Toe Guard Yamaha R3 Woodcraft Shark Fin Toe Guard Modification Yamaha R3 / Kawasaki Ninja 400
    • Track_Day_TTD_2015_Thompson_8-24-15-2195-sm-300×200 5 Reasons Why Roadracers Give Up Street Riding
    • modified rear brake rotor rev a Reducing weight on a race bike and the different types of weight
    • video thumb Tire Shootout for Small Sport Bikes by Ari Henning
    • IMG_5091 Race Bike Designs, Graphics, and Paint Jobs
    • thumb Kawasaki Ninja 300 vs. KTM RC390 – Video Review
    • Close
  • Press Release
  • Race / Ride Reports
  • Race Team

How to install a stainless steel braided front brake line on the Yamaha R3 / MT-03

by Norton Racing / 2015, September 07 / Published in Yamaha R3 / MT-03

***UPDATED 11/9/18 (some photos have been updated, so pictures may have different color lines)

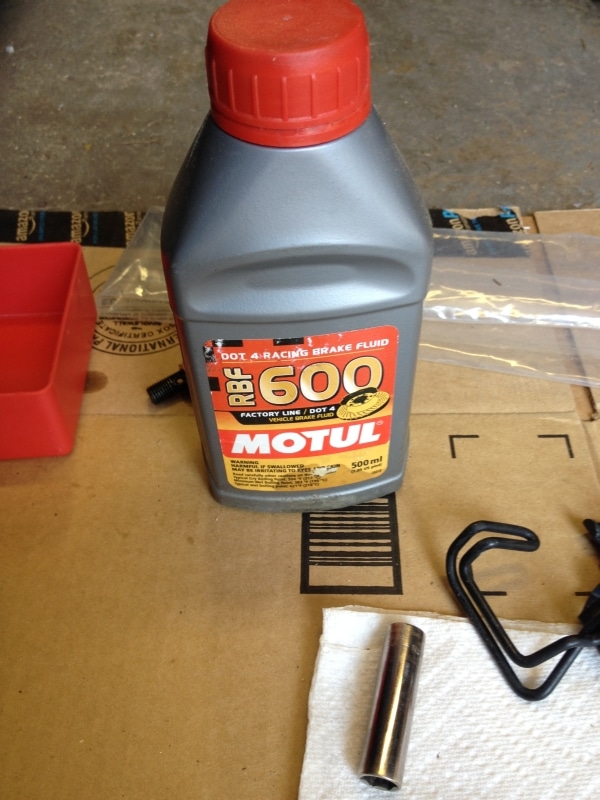
For racing or aggressive riding, one of the first upgrades I recommend is to replace the OEM rubber front brake line with a stainless steel or kevlar braided line.  OEM rubber lines are flexible and will expand when you squeeze the lever.  This expansion gets worse when the brake fluid gets hot, or the ambient temperature is hot.  This makes the brakes feel mushy and less effective than they really are because some of the energy you spend squeezing the lever goes into flexing the brake line instead of squeezing the brakes.  Fortunately, the fix is easy and inexpensive, and if money is tight, I recommend changing the brake lines before changing the brake pads to see if the new stopping power is enough without spending the money on new pads.  Since a single stainless steel braided front brake line for the R3 costs only $65, there isn’t a better bang for the buck upgrade you can do to your motorcycle.  Add another $30 for a brake bleeder to make the job easy (see below) and last you for a lifetime of bikes, and another $18 for some Motul RBF600 racing brake fluid:

and you will be back up and running for under $120 with significantly better brakes and a valuable skill, (how to bleed the brakes or flush the brake fluid on the Yamaha R3).  Since the rear brake is hardly ever used, I recommend prioritizing the front brake line, and only change the rear if you are installing aftermarket rearsets and need more room for adjustment.


Here’s a step by step procedure for changing the front brake line on the Yamaha R3 2015:

Once finished, follow the procedure here to bleed the brakes.


Tools Needed:
rubber gloves (brake fluid is bad for you)

paper towels or rags (brake fluid is corrosive and can damage the paint on your bike if not cleaned up)

some cardboard pieces to set on the ground under the bike and work on

bottle of brake fluid, I recommend a high temperature brake fluid designed for racing, I use Motul RBF600

10mm Socket

12mm Socket

14mm Socket

14mm Wrench

8mm Wrench

a torque wrench is useful to torque the banjo bolts, but not completely necessary

a plastic bag for the OEM brake line and hardware is helpful to keep it from making a mess

Pneumatic Vacuum Bleeder connected to an air compressor (It’s possible to change the brake lines without a bleeder, but it takes forever and it’s a huge pain in the ass to get fluid to fill the new lines by just using the brake lever, this makes it SOOO much easier)

I don’t recommend using the common hand pump style vacuum bleeder like this:

61hbN+-tuaL._SL1200_400

I think they are a huge pain in the ass, the container is too light weight and falls over while trying to use it, and it’s too hard to seal to maintain vacuum, and they break easily, super annoying.

Instead, I use and highly recommend getting a pneumatic vacuum bleeder like this, they are almost the same price, like $30:

IMG_3834

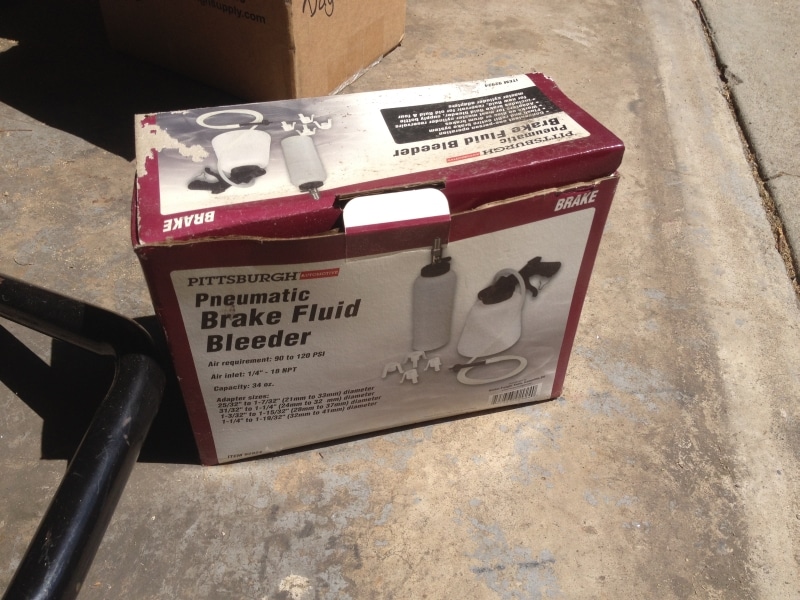
And they are SOOO much easier to use to draw fluid into a new line.  You connect it to an air compressor and it uses a Venturi to create vacuum.  You just squeeze the handle for continuous vacuum, awesome.  Plus, the hose is more flexible than the cheap hand pump style kits, and the fluid reservoir is weighted so it just sits there while you work instead of tipping over and frustrating the crap out of you.  I bought mine from Harbor Freight for about $40, but here’s a link to one from Amazon that includes 2 lines which makes it much easier to use for other bikes with dual caliper front brakes so I’d get this one if I did it again:


I had the bodywork off my bike when I did this install, but it isn’t necessary.  You can change the brake line with all of the bodywork in place.  Set down some cardboard scraps under the bike and where you are planning to work to keep everything clean.  You can put the bike up on a rear stand, however, because of the angle of the master cylinder, I found it easier to refill and get the air out of the line with the bike on the kick stand instead.


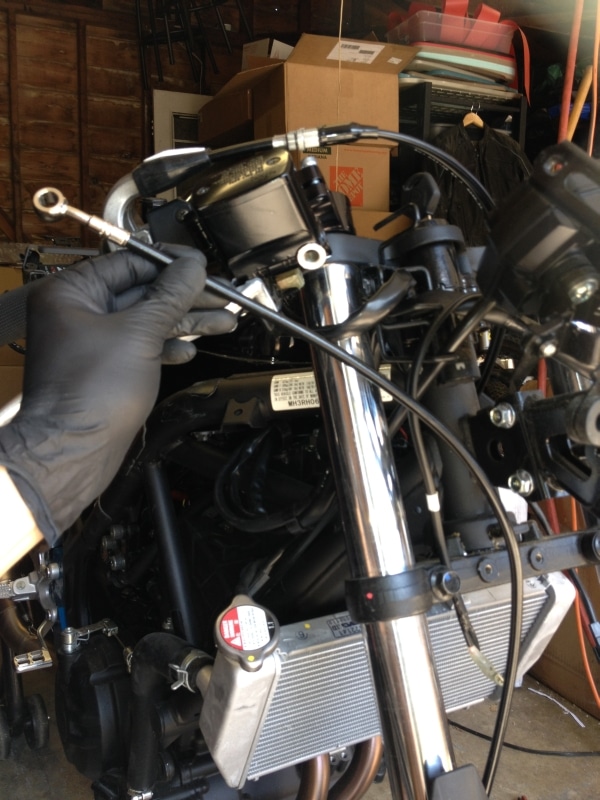
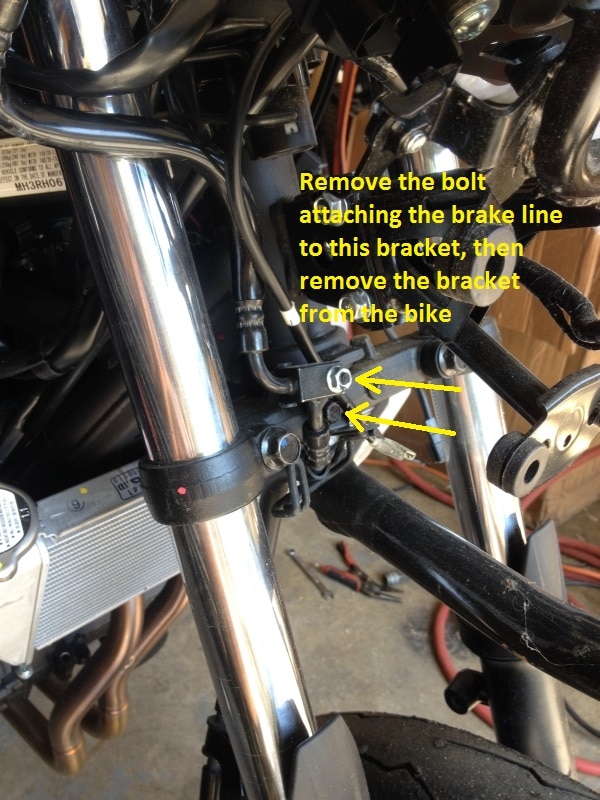
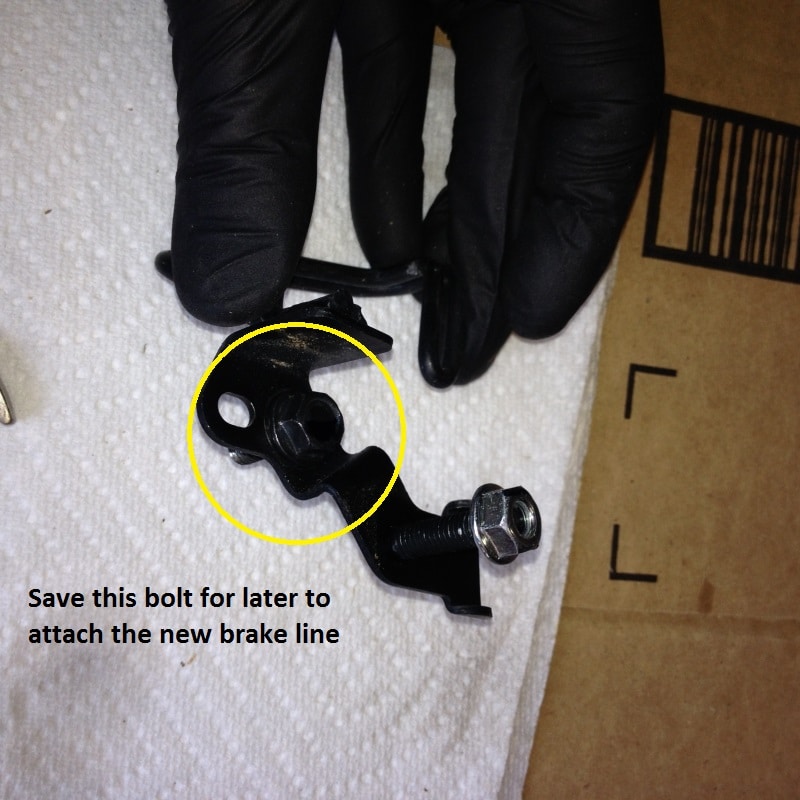
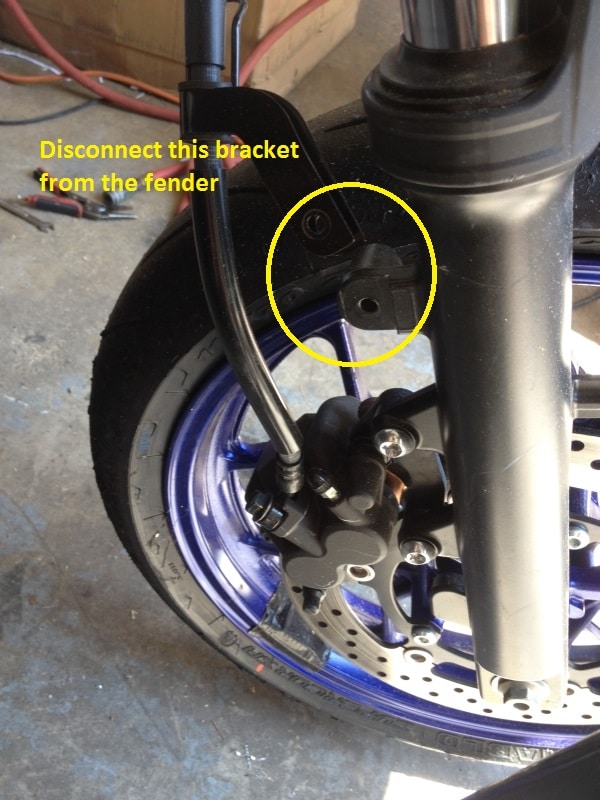
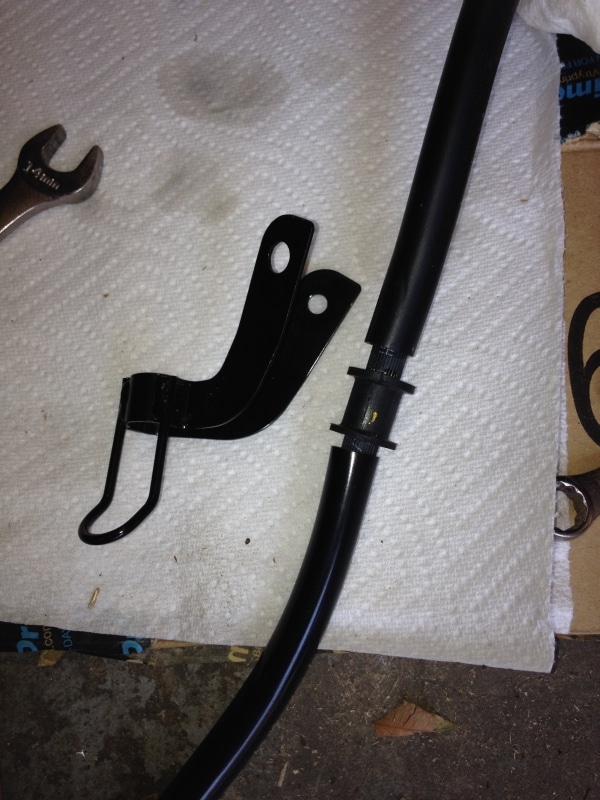
Step 1:  Use a 10mm socket to remove the brake line from the bracket, then remove the bolt attaching the bracket to the lower triple clamp and set the bracket aside, you do not need it anymore.  Save the bolt that attached the bracket to the triple clamp, it is useful for attaching the new brake line later on.

01 IMG_3832 IMG_3856


Step 2:  Use an 8mm socket to remove the clamp attaching the brake line to the front fender.  Pry this clamp open to remove it front the OEM brake line and set it aside, it works well to attach the new brake line to the lower triple clamp.

IMG_3833

IMG_3854


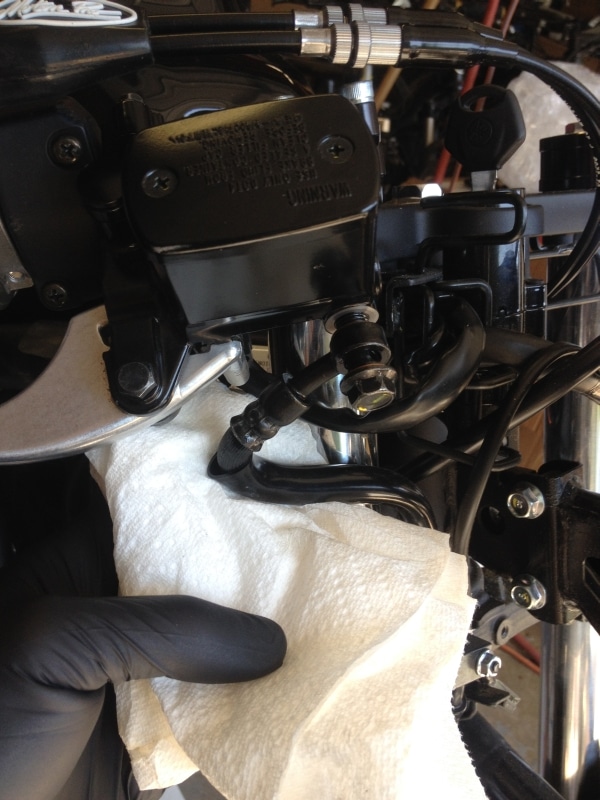
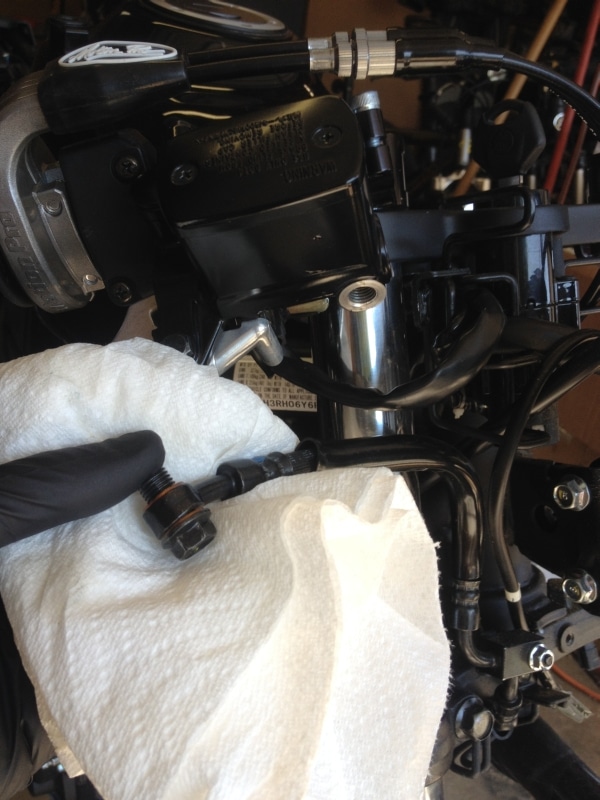
Step 3:  Use a 12mm socket to remove the banjo bolt at the master cylinder.  Wear gloves and wrap the area with a rag, brake fluid will leak out once you remove this bolt.  Wipe up any dripping brake fluid from the area and set the disconnected end of the brake into a container to catch the brake fluid as it drains while you keep working.

IMG_3838 IMG_3839 IMG_3840


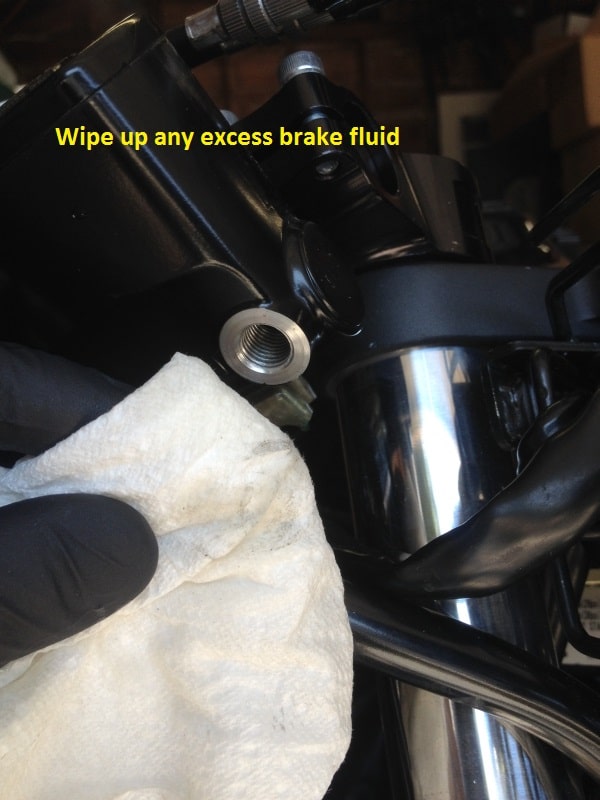
Step 4:  Use a 12mm socket to remove the banjo bolt from the brake caliper.  Set your drain pan or brake fluid container under the caliper to catch the fluid that drains out.  Allow all the fluid to drain, then use a rag to immediately wipe up any excess fluid from the area.  Put the brake line and banjo bolts in a plastic bag and set them aside where they won’t make a mess.

IMG_3841 IMG_3908


***I like to install the brake caliper side of the line first, some people prefer to install the master cylinder side first, it doesn’t really matter.


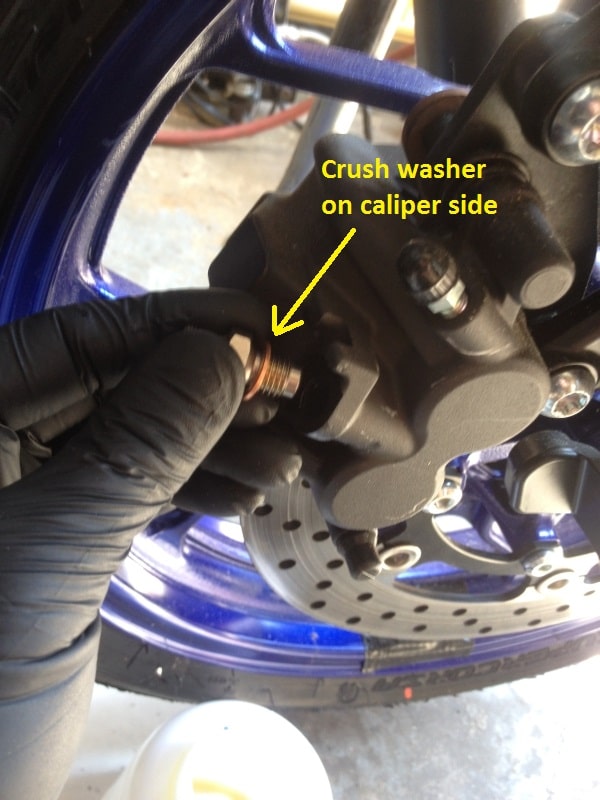
Step 5:  Locate the male-male fitting and make sure it has a copper crush washer on the side that threads into the caliper.  Thread the fitting into the caliper and tighten it down tight so it seals against the crush washer.  Torque the fitting to 21 ft lbs.

IMG_3843 2


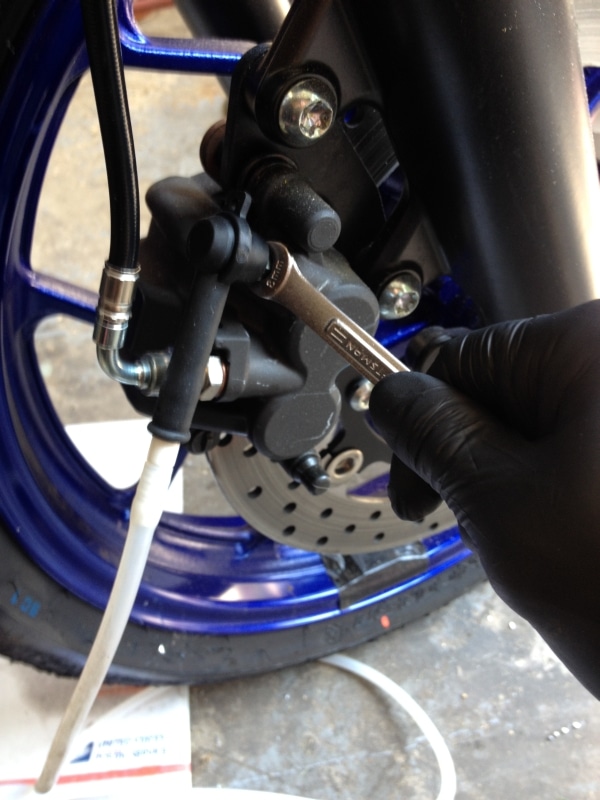
Step 6:  Thread the brake line onto the fitting in the brake caliper.  Snug the fitting down and run the line around the fork to where it will connect to the master cylinder.  While holding the brake line pointed up, tighten the fitting with the 14mm wrench.  This fitting has to be very tight to seal properly.  When you try to bleed the brakes later, keep an eye on this fitting, if it leaks, tighten it down more.


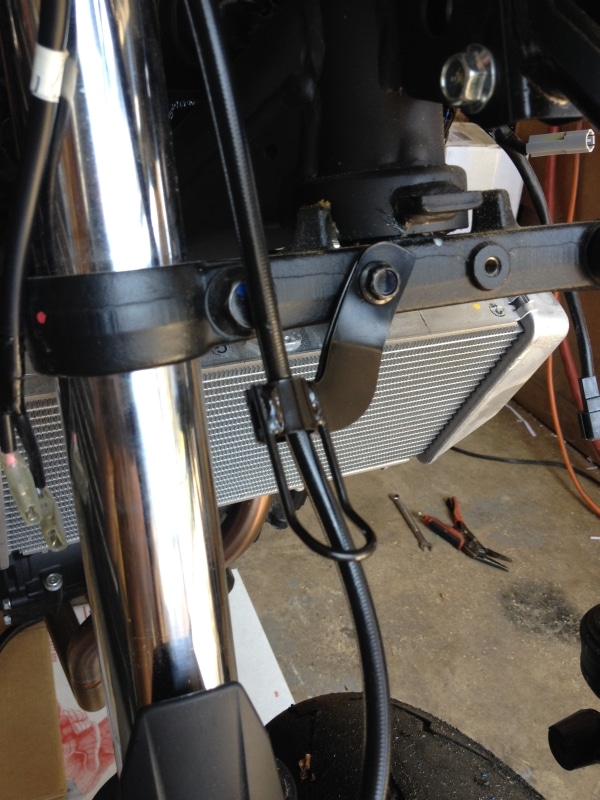
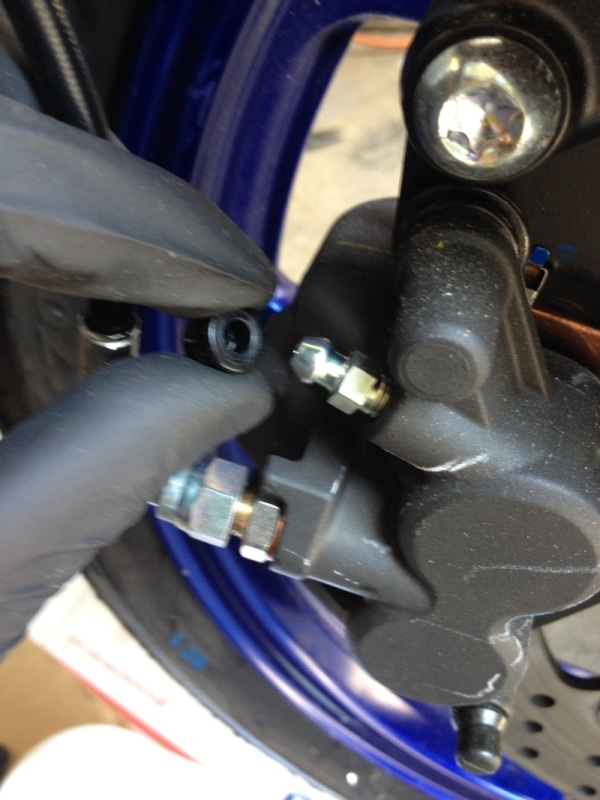
Step 7:  Locate the new banjo bolt and (2) new copper crush washers.  Place one washer on the bolt, then put the bolt through the brake line fitting, then add the second crush washer (see photo below).  Proper installation of the crush washers is critical!!!  Routing of the brake line may vary with different lines, but if you are using my Race Spec. lines, route the line behind the fork leg and between the forks above the fender and up to the master cylinder.  Align the cable as seen in the photo below and hold it in place while you tighten the new banjo bolt to 15 ft lbs to seal the crush washers.  The OEM banjo bolt is torqued to 21 ft lbs, but it is a steel bolt and the replacement bolt is aluminum, 21 ft lbs will damage the new aluminum banjo bolt.

IMG_3851 crop


Step 8:  The new brake lines should come with a replacement clamp to secure the line to the lower triple clamp, but if not, you can always reuse the oem clamp, you just may have to bend it a little.

IMG_3861


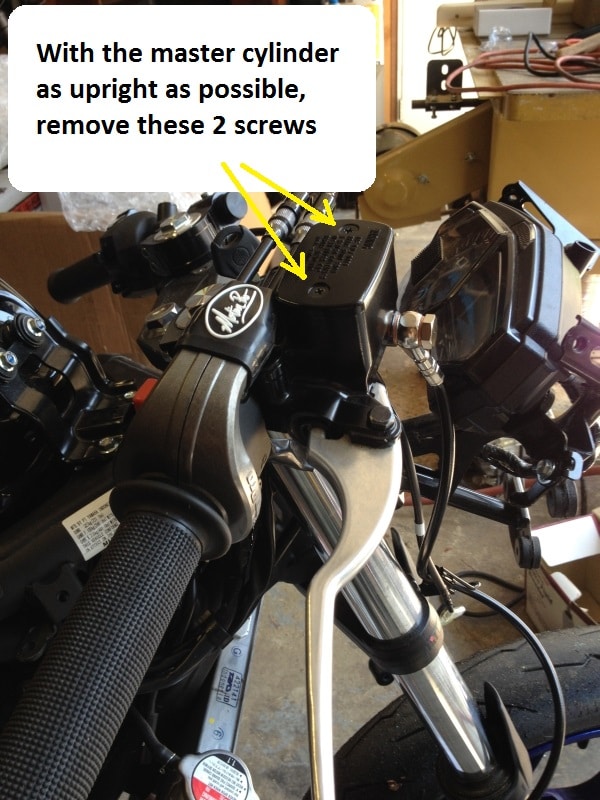
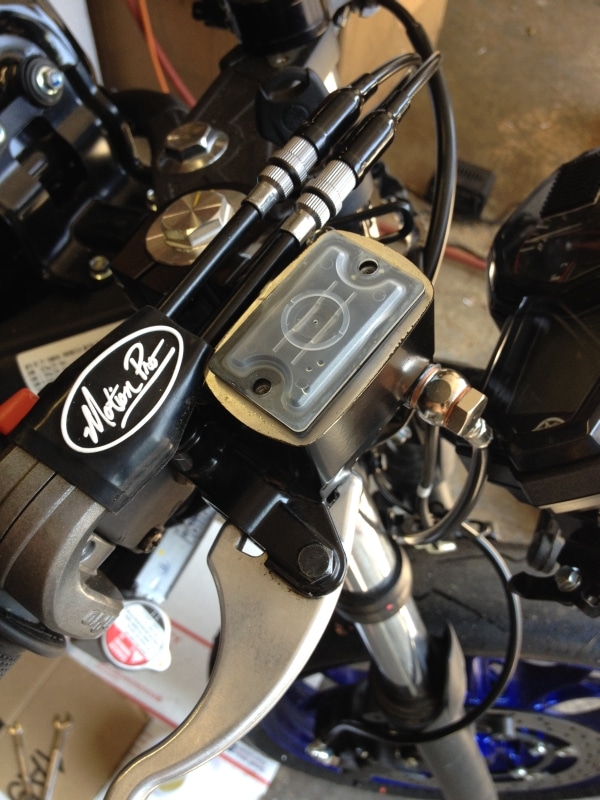
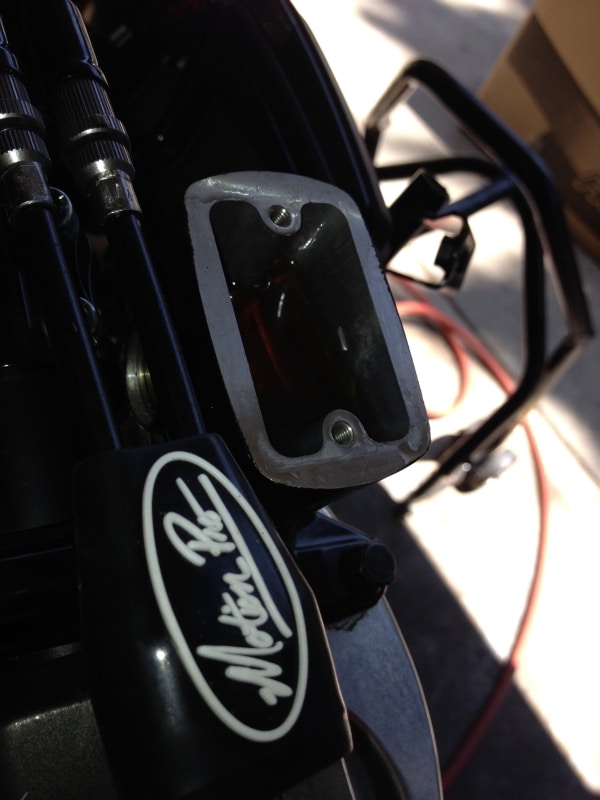
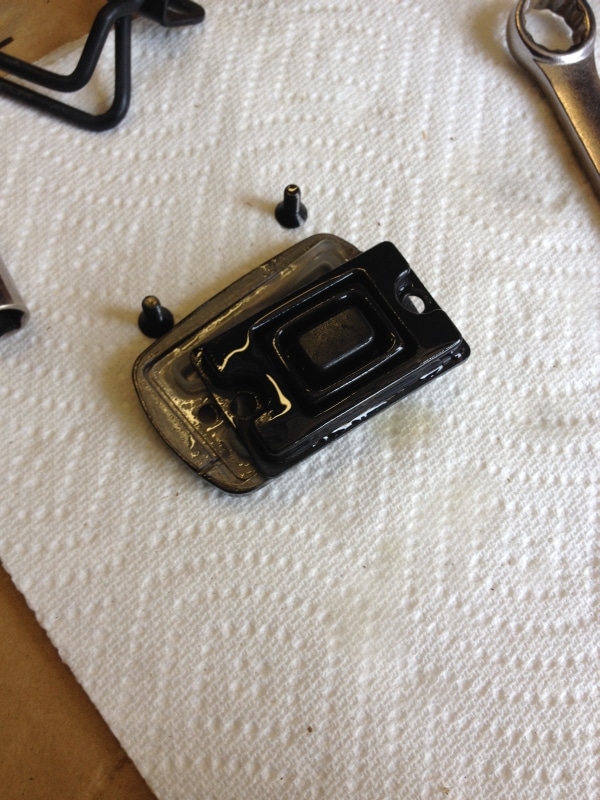
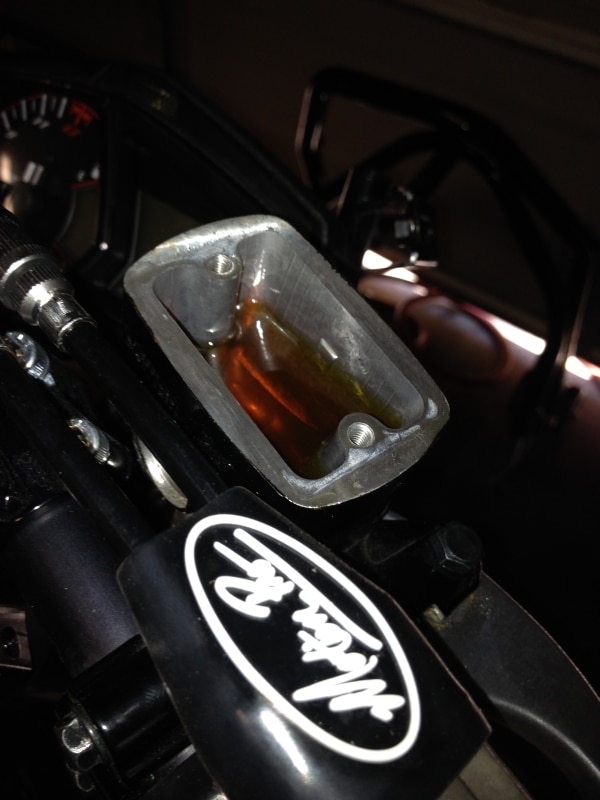
Step 9:  With the bike on the kick stand, turn the bars all the way to the left.  Use an 8mm socket to loosen the clamp bolts on the brake lever/master cylinder and adjust the master cylinder so that it is as upright and level as possible, then tighten the clamp back down so it doesn’t move later while you are bleeding the brakes.  Remove the 2 phillips screws on the master cylinder and carefully remove the lid, plastic insert, and rubber boot.  If the rubber boot is extended, collapse it back so it looks like the picture below.

IMG_3866 IMG_3867

IMG_3877 IMG_3868


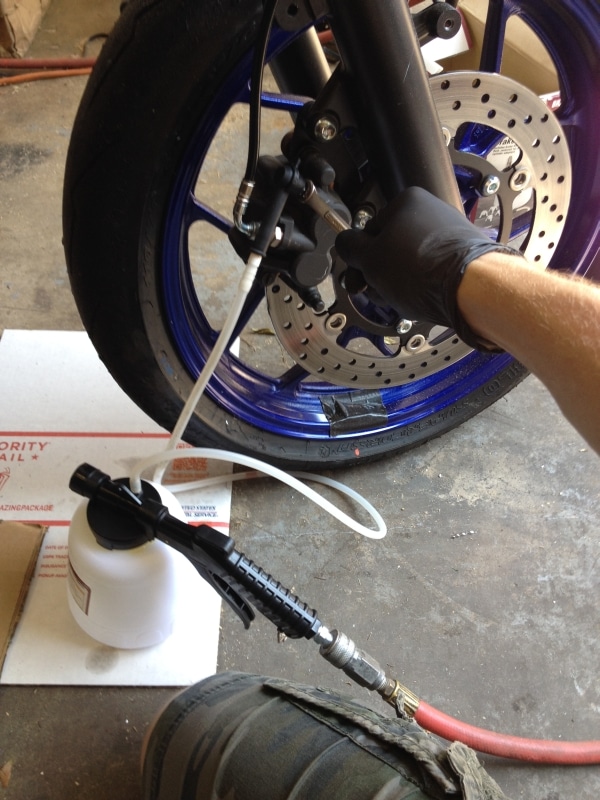
Step 10:  Connect your vacuum pump to an air line and squeeze the handle to start the vacuum.  Use the vacuum pump to remove as much fluid from the reservoir as you can before refilling it with new fluid.  Fill the reservoir with fresh brake fluid.  Brake fluid gets crusty if it sits open on the shelf for too long, so always use new fluid, or at least check the fluid you have before you pour it into your reservoir and make a big crusty mess.

IMG_3869


Step 11:  Pry the plastic cover off the bleed nipple and slip the end of the vacuum line over the bleed nipple.  Start the vacuum, and while holding the vacuum on, use an 8mm wrench to crack open the bleed nipple.  Open the nipple far enough that fluid begins to flow (the level starts to drop in the reservoir).  Don’t let the reservoir run dry and be sure to close the nipple before shutting off the vacuum.  Fill the reservoir again, and repeat until you see brake fluid flow out of the bleed nipple into the vacuum line.  Always starting the vacuum before opening the bleed nipple, and closing the bleed nipple before stopping the vacuum.

IMG_3870 IMG_3871   IMG_3872 IMG_3873 IMG_3878


Once you see fluid start to flow out of the bleed nipple into the vacuum line, close the bleed nipple then stop the vacuum, you are finished filling the line with fluid and you need to bleed the line to get all of the air out.  Go to my other post here for instructions on bleeding the brakes on the Yamaha R3.


  • Tweet

About Norton Racing

What you can read next

How to remove the tail and taillight of the Yamaha R3
How to remove the fuel tank from the yamaha R3
How to remove the gas tank from the Yamaha R3
how to remove the windscreen yamaha r3
How to remove the windscreen and upper fairing from the Yamaha R3

8 Comments to “ How to install a stainless steel braided front brake line on the Yamaha R3 / MT-03”

  1. Mattia says : Log in to Reply
    June 2, 2016 at 3:36 AM

    With this upgrade you lose the abs. Am i right?

    1. jbluetooth@gmail.com says : Log in to Reply
      June 3, 2016 at 11:53 PM

      Upgrading to a SS brake line should not affect your ABS if your bike has ABS.

      1. Mattia says : Log in to Reply
        June 6, 2016 at 10:09 AM

        yes but if you use this method you bypass abs.

        1. jbluetooth@gmail.com says : Log in to Reply
          June 6, 2016 at 10:51 AM

          Okay, thank you for mentioning this. I am not familiar with the installation for the ABS model as we do not have the ABS model in the US.
          Thank you!

  2. Cris says : Log in to Reply
    November 22, 2017 at 11:43 AM

    Hi mate, thank you for the post. One question.

    I can see the fitting your braided line uses at the caliper side is not a regular banjo bolt. It is different. What type of fitting is that one? What’s the difference between that one and a regular banjo bolt?
    Can you name the brand of braided lines you used?

    Thanks!!

    1. Jesse Norton says : Log in to Reply
      November 23, 2017 at 10:10 AM

      They are my own lines made by Galfer:
      https://www.norton-motorsports.com/product/race-spec-superbike-stainless-steel-braided-brake-lines-yamaha-r3-2015/
      They use a superbike style fitting, it is less restrictive at the joint than a standard banjo bolt fitting. whether or not it is a noticeable difference with the R3, I can’t confirm, as I haven’t personally tested both back to back, but in theory, it has higher flow.

  3. Parthiv says : Log in to Reply
    April 17, 2018 at 1:07 PM

    Is it similar to that of abs model of Yamaha R3

    1. Jesse Norton says : Log in to Reply
      April 18, 2018 at 3:22 PM

      The ABS model is different

You must be logged in to post a comment.

Search All Posts

Post Category:

Yamaha R3 / MT-03
  • ** Yamaha R3 / MT-03 Critical Issues
  • *** Top 5 Yamaha R3 / MT-03 Mods and Upgrades
  • Annitori Quickshifter QS Pro installed and beta tested on Yamaha R3
  • Dyno tested: 520 vs. 415 chain and sprockets – Yamaha R3
  • How to bleed the brakes or flush the brake fluid on the Yamaha R3 / MT-03
  • How to change the front brake pads on the Yamaha R3 / MT-03
  • How to change the Yamaha R3 / MT-03 to GP Shift
  • How to do an oil and filter change on the Yamaha R3 / MT-03
  • How to get more dash clearance for your clipons and brake line – Yamaha R3
  • How to install a BMC Race Air Filter in the Yamaha R3 / MT-03
  • How to install a stainless steel braided front brake line on the Yamaha R3 / MT-03
  • How to install a Yoyodyne slipper clutch in the Yamaha R3 / MT-03
  • How to install aftermarket clipons on the Yamaha R3 / MT-03
  • How to Install Hotbodies Race Bodywork on the Yamaha R3
  • How to install the Traxxion Dynamics Fork Damper Rod kit with Cartridge Emulators in the Yamaha R3 2015-2018
  • How to remove the emissions systems and install a block off plate on the Yamaha R3 / MT-03
  • How to remove the front wheel from the Yamaha R3 / MT-03
  • How to remove the gas tank from the Yamaha R3
  • How to remove the kickstand from the Yamaha R3
  • How to remove the rear wheel from the Yamaha R3 / MT-03
  • How to remove the side fairings from the Yamaha R3
  • How to remove the tail and taillight of the Yamaha R3
  • How to remove the windscreen and upper fairing from the Yamaha R3
  • How to replace the fork seals on the Yamaha R3
  • Installed: Hotbodies Color Form Race Bodywork – Yamaha R3 2015-2018
  • Lightweight Rear Brake Rotor for Yamaha R3
  • Paint is done, heading to 5zero4 Designs next weekend to install the graphics
  • Suspension Spring Rate Chart for Yamaha R3 / MT-03
  • What are the best clipons for the Yamaha R3?
  • What are the best rearsets for the Yamaha R3?
  • Yamaha R3 / MT03 Exhaust Dyno Test and Superbike Build
  • Yamaha R3 OEM exhaust weight, headers, muffler, slip-on, heat shield

Contact Information

Email: sales@norton-motorsports.com
Telephone: (858) 842-4595

Address

Norton Motorsports
San Diego, CA

Contact us for address before sending anything.

Thank you.

© Copyright Norton Motorsports. All rights reserved.

TOP