SIGN IN YOUR ACCOUNT TO HAVE ACCESS TO DIFFERENT FEATURES

FORGOT YOUR PASSWORD?

FORGOT YOUR DETAILS?

AAH, WAIT, I REMEMBER NOW!
(858) 842-4595
  • Policies
  • My Account
  • LOGIN

Norton Motorsports

  • Shop by Bike
    • Aprilia
      • Tuono 660 2021+
      • RS 660 2021+
      • Close
    • KTM
      • RC390 / Duke 390
      • Close
    • Kawasaki
      • Ninja 250 / 300
      • Ninja 400 2018+
      • Z400 2019+
      • Close
    • Ohvale
      • GP-0
      • GP-2
      • Close
    • Yamaha
      • MT-03 2020+
      • MT-07 / FZ-07 2015-2017
      • MT-07 2018-2020
      • MT-07 2021+
      • R3 2015-2018
      • R3 2019+
      • R7 2021+
      • Close

    • View All
    • Close
  • Norton Built Motorcycles
    • Norton Racing Hotbodies GP Spec Race Bodywork Kit - Kawasaki Ninja 400 Z400 Ninja400R main Norton Motorsports GP Spec Kawasaki Ninja400R
    • 2019-04-28 18_00_05-2018 Ninja 400 Race Motorcycle from Ninja400R.com Norton Motorsports Kawasaki Ninja400R
    • 2019 yamaha yzf-r3 race bodywork Hotbodies Racing Norton Motorsports Norton Motorsports Race Spec Yamaha R3
    • Close
  • Apparel, Gear, & Tools
    • Apparel
    • Riding Gear
    • Tools
    • Close
  • MY CART
    No products in cart.
  • Bike Build Write-ups
    • Aprilia RS 660 2021-
      • Close
    • Kawasaki Ninja 400 2018- / Z400 2019-
      • Important ** Kawasaki Ninja 400 / Z400 Critical Issues
      • Top5 *** Top 5 Kawasaki Ninja 400 / Z400 Mods and Upgrades
      • Do you need a fuel controller with full exhaust ninja 400 Do you need a Power Commander for full exhaust on the Kawasaki Ninja 400?
      • featured image How to install an R6 throttle tube in the Kawasaki Ninja 400 / Z400
      • 49899087_301487663905591_4918556926305894400_n How to remove the front fender and rear fender of the Kawasaki Ninja 400
      • 2019-02-07 10_57_46-Clipboard How to remove the gas tank on the Kawasaki Ninja 400
      • IMG_4330_2 How to remove the OEM bodywork of the Kawasaki Ninja 400
      • open clutch Kawasaki Ninja 400 / Z400 Clutch Slipping, Poor Shifting, False Neutrals, and Dropping Gears – Explained and Fixed!
      • Kawasaki Ninja 400 dyno horsepower Kawasaki Ninja 400 Exhaust Dyno Shootout!
      • CVR_3132_Sep1519_CaliPhoto Ninja 400 Electronics and GP Bodywork Test
      • Traxxion Dynamics Omni Fork Spring Kit Yamaha R3 2015-2018 Suspension Spring Rate Chart for Kawasaki Ninja 400 / Z400
      • Braketech Vs Galfer Rotor Brake Test Rocco Landers What’s up with the Kawasaki Ninja 400 / Z400 brakes?
      • Close
    • Ohvale GP-0 / GP-2
      • Important ** Ohvale GP-0 / GP-2 Critical Issues
      • OV001 Ohvale 190 5 Speed Shift Star Cap Ohvale 190 False Neutral and Miss Shift Problems – FIXED!
      • Close
    • Yamaha R3 2015-2018
      • Important ** Yamaha R3 / MT-03 Critical IssuesJanuary 24, 2021
      • Top5 *** Top 5 Yamaha R3 / MT-03 Mods and UpgradesJanuary 24, 2021
      • Yamaha R3 Annitori Quickshifter QS Pro Annitori Quickshifter QS Pro installed and beta tested on Yamaha R3June 24, 2015
      • Yamaha R3 415 chain kit horsepower Dyno tested: 520 vs. 415 chain and sprockets – Yamaha R3February 14, 2016
      • IMG_3869 How to bleed the brakes or flush the brake fluid on the Yamaha R3 / MT-03September 7, 2015
      • IMG_3896 How to change the front brake pads on the Yamaha R3 / MT-03September 11, 2015
      • R3GPShift How to change the Yamaha R3 / MT-03 to GP ShiftSeptember 7, 2015
      • DSCN2608_zpsqza81eb3 How to do an oil and filter change on the Yamaha R3 / MT-03August 16, 2015
      • IMG_3857 How to get more dash clearance for your clipons and brake line – Yamaha R3August 28, 2015
      • IMG_3630 How to install a BMC Race Air Filter in the Yamaha R3 / MT-03August 8, 2015
      • IMG_3846 How to install a stainless steel braided front brake line on the Yamaha R3 / MT-03September 7, 2015
      • img_6102 How to install a Yoyodyne slipper clutch in the Yamaha R3 / MT-03December 10, 2016
      • topdown vortex clipons How to install aftermarket clipons on the Yamaha R3 / MT-03March 26, 2016
      • IMG_4189 How to Install Hotbodies Race Bodywork on the Yamaha R3May 7, 2016
      • IMG_3965 How to install the Traxxion Dynamics Fork Damper Rod kit with Cartridge Emulators in the Yamaha R3 2015-2018January 16, 2016
      • IMG_4511 featured How to remove the emissions systems and install a block off plate on the Yamaha R3 / MT-03August 16, 2015
      • DSCN2484_zpsuqljyccu How to remove the front wheel from the Yamaha R3 / MT-03August 2, 2015
      • How to remove the fuel tank from the yamaha R3 How to remove the gas tank from the Yamaha R3April 23, 2015
      • IMG_3927 How to remove the kickstand from the Yamaha R3May 7, 2016
      • DSCN2189_zpsg2hs8ooe How to remove the rear wheel from the Yamaha R3 / MT-03August 2, 2015
      • Remove Side Fairings Yamaha R3 How to remove the side fairings from the Yamaha R3May 23, 2015
      • IMG_0167 How to remove the tail and taillight of the Yamaha R3April 21, 2015
      • how to remove the windscreen yamaha r3 How to remove the windscreen and upper fairing from the Yamaha R3May 4, 2015
      • IMG_3985 How to replace the fork seals on the Yamaha R3January 16, 2016
      • IMG_3719 Installed: Hotbodies Color Form Race Bodywork – Yamaha R3 2015-2018August 26, 2015
      • Yamaha R3 Modified rear brake rotor, lightened machined rotor Lightweight Rear Brake Rotor for Yamaha R3October 1, 2015
      • IMG_4463 Paint is done, heading to 5zero4 Designs next weekend to install the graphicsDecember 14, 2015
      • Traxxion Dynamics Omni Fork Spring Kit Yamaha R3 2015-2018 Suspension Spring Rate Chart for Yamaha R3 / MT-03January 24, 2021
      • Yamaha R3 Woodcraft 1.5 rise clipons What are the best clipons for the Yamaha R3?March 24, 2016
      • yamahaR3_raceconcept_rearsets_gold_fitR1 What are the best rearsets for the Yamaha R3?March 26, 2016
      • Yamaha R3 Exhaust Test Superbike Dyno horsepower Norton Motorsports Yamaha R3 / MT03 Exhaust Dyno Test and Superbike BuildJune 6, 2019
      • 2015 yamaha r3 exhaust header muffler weight Yamaha R3 OEM exhaust weight, headers, muffler, slip-on, heat shieldJuly 3, 2015
      • Close
    • Close
  • Dyno Testing
    • Aprilia RS660 Dyno Testing
      • Close
    • Kawasaki Ninja 400 / Z400
      • Do you need a fuel controller with full exhaust ninja 400 Do you need a Power Commander for full exhaust on the Kawasaki Ninja 400?September 2, 2019
      • Kawasaki Ninja 400 dyno horsepower Kawasaki Ninja 400 Exhaust Dyno Shootout!September 2, 2019
      • Close
    • Yamaha R3 / MT-03
      • Yamaha R3 415 chain kit horsepower Dyno tested: 520 vs. 415 chain and sprockets – Yamaha R3February 14, 2016
      • Yamaha R3 Exhaust Test Superbike Dyno horsepower Norton Motorsports Yamaha R3 / MT03 Exhaust Dyno Test and Superbike BuildJune 6, 2019
      • Close
    • Yamaha R7 / MT-07
      • Close
    • Close
  • Other Cool Stuff
    • Power Commander vs Bazzaz vs ECU Flash vs aRacer Race ECU Power Commander vs. Bazzaz vs. ECU Flash vs. aRacer Race ECU
    • Woodcraft Toe Guard Yamaha R3 Woodcraft Shark Fin Toe Guard Modification Yamaha R3 / Kawasaki Ninja 400
    • Track_Day_TTD_2015_Thompson_8-24-15-2195-sm-300×200 5 Reasons Why Roadracers Give Up Street Riding
    • modified rear brake rotor rev a Reducing weight on a race bike and the different types of weight
    • video thumb Tire Shootout for Small Sport Bikes by Ari Henning
    • IMG_5091 Race Bike Designs, Graphics, and Paint Jobs
    • thumb Kawasaki Ninja 300 vs. KTM RC390 – Video Review
    • Close
  • Press Release
  • Race / Ride Reports
  • Race Team

** Kawasaki Ninja 400 / Z400 Critical Issues

by Norton Racing / 2021, February 24 / Published in Kawasaki Ninja 400 / Z400

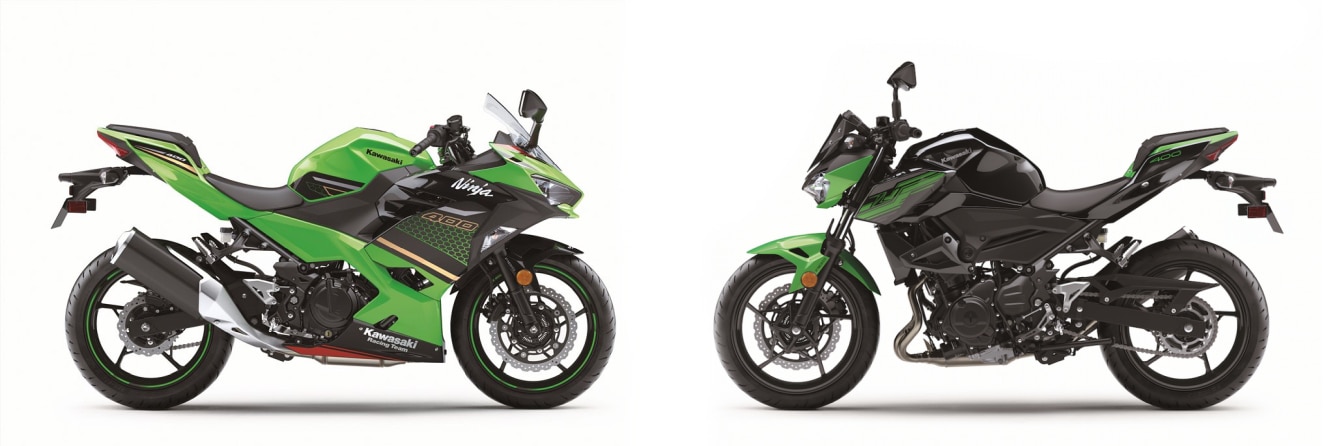
The Kawasaki Ninja 400 and Z400 are awesome little bikes!  Kawasaki made some advancements to the little bike scene offering a 400cc package that was just as lightweight (or lighter) and nimble as other 250cc and 300cc bikes.  But like with anything that’s a brand new design, there are a few quirks that should be addressed to really top off the great work Kawasaki did with the 400.


1.  Clutch and Shifting
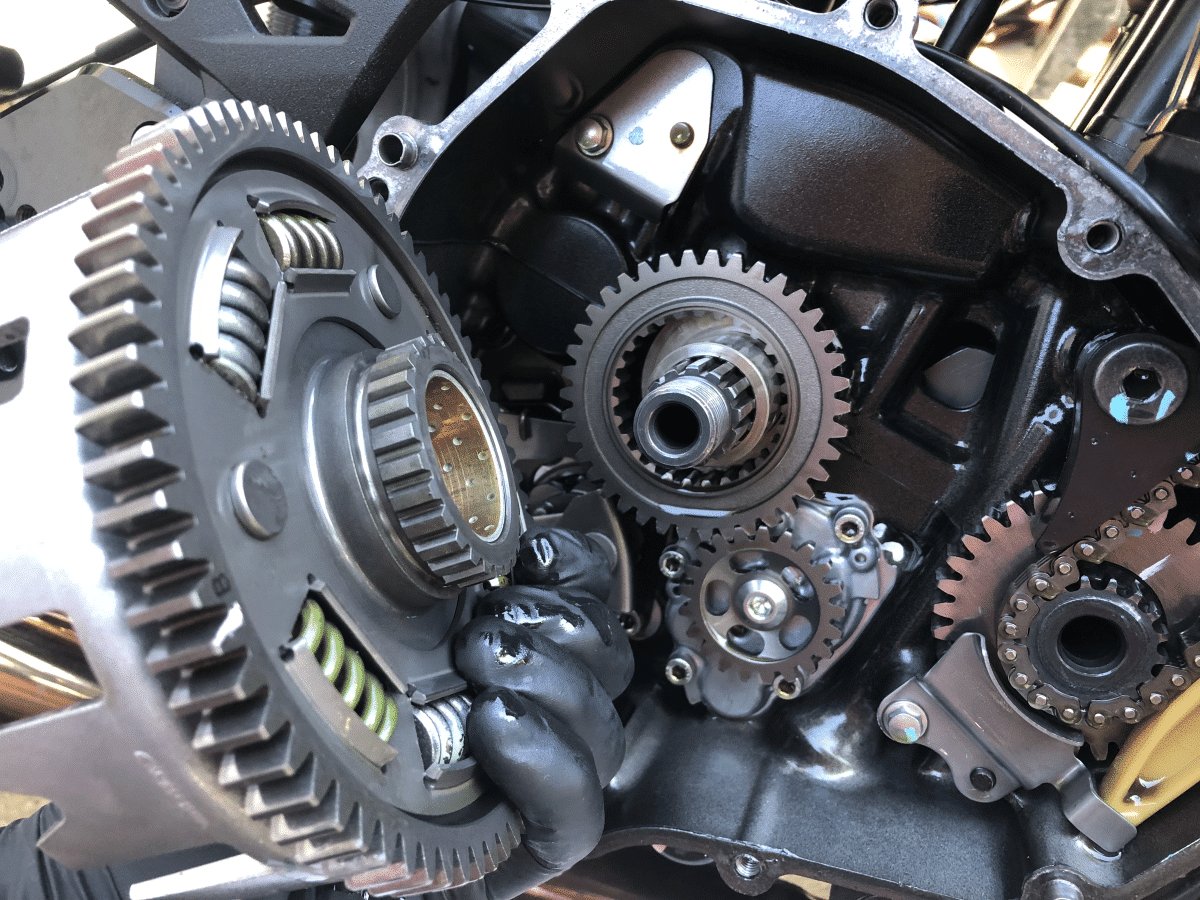
The Ninja 400 engine has some shortfalls in the design and manufacturing of the clutch and shifting mechanisms that are pretty widespread.  Please read our full detailed article here for all the information and solutions:

Kawasaki Ninja 400 / Z400 Clutch Slipping, Poor Shifting, False Neutrals, and Dropping Gears – Explained and Fixed!


2.  Front Brakes

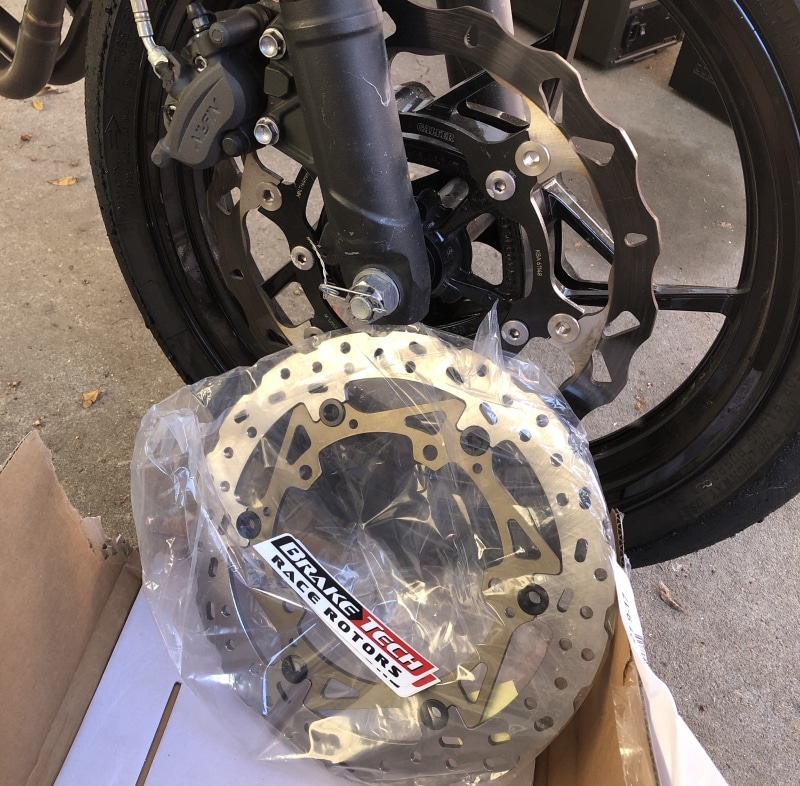
Braketech Vs Galfer Rotor Brake Test Rocco Landers The front brakes on the Ninja 400 and Z400 are pretty good for a beginner street bike.  A new set of front pads makes a world of difference and go ride and have fun.  But if you are planning on taking your bike to the race track, you definitely want to read this article on the front brakes before you warp your front rotor:

What’s up with the Kawasaki Ninja 400 / Z400 brakes?


3.  Cylinder Coolant Seal
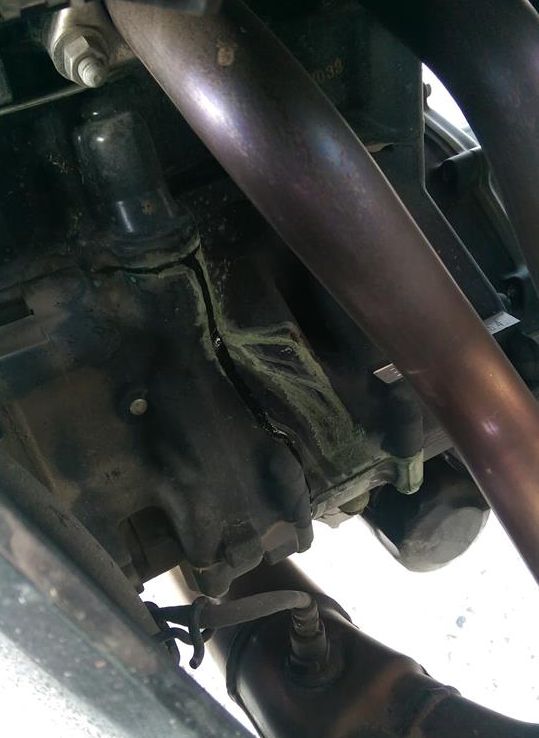
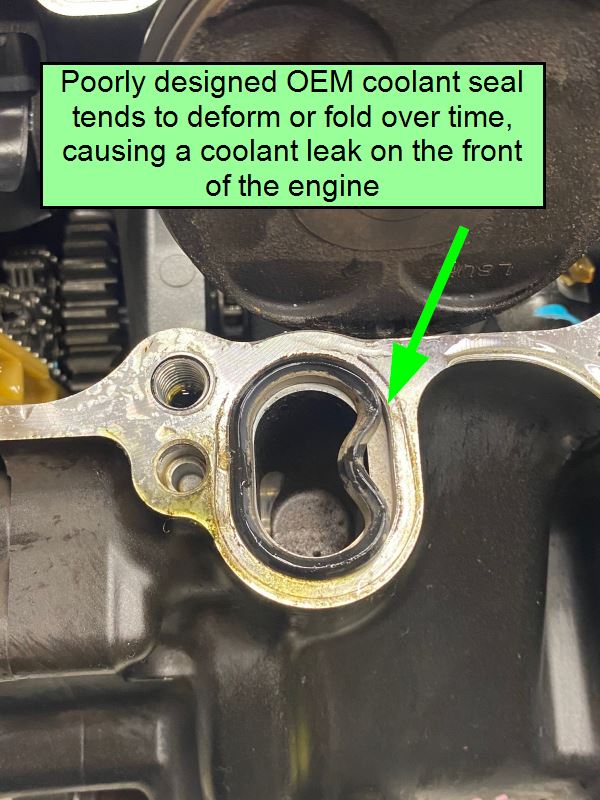
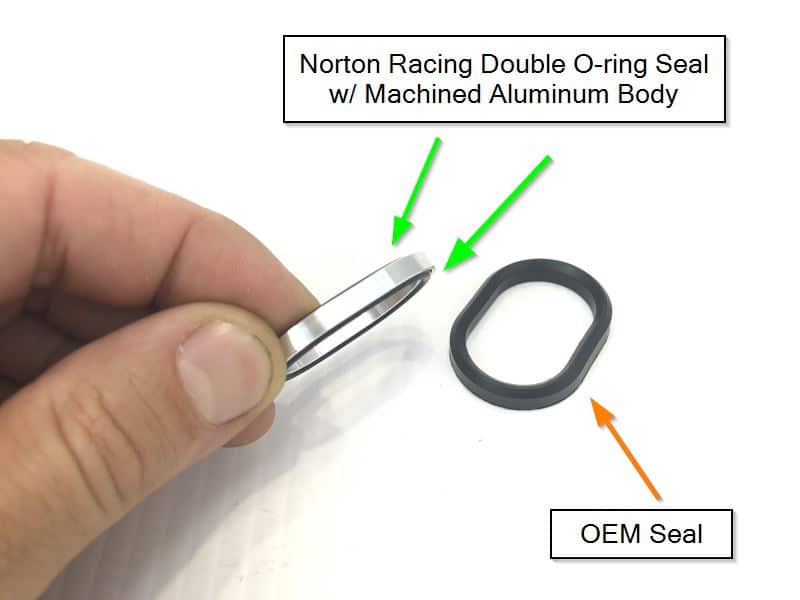
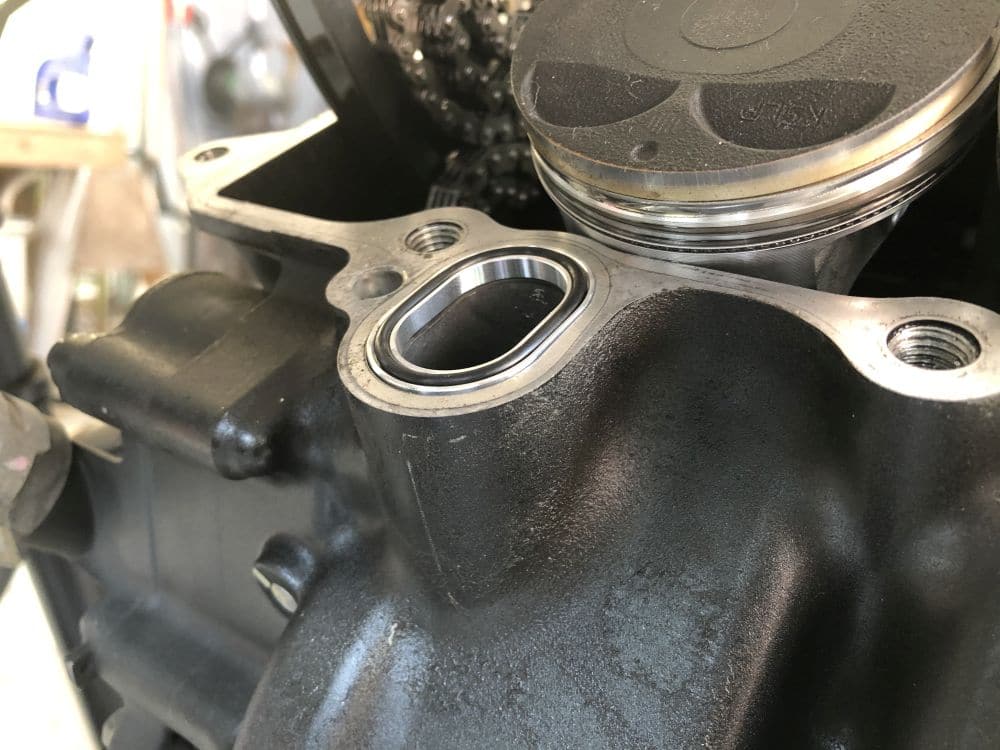
Kawasaki Ninja 400 Z400 Coolant Water Leak OEM Seal 4 This one is a major bummer.  I’m pretty disappointed at Kawasaki for this little gem.  This is just piss poor engineering.  The rubber seal around the coolant passage that allows coolant to travel from the cylinder head down through the cylinder to the engine case has a tendency to deform and fold over and cause a leak.  It’s easy to see why too, it’s a tall and skinny seal that’s just floating in an open cavity.  A rubber seal that is tall and skinny is always going to try to fold over.  It has to be contained if it’s taller than it is wide, that’s just basic engineering 101.

Unfortunately to get to this seal to replace it, you have to remove the cylinder head (and replace the head gasket) and either remove or at least loosen the cylinder (and you should replace the base gasket).  The engine doesn’t have to come out of the frame, but it’s still a lot of work.  We have designed our own replacement seal to solve this issue once and for all.  You definitely don’t want to repeat this procedure, so do yourself a favor and replace this seal when it’s convenient before it fails on you when it’s really inconvenient, like Friday practice before a MotoAmerica race weekend…  For street riders and track day guys, I’ll leave it up to you whether this is something you want to make sure doesn’t happen, or just wait and see if it happens to you and then get it fixed.  But for racers who don’t want to waste a whole weekend or go through an unplanned engine tear-down, I highly recommend replacing this preventatively:

Norton Racing Cylinder Coolant Seal – Kawasaki Ninja 400 / Z400


Kawasaki Ninja 400 Z400 Coolant Water Leak OEM Seal 2 KN443 Norton Racing Cylinder Coolant Seal Kawasaki Ninja 400 Z400 2 KN443 Norton Racing Cylinder Coolant Seal Kawasaki Ninja 400 Z400 3


4.  Track Bodywork

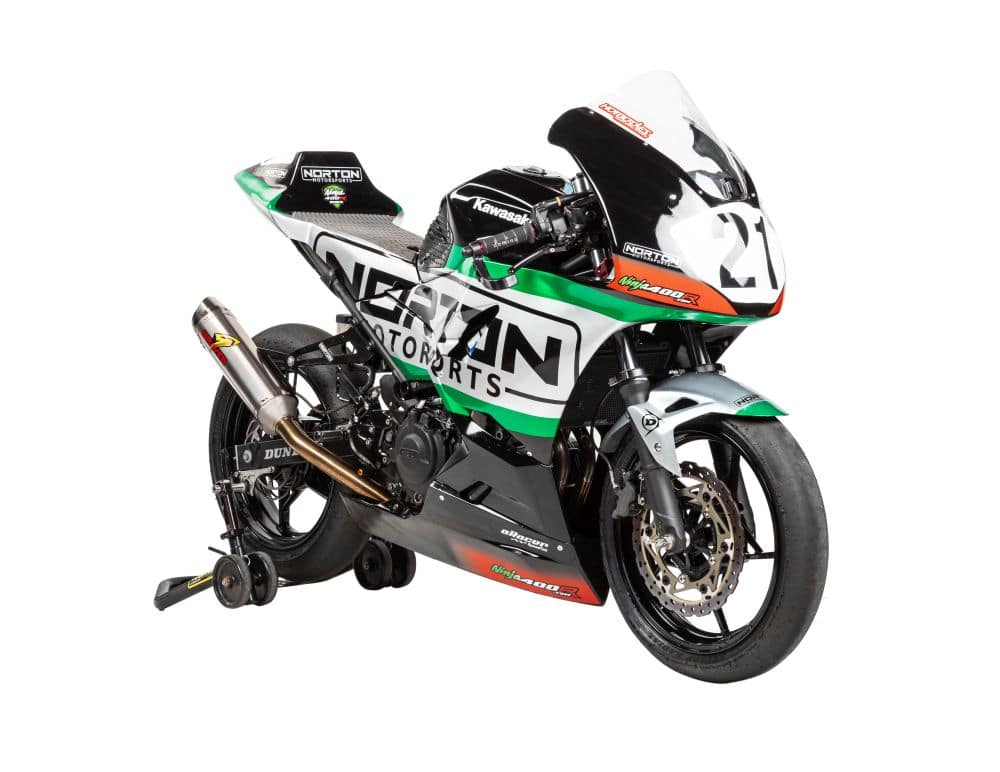
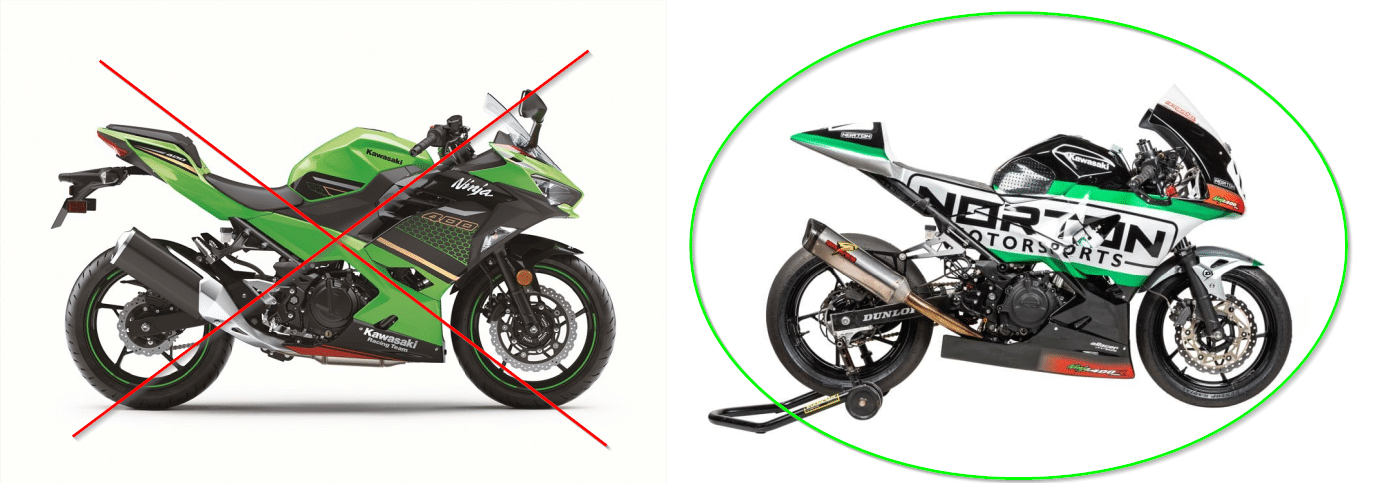
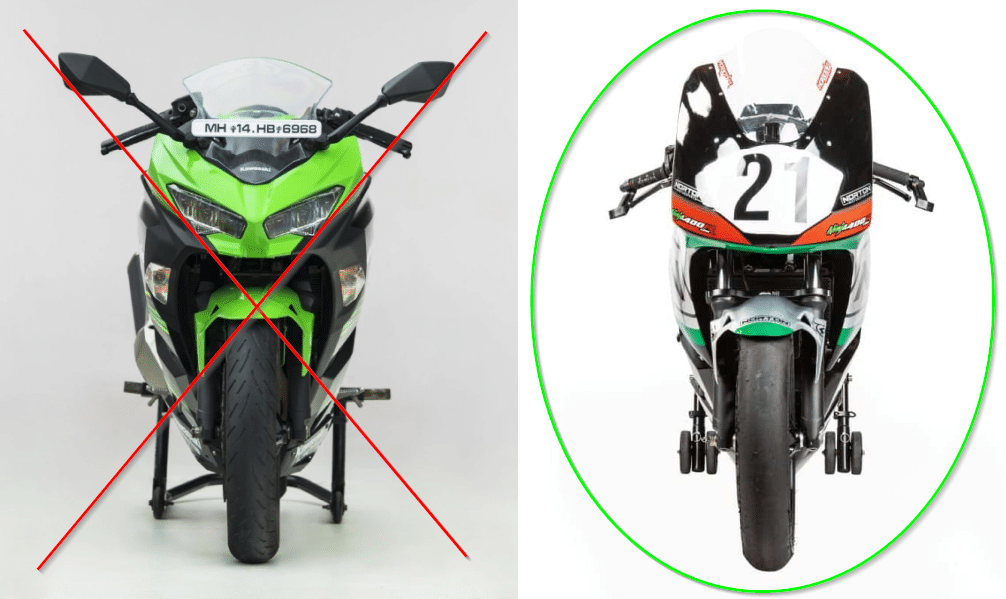
Norton Racing Hotbodies GP Spec Race Bodywork Kit - Kawasaki Ninja 400 Z400 Ninja400R main This is not really a critical issue unless you are building a track only or race bike.  The Ninja 400 ergonomics leave a lot to be desired for track use and racing.  The standard body shape has a very high and wide front/side fairing which doesn’t allow much clipon adjustment without major bodywork modifications, even with aftermarket clipons and steering stops.  The gauge cluster is mounted to a piece of the bodywork, so it’s a pain in the butt to remove with some bodywork and often times an aftermarket fairing stay is used to re-mount the gauges.  The coolant reservoir and voltage regulator are mounted to the upper fairing stay, so these are commonly moved inside the frame with aftermarket options.  The tail section also has a very steep hump that forces the rider forward and close to the handlebars.  This position is downright awkward for track use and racing.  These ergonomics are worse on the Ninja 400 than other similar bikes, so we decided to build an entirely new bodywork kit for the Ninja 400 based on a Moto2 bike to take full advantage of the awesome little engine and chassis package Kawasaki gave us.

So before you invest in race bodywork, be sure to take a look at our Norton GP Spec race bodywork for the Ninja 400.  You will not regret it.  It does requires the purchase of a few additional parts to properly mount up the first time, but it’s much easier to go on and off the bike than standard bodywork, and the reality is that most people are replacing these parts anyway for other race bodywork, so it’s not really much different and it’s a far better track package with the GP bodywork.  Plus the engine cools better.  Win – Win.

Norton Motorsports GP Spec Race Bodywork – Kawasaki Ninja 400 2018-

Ninja 400 Stock Body Vs Norton GP Spec Moto2 Ninja 400 Stock Body Vs Norton GP Spec Moto2 Front

  • Tweet

About Norton Racing

What you can read next

How to remove the OEM bodywork of the Kawasaki Ninja 400
How to remove the front fender and rear fender of the Kawasaki Ninja 400
How to remove the gas tank on the Kawasaki Ninja 400

You must be logged in to post a comment.

Search All Posts

Post Category:

Kawasaki Ninja 400 / Z400
  • ** Kawasaki Ninja 400 / Z400 Critical Issues
  • *** Top 5 Kawasaki Ninja 400 / Z400 Mods and Upgrades
  • Do you need a Power Commander for full exhaust on the Kawasaki Ninja 400?
  • How to install an R6 throttle tube in the Kawasaki Ninja 400 / Z400
  • How to remove the front fender and rear fender of the Kawasaki Ninja 400
  • How to remove the gas tank on the Kawasaki Ninja 400
  • How to remove the OEM bodywork of the Kawasaki Ninja 400
  • Kawasaki Ninja 400 / Z400 Clutch Slipping, Poor Shifting, False Neutrals, and Dropping Gears – Explained and Fixed!
  • Kawasaki Ninja 400 Exhaust Dyno Shootout!
  • Ninja 400 Electronics and GP Bodywork Test
  • Suspension Spring Rate Chart for Kawasaki Ninja 400 / Z400
  • What’s up with the Kawasaki Ninja 400 / Z400 brakes?

Contact Information

Email: sales@norton-motorsports.com
Telephone: (858) 842-4595

Address

Norton Motorsports
San Diego, CA

Contact us for address before sending anything.

Thank you.

© Copyright Norton Motorsports. All rights reserved.

TOP