SIGN IN YOUR ACCOUNT TO HAVE ACCESS TO DIFFERENT FEATURES

FORGOT YOUR PASSWORD?

FORGOT YOUR DETAILS?

AAH, WAIT, I REMEMBER NOW!
(858) 842-4595
  • Policies
  • My Account
  • LOGIN

Norton Motorsports

  • Shop by Bike
    • Aprilia
      • Tuono 660 2021+
      • RS 660 2021+
      • Close
    • KTM
      • RC390 / Duke 390
      • Close
    • Kawasaki
      • Ninja 250 / 300
      • Ninja 400 2018+
      • Ninja ZX-4RR 2023+
      • Z400 2019+
      • Kawasaki Ninja 500 2024+
      • Close
    • Ohvale
      • GP-0
      • GP-2
      • Close
    • Yamaha
      • MT-03 2020+
      • MT-07 / FZ-07 2015-2017
      • MT-07 2018-2020
      • MT-07 2021+
      • R3 2015-2018
      • R3 2019+
      • R7 2021+
      • Close
    • Suzuki
      • Suzuki GSX-8R
      • Close

    • View All
    • Close
  • Norton Built Motorcycles
    • Norton Racing Hotbodies GP Spec Race Bodywork Kit - Kawasaki Ninja 400 Z400 Ninja400R main Norton Motorsports GP Spec Kawasaki Ninja400R
    • 2019-04-28 18_00_05-2018 Ninja 400 Race Motorcycle from Ninja400R.com Norton Motorsports Kawasaki Ninja400R
    • 2019 yamaha yzf-r3 race bodywork Hotbodies Racing Norton Motorsports Norton Motorsports Race Spec Yamaha R3
    • IMG 2548 Edit Norton Motorsports Kawasaki Ninja ZX4RR Race Motorcycle
    • Close
  • Apparel, Gear, & Tools
    • Apparel
    • Riding Gear
    • Tools
    • Close
  • MY CART
    No products in cart.
  • Bike Build Write-ups
    • Aprilia RS 660 2021-
      • Close
    • Kawasaki Ninja 400 2018- / Z400 2019-
      • Important ** Kawasaki Ninja 400 / Z400 Critical Issues
      • Top5 *** Top 5 Kawasaki Ninja 400 / Z400 Mods and Upgrades
      • Do you need a fuel controller with full exhaust ninja 400 Do you need a Power Commander for full exhaust on the Kawasaki Ninja 400?
      • featured image How to install an R6 throttle tube in the Kawasaki Ninja 400 / Z400
      • 49899087_301487663905591_4918556926305894400_n How to remove the front fender and rear fender of the Kawasaki Ninja 400
      • 2019-02-07 10_57_46-Clipboard How to remove the gas tank on the Kawasaki Ninja 400
      • IMG_4330_2 How to remove the OEM bodywork of the Kawasaki Ninja 400
      • open clutch Kawasaki Ninja 400 / Z400 (Ninja 500 / Z500) Clutch Slipping, Poor Shifting, False Neutrals, and Dropping Gears – Explained and Fixed!
      • Kawasaki Ninja 400 dyno horsepower Kawasaki Ninja 400 Exhaust Dyno Shootout!
      • CVR_3132_Sep1519_CaliPhoto Ninja 400 Electronics and GP Bodywork Test
      • Traxxion Dynamics Omni Fork Spring Kit Yamaha R3 2015-2018 Suspension Spring Rate Chart for Kawasaki Ninja 400 / Z400
      • Braketech Vs Galfer Rotor Brake Test Rocco Landers What’s up with the Kawasaki Ninja 400 / Z400 brakes?
      • Close
    • Ohvale GP-0 / GP-2
      • Important ** Ohvale GP-0 / GP-2 Critical Issues
      • OV001 Ohvale 190 5 Speed Shift Star Cap Ohvale 190 False Neutral and Miss Shift Problems – FIXED!
      • Close
    • Yamaha R3 2015-2018
      • Important ** Yamaha R3 / MT-03 Critical IssuesJanuary 24, 2021
      • Top5 *** Top 5 Yamaha R3 / MT-03 Mods and UpgradesJanuary 24, 2021
      • Yamaha R3 Annitori Quickshifter QS Pro Annitori Quickshifter QS Pro installed and beta tested on Yamaha R3June 24, 2015
      • Yamaha R3 415 chain kit horsepower Dyno tested: 520 vs. 415 chain and sprockets – Yamaha R3February 14, 2016
      • IMG_3869 How to bleed the brakes or flush the brake fluid on the Yamaha R3 / MT-03September 7, 2015
      • IMG_3896 How to change the front brake pads on the Yamaha R3 / MT-03September 11, 2015
      • R3GPShift How to change the Yamaha R3 / MT-03 to GP ShiftSeptember 7, 2015
      • DSCN2608_zpsqza81eb3 How to do an oil and filter change on the Yamaha R3 / MT-03August 16, 2015
      • IMG_3857 How to get more dash clearance for your clipons and brake line – Yamaha R3August 28, 2015
      • IMG_3630 How to install a BMC Race Air Filter in the Yamaha R3 / MT-03August 8, 2015
      • IMG_3846 How to install a stainless steel braided front brake line on the Yamaha R3 / MT-03September 7, 2015
      • img_6102 How to install a Yoyodyne slipper clutch in the Yamaha R3 / MT-03December 10, 2016
      • topdown vortex clipons How to install aftermarket clipons on the Yamaha R3 / MT-03March 26, 2016
      • IMG_4189 How to Install Hotbodies Race Bodywork on the Yamaha R3May 7, 2016
      • IMG_3965 How to install the Traxxion Dynamics Fork Damper Rod kit with Cartridge Emulators in the Yamaha R3 2015-2018January 16, 2016
      • IMG_4511 featured How to remove the emissions systems and install a block off plate on the Yamaha R3 / MT-03August 16, 2015
      • DSCN2484_zpsuqljyccu How to remove the front wheel from the Yamaha R3 / MT-03August 2, 2015
      • How to remove the fuel tank from the yamaha R3 How to remove the gas tank from the Yamaha R3April 23, 2015
      • IMG_3927 How to remove the kickstand from the Yamaha R3May 7, 2016
      • DSCN2189_zpsg2hs8ooe How to remove the rear wheel from the Yamaha R3 / MT-03August 2, 2015
      • Remove Side Fairings Yamaha R3 How to remove the side fairings from the Yamaha R3May 23, 2015
      • IMG_0167 How to remove the tail and taillight of the Yamaha R3April 21, 2015
      • how to remove the windscreen yamaha r3 How to remove the windscreen and upper fairing from the Yamaha R3May 4, 2015
      • IMG_3985 How to replace the fork seals on the Yamaha R3January 16, 2016
      • IMG_3719 Installed: Hotbodies Color Form Race Bodywork – Yamaha R3 2015-2018August 26, 2015
      • Yamaha R3 Modified rear brake rotor, lightened machined rotor Lightweight Rear Brake Rotor for Yamaha R3October 1, 2015
      • IMG_4463 Paint is done, heading to 5zero4 Designs next weekend to install the graphicsDecember 14, 2015
      • Traxxion Dynamics Omni Fork Spring Kit Yamaha R3 2015-2018 Suspension Spring Rate Chart for Yamaha R3 / MT-03January 24, 2021
      • Yamaha R3 Woodcraft 1.5 rise clipons What are the best clipons for the Yamaha R3?March 24, 2016
      • yamahaR3_raceconcept_rearsets_gold_fitR1 What are the best rearsets for the Yamaha R3?March 26, 2016
      • Yamaha R3 Exhaust Test Superbike Dyno horsepower Norton Motorsports Yamaha R3 / MT03 Exhaust Dyno Test and Superbike BuildJune 6, 2019
      • 2015 yamaha r3 exhaust header muffler weight Yamaha R3 OEM exhaust weight, headers, muffler, slip-on, heat shieldJuly 3, 2015
      • Close
    • Close
  • Dyno Testing
    • Aprilia RS660 Dyno Testing
      • Close
    • Kawasaki Ninja 400 / Z400
      • Kawasaki Ninja 400 dyno horsepower Kawasaki Ninja 400 Exhaust Dyno Shootout!September 2, 2019
      • Do you need a fuel controller with full exhaust ninja 400 Do you need a Power Commander for full exhaust on the Kawasaki Ninja 400?September 2, 2019
      • Close
    • Yamaha R3 / MT-03
      • Yamaha R3 415 chain kit horsepower Dyno tested: 520 vs. 415 chain and sprockets – Yamaha R3February 14, 2016
      • Yamaha R3 Exhaust Test Superbike Dyno horsepower Norton Motorsports Yamaha R3 / MT03 Exhaust Dyno Test and Superbike BuildJune 6, 2019
      • Close
    • Yamaha R7 / MT-07
      • Close
    • Close
  • Other Cool Stuff
    • Power Commander vs Bazzaz vs ECU Flash vs aRacer Race ECU Power Commander vs. Bazzaz vs. ECU Flash vs. aRacer Race ECU
    • Woodcraft Toe Guard Yamaha R3 Woodcraft Shark Fin Toe Guard Modification Yamaha R3 / Kawasaki Ninja 400
    • Track_Day_TTD_2015_Thompson_8-24-15-2195-sm-300×200 5 Reasons Why Roadracers Give Up Street Riding
    • modified rear brake rotor rev a Reducing weight on a race bike and the different types of weight
    • video thumb Tire Shootout for Small Sport Bikes by Ari Henning
    • IMG_5091 Race Bike Designs, Graphics, and Paint Jobs
    • thumb Kawasaki Ninja 300 vs. KTM RC390 – Video Review
    • Close
  • Press Release
  • Race / Ride Reports
  • Race Team

Ninja 400 Electronics and GP Bodywork Test

by Norton Racing / 2019, September 19 / Published in Kawasaki Ninja 400 / Z400
[av_textblock size=” font_color=” color=” av-medium-font-size=” av-small-font-size=” av-mini-font-size=” av_uid=’av-k1faub81′ admin_preview_bg=”]

Ninja 400 Electronics and GP Bodywork Testing at Chuckwalla Raceway

I was out at Chuckwalla this weekend of September 14-15th with Jeremy Toye and a couple friends to do some testing and turn some laps to start getting in shape for the CVMA season, which starts in a couple weeks. It’s been an incredibly busy year and I apologize for not posting much riding and testing stuff this past year. I’ll be catching up on articles and info for you all as I get time this fall.
[/av_textblock] [av_textblock size=” font_color=” color=” av-medium-font-size=” av-small-font-size=” av-mini-font-size=” av_uid=’av-k1fa743p’ admin_preview_bg=”]

I had a few cool things to test out this weekend. First up was two different stand-alone quickshifters for the Ninja 400, the Annitori and the IRC, both of which we sell at Norton Motorsports. Next I would be testing a first revision of my ECU flash built to pair with our Ninja400R Velocity Stacks. I always test any tuning systems on the dyno and on the track before releasing them to customers. I also brought my aRacer RC2 Super ECU and autotuner to test and use as a reference to compare our ECU flash. This system is so awesome, just a step above anything else on the market right now for these Ultra Lightweight bikes. And finally, the thing I’m most excited about, our GP bodywork for the Ninja 400. The Ninja has an amazing engine and great chassis, but I personally can’t stand the bodywork and ergonomics. So I’m on a mission to build a new set of bodywork and ergonomics package for the bike. The whole time I would also be testing the Dunlop MotoAmerica spec slick tires compared to the other options I’d used on the R3 and my current Bridgestone setup. I haven’t really had much time on the Dunlops yet, so this would be a good time to get some back to back time between the two setups.

I actually wasn’t planning on testing the bodywork this weekend, but I was able to just barely get it roughly mounted up, so what the hell, why not. Here I am installing the windscreen super last minute in the morning before riding.

I also needed to deliver a Yamaha R3 superbike to one of my friends and customers, Trisin Harris, for his first ride and put some laps on my own R3 superbike to dial in my new Penske shock. Tristin and our friend Alex getting ready, also last minute, of course!
Also got to see a few of our Norton Motorsports team riders, Ana Mata and Matt Cavarlez, along with Matt’s wife Sofia.
Norton Motorsports rider Ana Mata
Norton Motorsports rider Matt Cavarlez
Matt’s awesome wife, Sofia Amadio, also riding a Norton Motorsports bike tuned with aRacer Mini5 ECU
Everyone trying to tough out the heat and get some good laps in before the CVMA race season starts in 2 weeks. And it was HOT! How hot? Here…
At least it “feels like 102” LOL.

Quickshifter Testing!

Okay, let’s get to the nitty gritty. First up I’ll talk about quickshifters. I installed the IRC Quickshifter before arriving at the track.
Ninja 400 2018-19 IRC Components Quick Shifters
Pretty simple installation. Plug and play at the coils and only a single ground wire to connect to the battery. Installed the shift switch with a 3” stainless steel male/male shift rod, which worked well with my Sato Racing Race Concept Rearsets. Default settings on the unit are for Standard Shift, so I followed the instructions while I had the bike apart to switch the unit to GP shift and I left the rest of the settings alone. The IRC’s big selling point is it’s “Plug and Play” installation with automatic kill time settings. I have to say, the unit works as described. Shifts were smooth with default automatic settings and the quickshifter performed flawlessly. The bike even makes a sweet sound with each shift as the quickshifter does it’s job. I rode the bike for 2 sessions with the IRC quickshifter and then when back in the pits, pulled the bike apart to remove the IRC and install the Annitori Quickshifter.
Annitori Quickshifter for Yamaha R3
I’ve used the Annitori shifters a lot with the Yamaha R3 and they have always worked well and been easy to use and the company is great with excellent customer support.  Installation was basically the same as the IRC.  Plug and Play at the ignition coils and a single power and ground wire to the battery.  Shift switch is roughly the same size and I used the same 3” SS shift rod with my Sato rearsets.  The Annitori also must be programmed before use because it comes with both GP and Standard shift enabled and you must disable the one you don’t want or you’ll have ignition kills in both directions.  I disabled standard shift and left the rest of the default settings to test it out. I went out on track and started turning laps.  The Annitori shifts made the same awesome sound with the bike as the IRC, so that must just be a function of the bike.  Honestly, the shifting felt identical to the IRC.  Both units performed as expected with smooth shifts as long as you were hard on the gas and relatively high in the RPM range, where you’d normally be shifting anyway. The main difference between the two units is with programming the settings. The Annitori programming is done via Bluetooth using a smart phone and the IRC must be programmed with buttons on the control box. Both options have their advantages and disadvantages. If you don’t have a smart phone handy, you can’t program the Annitori at all. But, if you have a smart phone, you can make adjustments to the Annitori without taking anything apart on the bike since it connects wirelessly via Bluetooth. The IRC must be programmed on the box, so it’s best to program it once when installing it and hopefully not have to make any changes or you’ll have to take the bike apart again to get to the box. This won’t be a big deal if it’s installed under the seat. The Annitori is also a little less expensive than the IRC, which may be the biggest factor.

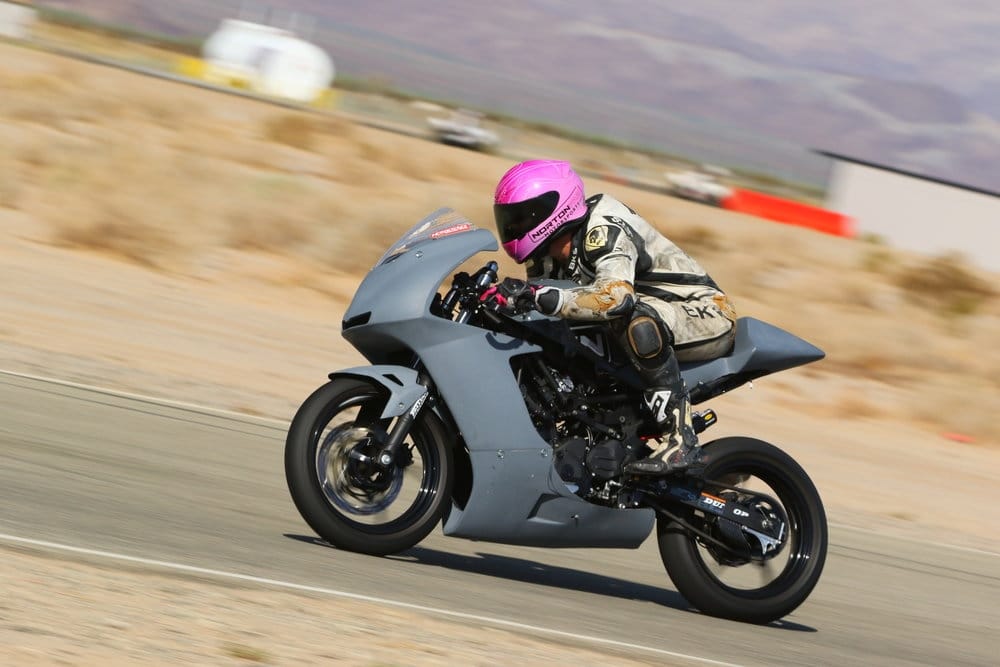
Ninja 400 GP Bodywork, am I crazy or is this awesome???

Okay, now let’s talk about the new GP Bodywork I’m working on for the Kawasaki Ninja 400. Here’s some shots of the prototype bodywork fit up on the bike. (There will be full side panels, I just didn’t get them done and mounted up yet)
While riding the Ninja to test quickshifters, I got to ride the new GP bodywork and OH MAN!!! This is the HOTNESS! I absolutely love the riding position with this bodywork. The seat base is higher and farther back than the OEM seat, with more room to slide backward and tuck in and the higher seat gives my legs room so I’m not so squished with the rearsets up high enough to get good ground clearance. The GP upper has miles of clearance for clipons so just because I could, I dropped the clipons about 4 inches from where they were with the standard Ninja 400 bodywork. Lowering the clipons this much pulled my upper body down so I was nearly hugging the gas tank while riding and my legs and body were perfectly positioned to grip the bike while turning and tuck in while driving down the straight. I couldn’t believe how comfortable the bike felt. It just felt natural, with small movements to get from side to side, tucked in, turning, everything was closer together and closer to the bike. It literally felt like a GP bike. I was so thrilled. I had a huge grin on my face the whole time while riding. (Don’t mind the pink helmet. My R3 had pink bodywork before updating to the new 2019 bodywork and I haven’t had a chance to repaint the helmet…)
At least I had a huge smile on my face until I noticed that the bike was overheating and I had to roll out and come in early. Looking at the bike more closely, and especially looking back at the photos, it’s pretty easy to see why the bike was running hot. The combination of bodywork tight to the forks and low in the front, with the stock Ninja 400 fender which is large and pushes air up, was severly restricting the amount of air that could reach the radiator, which is also mounted lower in the 400’s frame than other bikes. if you look from the front of the bike, you can barely even see the radiator. That’s not going to work. I’ll look closer at this when I get home, but the solution will probably involve a lower profile fender and raising the upper slightly, along with possibly an addition to the upper to help direct air down to the radiator as it comes over the fender. We’ll see what I come up with. I’d like to avoid having to flare the sides of the upper out to bring air in from the sides. While riding and testing quickshifters, I was also paying attention to the tuning in the ECU and making mental notes. The bike pulled amazing everywhere once the throttle was open. But I made some mental notes about off throttle, neutral throttle, and transition areas I wanted to fine tune a little more. These areas are tough to tune on a dyno without riding the bike. You really have to ride it to take note of where you are in throttle position and RPM in various places and actually feel the transitions and deceleration to fine tune based on real world conditions and how the bike is actually ridden. Got some great data to make this flash better before releasing it on the website. Just to be sure it was the bodywork causing the overheating, we pulled the upper and turned some laps without it. This confirmed that the bike ran fine without it, so it was just an air flow problem, not a tuning problem. And here’s the legendary Jeremy Toye rolling back in after session turning laps on this awesome little bike without bodywork. Spending most of his career on superbikes and not entry level sport bikes like the Ninja 400, he also really appreciated the GP-like riding position of the new bodywork.
Jeremy also jumped on my R3 to turn a few laps since he’s never ridden an R3 before. With 4+ years of development in my R3 before partnering up with Jeremy, I was hoping it would meet his high expectations for handling and geometry. Though I was pretty confident he would like it, since I had done some testing months before with our MotoAmerica Junior Cup champion Rocco Landers and fine tuned the bike for that last 5% of performance at the highest level. If Rocco liked it, Jeremy should too. Jeremy rode my R3 for maybe 6-7 laps before coming back in. “This thing is a lot of fun.” he said, with an ever so slight Jeremy smile. Good enough for me. The bike was pretty well dialed, and It was definitely a pat on the back to hear that Jeremy liked it as well. It’s a good exercise to ride both bikes back to back and be able to feel the little differences in handling, geometry, and tires. I don’t have too much to say about the tire setups yet. I’ll wait to get fully back up to speed on both bikes again and save my tire review for one of the next articles.

aRacer Super RC2 w/ Autotuning

With some solid mental notes on the ECU flash, I swapped the ECU for my aRacer RC2 Super and switched on the autotuner for some laps with the aRacer to compare it to my ECU flash.
The map I loaded as a base map was built for the stock airbox and nowhere close on fueling for the Ninja 400 with velocity stacks installed. I have to emphasize just how awesome the aRacer autotuner works. I typically don’t like autotuners and have not been shy about telling people to be careful trusting tuning data from piggyback style autotuners from Bazzaz, Power Commander, and Rapidbike if not used on a dyno. But the aRacer’s autotuner works based on MAP pressure rather than TPS and the aRacer’s ECU is a much faster, more powerful computer than any of these other systems. The data it collects and changes it makes are much more accurate than any other systems I’ve worked with. You can see it clear as day when you run it on the dyno, it produces much smoother AFR lines in less time than other systems. And I’ve run it on track with my R3 and verified the results on the dyno and it’s amazing. When enabled, you can feel just how quickly the tuning works as you ride it. I could feel the map very rough as I rolled out on track and it completely smoothed out everywhere within just 2-3 laps. It’s the only autotuning system I trust to setup and run on track and just leave the data the way it tunes it. Very cool system. That’s about it for this weekend. Another awesome weekend at the track. Back in 2 weeks for CVMA Round 1! [/av_textblock] [av_textblock size=” font_color=” color=” av-desktop-hide=” av-medium-hide=” av-small-hide=” av-mini-hide=” av-medium-font-size=” av-small-font-size=” av-mini-font-size=” av_uid=’av-4u19a8′] Click here to add your own text [/av_textblock] [av_textblock size=” font_color=” color=” av-desktop-hide=” av-medium-hide=” av-small-hide=” av-mini-hide=” av-medium-font-size=” av-small-font-size=” av-mini-font-size=” av_uid=’av-wmohpc’] Click here to add your own text [/av_textblock]
  • Tweet

About Norton Racing

What you can read next

How to remove the OEM bodywork of the Kawasaki Ninja 400
How to remove the front fender and rear fender of the Kawasaki Ninja 400
How to remove the gas tank on the Kawasaki Ninja 400

2 Comments to “ Ninja 400 Electronics and GP Bodywork Test”

  1. Ryan says : Log in to Reply
    March 19, 2022 at 7:12 AM

    The Annitori can do both up and down QS on the 400?

    1. Jesse Norton says : Log in to Reply
      March 21, 2022 at 9:55 AM

      The Ninja 400 doesn’t have a ride by wire throttle body, so down QS with autoblib is not possible unless you add a solenoid to blip the throttle. The Annitori can be programmed to do upshift in GP or Standard shift configuration.

You must be logged in to post a comment.

Search All Posts

Post Category:

Kawasaki Ninja 400 / Z400
  • ** Kawasaki Ninja 400 / Z400 Critical Issues
  • *** Top 5 Kawasaki Ninja 400 / Z400 Mods and Upgrades
  • Do you need a Power Commander for full exhaust on the Kawasaki Ninja 400?
  • How to install an R6 throttle tube in the Kawasaki Ninja 400 / Z400
  • How to remove the front fender and rear fender of the Kawasaki Ninja 400
  • How to remove the gas tank on the Kawasaki Ninja 400
  • How to remove the OEM bodywork of the Kawasaki Ninja 400
  • Kawasaki Ninja 400 / Z400 (Ninja 500 / Z500) Clutch Slipping, Poor Shifting, False Neutrals, and Dropping Gears – Explained and Fixed!
  • Kawasaki Ninja 400 Exhaust Dyno Shootout!
  • Ninja 400 Electronics and GP Bodywork Test
  • Suspension Spring Rate Chart for Kawasaki Ninja 400 / Z400
  • What’s up with the Kawasaki Ninja 400 / Z400 brakes?

Contact Information

Email: sales@norton-motorsports.com
Telephone: (858) 842-4595

Address

Norton Motorsports
San Diego, CA

Contact us for address before sending anything.

Thank you.

© Copyright Norton Motorsports. All rights reserved.

TOP