SIGN IN YOUR ACCOUNT TO HAVE ACCESS TO DIFFERENT FEATURES

FORGOT YOUR PASSWORD?

FORGOT YOUR DETAILS?

AAH, WAIT, I REMEMBER NOW!
(858) 842-4595
  • Policies
  • My Account
  • LOGIN

Norton Motorsports

  • Shop by Bike
    • Aprilia
      • Tuono 660 2021+
      • RS 660 2021+
      • Close
    • KTM
      • RC390 / Duke 390
      • Close
    • Kawasaki
      • Ninja 250 / 300
      • Ninja 400 2018+
      • Z400 2019+
      • Close
    • Ohvale
      • GP-0
      • GP-2
      • Close
    • Yamaha
      • MT-03 2020+
      • MT-07 / FZ-07 2015-2017
      • MT-07 2018-2020
      • MT-07 2021+
      • R3 2015-2018
      • R3 2019+
      • R7 2021+
      • Close

    • View All
    • Close
  • Norton Built Motorcycles
    • Norton Racing Hotbodies GP Spec Race Bodywork Kit - Kawasaki Ninja 400 Z400 Ninja400R main Norton Motorsports GP Spec Kawasaki Ninja400R
    • 2019-04-28 18_00_05-2018 Ninja 400 Race Motorcycle from Ninja400R.com Norton Motorsports Kawasaki Ninja400R
    • 2019 yamaha yzf-r3 race bodywork Hotbodies Racing Norton Motorsports Norton Motorsports Race Spec Yamaha R3
    • Close
  • Apparel, Gear, & Tools
    • Apparel
    • Riding Gear
    • Tools
    • Close
  • MY CART
    No products in cart.
  • Bike Build Write-ups
    • Aprilia RS 660 2021-
      • Close
    • Kawasaki Ninja 400 2018- / Z400 2019-
      • Important ** Kawasaki Ninja 400 / Z400 Critical Issues
      • Top5 *** Top 5 Kawasaki Ninja 400 / Z400 Mods and Upgrades
      • Do you need a fuel controller with full exhaust ninja 400 Do you need a Power Commander for full exhaust on the Kawasaki Ninja 400?
      • featured image How to install an R6 throttle tube in the Kawasaki Ninja 400 / Z400
      • 49899087_301487663905591_4918556926305894400_n How to remove the front fender and rear fender of the Kawasaki Ninja 400
      • 2019-02-07 10_57_46-Clipboard How to remove the gas tank on the Kawasaki Ninja 400
      • IMG_4330_2 How to remove the OEM bodywork of the Kawasaki Ninja 400
      • open clutch Kawasaki Ninja 400 / Z400 Clutch Slipping, Poor Shifting, False Neutrals, and Dropping Gears – Explained and Fixed!
      • Kawasaki Ninja 400 dyno horsepower Kawasaki Ninja 400 Exhaust Dyno Shootout!
      • CVR_3132_Sep1519_CaliPhoto Ninja 400 Electronics and GP Bodywork Test
      • Traxxion Dynamics Omni Fork Spring Kit Yamaha R3 2015-2018 Suspension Spring Rate Chart for Kawasaki Ninja 400 / Z400
      • Braketech Vs Galfer Rotor Brake Test Rocco Landers What’s up with the Kawasaki Ninja 400 / Z400 brakes?
      • Close
    • Ohvale GP-0 / GP-2
      • Important ** Ohvale GP-0 / GP-2 Critical Issues
      • OV001 Ohvale 190 5 Speed Shift Star Cap Ohvale 190 False Neutral and Miss Shift Problems – FIXED!
      • Close
    • Yamaha R3 2015-2018
      • Important ** Yamaha R3 / MT-03 Critical IssuesJanuary 24, 2021
      • Top5 *** Top 5 Yamaha R3 / MT-03 Mods and UpgradesJanuary 24, 2021
      • Yamaha R3 Annitori Quickshifter QS Pro Annitori Quickshifter QS Pro installed and beta tested on Yamaha R3June 24, 2015
      • Yamaha R3 415 chain kit horsepower Dyno tested: 520 vs. 415 chain and sprockets – Yamaha R3February 14, 2016
      • IMG_3869 How to bleed the brakes or flush the brake fluid on the Yamaha R3 / MT-03September 7, 2015
      • IMG_3896 How to change the front brake pads on the Yamaha R3 / MT-03September 11, 2015
      • R3GPShift How to change the Yamaha R3 / MT-03 to GP ShiftSeptember 7, 2015
      • DSCN2608_zpsqza81eb3 How to do an oil and filter change on the Yamaha R3 / MT-03August 16, 2015
      • IMG_3857 How to get more dash clearance for your clipons and brake line – Yamaha R3August 28, 2015
      • IMG_3630 How to install a BMC Race Air Filter in the Yamaha R3 / MT-03August 8, 2015
      • IMG_3846 How to install a stainless steel braided front brake line on the Yamaha R3 / MT-03September 7, 2015
      • img_6102 How to install a Yoyodyne slipper clutch in the Yamaha R3 / MT-03December 10, 2016
      • topdown vortex clipons How to install aftermarket clipons on the Yamaha R3 / MT-03March 26, 2016
      • IMG_4189 How to Install Hotbodies Race Bodywork on the Yamaha R3May 7, 2016
      • IMG_3965 How to install the Traxxion Dynamics Fork Damper Rod kit with Cartridge Emulators in the Yamaha R3 2015-2018January 16, 2016
      • IMG_4511 featured How to remove the emissions systems and install a block off plate on the Yamaha R3 / MT-03August 16, 2015
      • DSCN2484_zpsuqljyccu How to remove the front wheel from the Yamaha R3 / MT-03August 2, 2015
      • How to remove the fuel tank from the yamaha R3 How to remove the gas tank from the Yamaha R3April 23, 2015
      • IMG_3927 How to remove the kickstand from the Yamaha R3May 7, 2016
      • DSCN2189_zpsg2hs8ooe How to remove the rear wheel from the Yamaha R3 / MT-03August 2, 2015
      • Remove Side Fairings Yamaha R3 How to remove the side fairings from the Yamaha R3May 23, 2015
      • IMG_0167 How to remove the tail and taillight of the Yamaha R3April 21, 2015
      • how to remove the windscreen yamaha r3 How to remove the windscreen and upper fairing from the Yamaha R3May 4, 2015
      • IMG_3985 How to replace the fork seals on the Yamaha R3January 16, 2016
      • IMG_3719 Installed: Hotbodies Color Form Race Bodywork – Yamaha R3 2015-2018August 26, 2015
      • Yamaha R3 Modified rear brake rotor, lightened machined rotor Lightweight Rear Brake Rotor for Yamaha R3October 1, 2015
      • IMG_4463 Paint is done, heading to 5zero4 Designs next weekend to install the graphicsDecember 14, 2015
      • Traxxion Dynamics Omni Fork Spring Kit Yamaha R3 2015-2018 Suspension Spring Rate Chart for Yamaha R3 / MT-03January 24, 2021
      • Yamaha R3 Woodcraft 1.5 rise clipons What are the best clipons for the Yamaha R3?March 24, 2016
      • yamahaR3_raceconcept_rearsets_gold_fitR1 What are the best rearsets for the Yamaha R3?March 26, 2016
      • Yamaha R3 Exhaust Test Superbike Dyno horsepower Norton Motorsports Yamaha R3 / MT03 Exhaust Dyno Test and Superbike BuildJune 6, 2019
      • 2015 yamaha r3 exhaust header muffler weight Yamaha R3 OEM exhaust weight, headers, muffler, slip-on, heat shieldJuly 3, 2015
      • Close
    • Close
  • Dyno Testing
    • Aprilia RS660 Dyno Testing
      • Close
    • Kawasaki Ninja 400 / Z400
      • Do you need a fuel controller with full exhaust ninja 400 Do you need a Power Commander for full exhaust on the Kawasaki Ninja 400?September 2, 2019
      • Kawasaki Ninja 400 dyno horsepower Kawasaki Ninja 400 Exhaust Dyno Shootout!September 2, 2019
      • Close
    • Yamaha R3 / MT-03
      • Yamaha R3 415 chain kit horsepower Dyno tested: 520 vs. 415 chain and sprockets – Yamaha R3February 14, 2016
      • Yamaha R3 Exhaust Test Superbike Dyno horsepower Norton Motorsports Yamaha R3 / MT03 Exhaust Dyno Test and Superbike BuildJune 6, 2019
      • Close
    • Yamaha R7 / MT-07
      • Close
    • Close
  • Other Cool Stuff
    • Power Commander vs Bazzaz vs ECU Flash vs aRacer Race ECU Power Commander vs. Bazzaz vs. ECU Flash vs. aRacer Race ECU
    • Woodcraft Toe Guard Yamaha R3 Woodcraft Shark Fin Toe Guard Modification Yamaha R3 / Kawasaki Ninja 400
    • Track_Day_TTD_2015_Thompson_8-24-15-2195-sm-300×200 5 Reasons Why Roadracers Give Up Street Riding
    • modified rear brake rotor rev a Reducing weight on a race bike and the different types of weight
    • video thumb Tire Shootout for Small Sport Bikes by Ari Henning
    • IMG_5091 Race Bike Designs, Graphics, and Paint Jobs
    • thumb Kawasaki Ninja 300 vs. KTM RC390 – Video Review
    • Close
  • Press Release
  • Race / Ride Reports
  • Race Team

How to remove the kickstand from the Yamaha R3

by Norton Racing / 2016, May 07 / Published in Yamaha R3 / MT-03

This post will cover how to remove the kick stand from the Yamaha R3 for race use and bypass the kickstand safety switch.  The kickstand bracket includes the lower fairing mount.  My race bodywork quick-release mounting kit includes a lightweight replacement bracket for the lower fairing as well as spacer washers for the motor mount bolt, which is too long once you remove the thick steel kickstand bracket.

Yamaha R3 Race Bodywork Mounting Quick Release Kit Hotbodies

Another little perk is that the kickstand and OEM bracket are heavy, removing it drops almost 3 lbs off the bike.

IMG_3675 IMG_3925

Hopefully I don’t need to say this, but put the bike on a rear stand before removing the kickstand.  Do not try to remove the kickstand while the bike is resting on the kickstand.  🙂

First, disconnect the kickstand switch.  The connector is located in the clear rubber bundle behind the coolant overflow reservoir above the shifter on the left side of the bike.  You will need to remove the left side fairings, which hopefully you already have removed to install race bodywork, and also remove the front sprocket cover and coolant overflow reservoir.  You can leave the reservoir hoses attached and just leave the reservoir dangling out of the way.

IMG_3673 IMG_3674


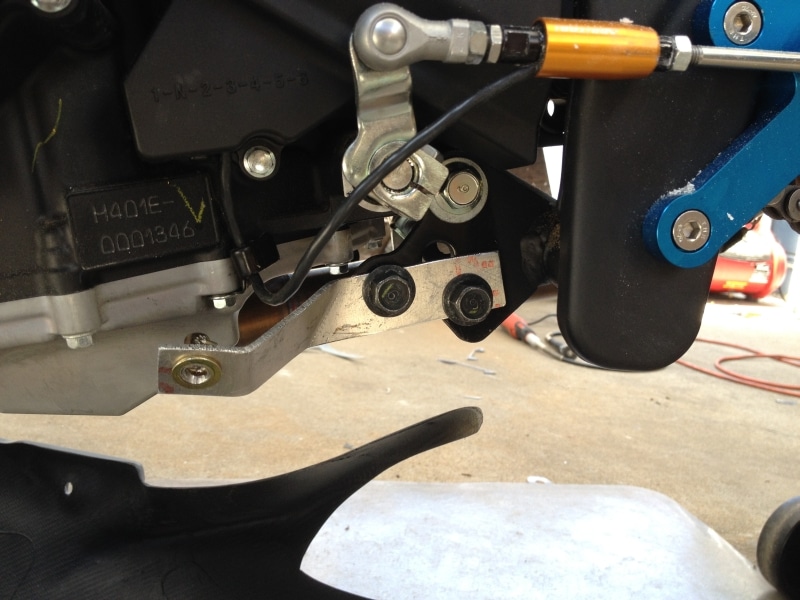
Unbolt the two kickstand mounting bolts and remove the long silver motor mount bolt.

IMG_3672


The kickstand is now free to be removed from the bike, just pull the cable free and cut any zip ties holding it in place.  However, the bike will not run until you bypass the kickstand safety switch because the bike thinks the kickstand is down permanently.

To bypass the safety switch, you must close the switch circuit.  You can do these any number of ways, but I like to leave the bike side of the wiring in tact, so I chose to cut the connector off of the wire coming off of the kickstand switch.  Leave about 2″ of wire on the connector.  Strip these two wires back, and crimp or solder them together.

IMG_3676 IMG_3677 IMG_3678


Then plug this connector back into the bike to close the circuit and bypass the switch.  Then close up the clear rubber bundle and zip tie it back together.

IMG_3679 IMG_3680 IMG_3681


Zip tie the wires back together near the front sprocket so everything is tidy and nothing is going to rub on the chain or sprocket, then reinstall the coolant overflow reservoir and front sprocket cover.

IMG_3682


Add the two spacer washers from the hardware mounting kit to the long silver motor mount bolt, one washer on each side of the motor, and reinstall the motor mount bolt.  Torque this bolt to 49 ft lbs (68 Nm).

IMG_3684


Attach the lightweight aluminum lower fairing bracket using the OEM kickstand bracket bolts.  Then you can attach the lower fairing to the new aluminum bracket.

IMG_3927 IMG_3928


That’s it, all done!


  • Tweet

About Norton Racing

What you can read next

How to remove the tail and taillight of the Yamaha R3
How to remove the fuel tank from the yamaha R3
How to remove the gas tank from the Yamaha R3
how to remove the windscreen yamaha r3
How to remove the windscreen and upper fairing from the Yamaha R3

You must be logged in to post a comment.

Search All Posts

Post Category:

Yamaha R3 / MT-03
  • ** Yamaha R3 / MT-03 Critical Issues
  • *** Top 5 Yamaha R3 / MT-03 Mods and Upgrades
  • Annitori Quickshifter QS Pro installed and beta tested on Yamaha R3
  • Dyno tested: 520 vs. 415 chain and sprockets – Yamaha R3
  • How to bleed the brakes or flush the brake fluid on the Yamaha R3 / MT-03
  • How to change the front brake pads on the Yamaha R3 / MT-03
  • How to change the Yamaha R3 / MT-03 to GP Shift
  • How to do an oil and filter change on the Yamaha R3 / MT-03
  • How to get more dash clearance for your clipons and brake line – Yamaha R3
  • How to install a BMC Race Air Filter in the Yamaha R3 / MT-03
  • How to install a stainless steel braided front brake line on the Yamaha R3 / MT-03
  • How to install a Yoyodyne slipper clutch in the Yamaha R3 / MT-03
  • How to install aftermarket clipons on the Yamaha R3 / MT-03
  • How to Install Hotbodies Race Bodywork on the Yamaha R3
  • How to install the Traxxion Dynamics Fork Damper Rod kit with Cartridge Emulators in the Yamaha R3 2015-2018
  • How to remove the emissions systems and install a block off plate on the Yamaha R3 / MT-03
  • How to remove the front wheel from the Yamaha R3 / MT-03
  • How to remove the gas tank from the Yamaha R3
  • How to remove the kickstand from the Yamaha R3
  • How to remove the rear wheel from the Yamaha R3 / MT-03
  • How to remove the side fairings from the Yamaha R3
  • How to remove the tail and taillight of the Yamaha R3
  • How to remove the windscreen and upper fairing from the Yamaha R3
  • How to replace the fork seals on the Yamaha R3
  • Installed: Hotbodies Color Form Race Bodywork – Yamaha R3 2015-2018
  • Lightweight Rear Brake Rotor for Yamaha R3
  • Paint is done, heading to 5zero4 Designs next weekend to install the graphics
  • Suspension Spring Rate Chart for Yamaha R3 / MT-03
  • What are the best clipons for the Yamaha R3?
  • What are the best rearsets for the Yamaha R3?
  • Yamaha R3 / MT03 Exhaust Dyno Test and Superbike Build
  • Yamaha R3 OEM exhaust weight, headers, muffler, slip-on, heat shield

Contact Information

Email: sales@norton-motorsports.com
Telephone: (858) 842-4595

Address

Norton Motorsports
San Diego, CA

Contact us for address before sending anything.

Thank you.

© Copyright Norton Motorsports. All rights reserved.

TOP