How to install a Yoyodyne slipper clutch in the Yamaha R3 / MT-03
The Yoyodyne back torque limiting clutch, or slipper clutch as it’s commonly called, is a clutch that uses a set of 1 way ramps, ball bearings, and springs pressed against the clutch boss to allow the clutch to engage when torque is applied in the drive direction, but allows the clutch boss to ride on the ball bearings up the ramps and against the springs to separate the clutch when enough back torque is applied, causing the clutch to slip. This back torque occurs most noticeably when a rider downshifts 2 or more times quickly as he enters a corner. The downshifting decelerates the motor faster than the rest of the motorcycle and the chain forces the rear wheel to slow also, however the motorcycle is still moving quickly toward the corner, and the rear wheel is forced to skip and hop across the ground because it is moving too slowly to roll. This skipping and hopping reduces traction and confidence and makes it difficult to enter the corner with as much control as if the wheel was rolling smoothly.
A slipper clutch can be adjusted by changing the springs in the clutch to limit the amount of back torque, or engine braking, that is applied by the motor before the clutch slips and the rear wheel can roll freely. Not only does this eliminate the rear wheel from jumping all around when downshifting several times, but the engine braking can be limited making it much easier for the rider to control and fine tune their corner entry speed, whether they are downshifting or not. Basically, you can downshift as many times as you want, drop the clutch, and the bike will just roll smoothly toward the corner as the slipper clutch slips and disengages the clutch plates. Once the engine speed and the bike speed are more closely matched, the clutch engages and the motorcycle can drive forward like normal without the rider ever feeling a thing.
Changing the clutch on the Yamaha R3 may seem like a daunting task if you have never done it, and professional installation is recommended. But the installation isn’t as complicated as it may seem. As long as you have a few critical tools, it can done very quickly. I actually changed my clutch multiple times between sessions of a track day (less than 40 minutes each time) when I was testing different spring configurations.
Tools Required:
-Yoyodyne slipper clutch
-a set of Barnett clutch springs for the Yamaha R3 (now included with your clutch, thanks Yoyodyne!)
-cardboard to place on the ground under the bike, and a couple layers to kneel on makes doing this job much cleaner and more comfortable
-oil drain pan
-a quart of oil to refill the small amount you lose when changing the clutch
-a small amount of water wetter or your coolant of choice, probably about a liter at most is all you have to remove
-plenty of paper towels or rags and a clean place to set parts while you work
-8mm socket to remove clutch cover
-small bungee cord to hold clutch cover out of the way
-10mm socket to remove OEM clutch springs
–Motion Pro clutch holding tool
-a flat head screw driver or punch and a hammer to flatten out the safety collar on the clutch basket nut
-electric or pneumatic impact gun to remove clutch basket nut, or a breaker bar works too
-27mm socket
-torque wrench to reinstall clutch basket nut to 81 ft lbs (110 Nm)
-4mm allen wrench or allen socket to install new clutch springs
-Yoyodyne recommends green Loctite No. 620 to install clutch basket nut
-some grease for the clutch push rod and use a little to hold the clutch cover gasket in place when you reassemble everything
-12mm wrench to adjust clutch cable
-a new clutch cover gasket (depending on how old your bike is, you may or may not be able to reuse your clutch cover gasket, however it is recommended that you replace the gasket when you change the clutch)
-Yoyodyne recommends taking a measurement from the front of the pressure plate to the clutch hub without the plates installed and comparing it to the same measurement with the plates installed to measure the “squish”. You will need a caliper or depth micrometer for this. Spec. is .9mm to 1.3mm with new plates, and minimum .5mm with used plates. My bike was a year old with over 1000 track miles on the original OEM clutch plates and mine measured exactly 1.0mm. It’s a good idea to measure this, but if you don’t have a caliper handy and your bike has OEM plates with less miles than mine did, you are probably safe to skip this step.

Step 1 – Drain the coolant from the radiator and upper half of the cooling system
Put the bike on a rear stand or kick stand and place a drain pan under the bike. Use an 8mm socket to remove the coolant drain bolt. It’s the lowest bolt on the water pump cover with the copper washer on it. Then remove the radiator cap and drain the coolant into the pan. Most of the coolant will not drain until you open the radiator cap because you need to let air into the system to allow the coolant to drain. Empty the drain pan and dispose of the coolant properly. Most oil change places will not take oil if it has coolant mixed in, so I recommend dumping the coolant into a separate bucket before draining the oil into the pan. My bike has water wetter in it for track use, which is why it looks clear instead of green.


Step 2 – Remove the clutch cover and drain the oil
Place the drain pan under the bike and use an 8mm socket to remove the bolts around the clutch cover. A little bit of oil will drain out when you loosen all of the bolts. Pay attention to where each bolt goes. The clutch cover gasket may fall loose, or it may stay stuck to the cover. If it stays stuck to the cover and you plan to reuse it, just leave it stuck, it will be easier to reinstall. I like to lay the bolts out on a piece of cardboard in the order that they came out. They are mostly the same length, but there is a longer one on the right side.


For the clutch cover to be removed from the bike, you have to swing the cable arm around counter clockwise to disengage the push rod.


Leave the coolant hose and clutch cable attached to the cover and use the small bungee cord to hold the cover out of your way.

Wipe the sealing surfaces of the cover and engine case clean and dry of oil and coolant and wipe up any coolant that spilled out of the water pump into the engine where the oil is.

Step 3 – Remove the clutch springs, pressure plate, push rod, and clutch plates
Use a 10mm socket to remove the four bolts holding the clutch springs and plate on.

Carefully remove the clutch pressure plate and springs, then remove the stack of clutch plates. Take note of how they were oriented when you removed them so you can install them the same way.


If you are clean and careful, you can remove the entire stack of clutch plates, and reinstall them all together. But if you get any dirt or grit in the stack, or notice that they are extremely dirty, it’s a good idea to clean and wipe them all off with clean oil, and reassemble the stack. It’s best to reassemble the stack in the same order.
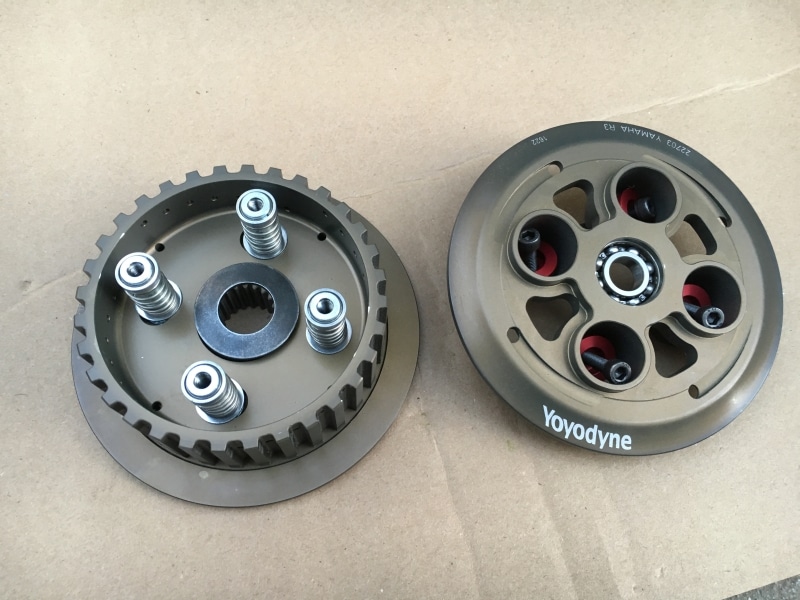
Step 4 – Remove the OEM clutch boss and install the new Yoyodyne clutch boss
Use a hammer and flat head screwdriver or punch to flatten out the safety collar that is securing the OEM clutch basket nut.


Use the Motion Pro clutch holding tool to secure the clutch boss and rest the tool against your footpeg. You can use a small piece of pipe to slide over the end of the tool if it isn’t long enough to reach your foot peg. Then use a breaker bar or impact gun and 27mm socket to remove the clutch basket nut.


Remove the nut and safety collar. The Yoyodyne clutch includes a different lock washer so you will not use the safety collar when you install the new clutch.

Remove the clutch boss. Be careful not to drop the large washer that is behind the boss. Leave the washer there and slide it back against the clutch basket before you install the new clutch boss.


Separate the Yoyodyne pressure plate from the clutch boss and slide the new clutch boss into place.


Slide the included lock washer into place with the cone pointed out away from the bike. See the picture below to help clarify.


Add some green Loctite No. 620 to the thread (I didn’t have any No. 620 when I first installed the clutch and took these pictures so I used red) and reinstall the OEM clutch basket nut.

Use the Motion Pro clutch holding tool to secure the clutch again, this time resting on the bottom of the foot peg or the ground, and torque the nut to 81 ft lbs (110 Nm).

Step 5 – Measure the “squish” of your clutch plate stack
Install the new Yoyodyne pressure plate without any clutch plates to take a base measurement. You only need to secure it with 2 or 3 bolts and springs for now.
Take a measurement from the front of the pressure plate, through one of the holes, to the top of the clutch boss underneath. Either record this measurement for later, or zero your caliper/micrometer here.

Remove the pressure plate again, and install the stack of clutch plates oriented with the tabs around the edge in the long slots in the clutch basket, the same way they came out.

Remove the push rod from the OEM pressure plate and insert it through the Yoyodyne pressure plate from the backside.


Install the Yoyodyne pressure plate. When you install the pressure plate, you can adjust how much engine braking the clutch will provide before it slips by changing the clutch springs and spacers that you use. The springs will cause a large adjustment, and the spacers will provide a very fine adjustment. If you use all four OEM clutch springs, there will be almost no engine braking. If you use all four of the included Barnett clutch springs, you will still have some engine braking, but less than with the stock clutch. You can also install the clutch with two OEM clutch springs and two Barnett clutch springs, which will provide a small amount of engine braking in between these previoius two options. If you want to install two of each, be sure to stagger them, so you don’t install two of the same springs next to each other. The Yoyodyne clutch also includes two sets of preload spacers for the clutch springs. I recommend starting with the red spacers, which provide less preload on the springs. The silver spacers will provide slightly more preload, stiffening the clutch slightly and increasing engine braking slightly.
The stiffer Barnett springs will also slightly increase the amount of force required to pull the clutch lever in, although the change is minimal and not something that I would worry about when choosing your springs.
I prefer to run my clutch with all four Barnett clutch springs and the red preload spacers.


Tighten each bolt a little at a time until they are all tight, torque them to 5.9 ft lbs (8 Nm).

Take the same “squish” measurement that you took above, through one of the holes in the pressure plate to the face of the clutch boss. The difference in the two measurements should be .9mm – 1.3mm with new clutch plates, and not less than .5mm with worn plates. If it is less than .5mm with used plates, replace your clutch plates before continuing. If it measure outside of the .9mm-1.3mm range and your plates are new, Yoyodyne suggests that you may be able to replace one or more of the steel spacers in your clutch pack with thinner or thicker plates from another clutch to bring the “squish” measurement into tolerance. As I mentioned above, my clutch has over a 1000 track miles on it with the original OEM clutch plates and mine measured right at 1.0mm.
Step 6 – Reinstall the clutch cover
Take your time to follow these steps. Read all of the steps carefully before attempting to install the cover. Getting the cover on can take a couple tries, but don’t worry, you’ll get it.
Again, clean the mating surfaces of the clutch cover and the engine case where the gasket will sit.
Add some globs of grease to the clutch cover to hold the gasket in place, then stick a new gasket onto the clutch cover (your choice if you want to reuse the old gasket, Yoyodyne recommends always using a new gasket).


Add some grease to the teeth of the clutch push rod and align push rod with the teeth to the left.

Slide the clutch cover into place on the engine case. There are a few tricks here. There are 2 dowel pins in the clutch cover that must slip into the engine case to align the cover, but before they can slip in, you have to lower the cover slightly to get the push rod to slide into the hole in the clutch cover. The push rod also must remain with the teeth facing to the left, or it will not go into the hole in the clutch cover where it meshes with the gear on the clutch cable arm in the cover. The plastic gear on the right side must also mesh it’s teeth with the gear on the engine side, or the cover will not go in.

And lastly, once you have the cover in place and everything is aligned properly, the cover still will not go on all the way until you engage a few of the teeth on the clutch cable arm gear. Hold the cover in place by applying a little pressure on it toward the bike so that it doesn’t move. While applying pressure with one hand, use the other hand to rotate the clutch cable lever arm counter clockwise (to the left) slowly. This will gently push the cover away from the bike until the next tooth engages. When you feel the next tooth engage, gently push the arm back to the right to check the alignment. This will pull the cover toward the bike. If you don’t have enough teeth engaged, the arm will point to the right when the cover sits flush, or you won’t be able to pull the cover flush against the engine case. Repeat this step and push the lever to the left to engage another tooth. Depending on where the arm is when you install the cover, you will probably have to do this twice to engage two teeth. When the correct teeth are engaged, you should be able to push the arm to the right and it will pull the cover against the engine case and the arm will stop so that it points toward the bike (see picture below). Check the alignment of the teeth after you feel each tooth engage to be sure you don’t go too far. If you go too far, you will have to pull the cover off and start over. Once you have the alignment of the clutch cable arm and gear correct, reinstall the 8mm bolts around the cover the same way they came out. Install the 2 bolts that hole the clutch cable last.


Torque down the clutch cover bolts to 7.2 ft lbs (10 Nm).
Reinstall the water pump drain bolt and washer, torque to 7.2 ft lbs (10 Nm).
Pull the clutch lever to be sure it has tension on it and feels about like it did before you started (it may be stiffer if you used the Barnett springs). It should not have tons of free slack in it, and you should be able to pull it all the way in. If there is a lot of slack in it so you can pull the lever all the way in without tension, you may need to engage another tooth on the push rod gear (see steps above), or if stops before you can pull it in all the way, you may have too many teeth engaged and may have to remove the cover and try again. A little bit of slack is okay and can be adjusted later.
Step 7 – Refill oil and coolant
Once you have the cover installed and test the clutch lever to make sure it feels normal, wipe everything clean around the clutch cover and water pump. Refill the oil using the sight glass on the clutch cover as a guide and replace the oil cap. Then refill the coolant through the radiator cap until it is full, but leave the radiator cap off. Start the motorcycle, the coolant level should drop as coolant is pumped through the system. Continue to add coolant while the bike is idling until the radiator is full, then gently rev the engine a few times and continue adding coolant until the level no longer drops when you rev the engine. Replace the radiator cap.
Check the clutch cover and coolant system for leaks.
Step 8 – Adjust the clutch cable
You may have to adjust your clutch cable tension after installing the new clutch.
Use the cable adjuster at the engine side of the cable to make large changes and the adjuster at the lever side of the cable to make small changes.
Start by loosening the adjuster at the lever side of the cable all the way until you feel slack in the cable at the lever, then tighten it just enough to remove the slack.
If you loosen it all the way and there is still no slack, then you will have to loosen the adjuster at the engine side of the cable. If you tighten the adjuster at the lever end of the cable all the way and there is still slack, then you will have to tighten the cable at the engine side of the cable. Loosen the adjuster at the lever end of the cable all the way before adjusting the cable at the engine end of the cable.
To adjust the cable tension at the engine side of the cable, loosen the nut on the left side of the clamp with a 12mm wrench, then loosen or tighten the nut on the right side of the clamp a few turns, then tighten down the nut on the left side of the clamp again. Repeat this until there is only a little bit of slack in the cable and then tighten both 12mm nuts down, then take up the slack with the adjuster at the lever end of the cable.

Once you have the lever adjusted so that you have just barely removed the slack from the cable, you can test the clutch.
Make sure the motorcycle is in neutral. With the motorcycle in neutral and on a rear stand, start the motorcycle and get on with your right foot holding the rear brake down. Pull in the clutch lever all the way and shift into first gear. If the bike goes into gear and dies because you are holding the rear brake, something is wrong, review the previous steps. If it doesn’t die, then slowly let out the clutch lever until you feel the clutch starting to engage. Adjust the clutch cable using the adjuster at the clutch lever until the clutch engages at a point to your liking.
You’re all done!


1 Comment to “ How to install a Yoyodyne slipper clutch in the Yamaha R3 / MT-03”
You must be logged in to post a comment.
thank you for this!!