SIGN IN YOUR ACCOUNT TO HAVE ACCESS TO DIFFERENT FEATURES

FORGOT YOUR PASSWORD?

FORGOT YOUR DETAILS?

AAH, WAIT, I REMEMBER NOW!
(858) 842-4595
  • Policies
  • My Account
  • LOGIN

Norton Motorsports

  • Shop by Bike
    • Aprilia
      • Tuono 660 2021+
      • RS 660 2021+
      • Close
    • KTM
      • RC390 / Duke 390
      • Close
    • Kawasaki
      • Ninja 250 / 300
      • Ninja 400 2018+
      • Z400 2019+
      • Close
    • Ohvale
      • GP-0
      • GP-2
      • Close
    • Yamaha
      • MT-03 2020+
      • MT-07 / FZ-07 2015-2017
      • MT-07 2018-2020
      • MT-07 2021+
      • R3 2015-2018
      • R3 2019+
      • R7 2021+
      • Close

    • View All
    • Close
  • Norton Built Motorcycles
    • Norton Racing Hotbodies GP Spec Race Bodywork Kit - Kawasaki Ninja 400 Z400 Ninja400R main Norton Motorsports GP Spec Kawasaki Ninja400R
    • 2019-04-28 18_00_05-2018 Ninja 400 Race Motorcycle from Ninja400R.com Norton Motorsports Kawasaki Ninja400R
    • 2019 yamaha yzf-r3 race bodywork Hotbodies Racing Norton Motorsports Norton Motorsports Race Spec Yamaha R3
    • Close
  • Apparel, Gear, & Tools
    • Apparel
    • Riding Gear
    • Tools
    • Close
  • MY CART
    No products in cart.
  • Bike Build Write-ups
    • Aprilia RS 660 2021-
      • Close
    • Kawasaki Ninja 400 2018- / Z400 2019-
      • Important ** Kawasaki Ninja 400 / Z400 Critical Issues
      • Top5 *** Top 5 Kawasaki Ninja 400 / Z400 Mods and Upgrades
      • Do you need a fuel controller with full exhaust ninja 400 Do you need a Power Commander for full exhaust on the Kawasaki Ninja 400?
      • featured image How to install an R6 throttle tube in the Kawasaki Ninja 400 / Z400
      • 49899087_301487663905591_4918556926305894400_n How to remove the front fender and rear fender of the Kawasaki Ninja 400
      • 2019-02-07 10_57_46-Clipboard How to remove the gas tank on the Kawasaki Ninja 400
      • IMG_4330_2 How to remove the OEM bodywork of the Kawasaki Ninja 400
      • open clutch Kawasaki Ninja 400 / Z400 Clutch Slipping, Poor Shifting, False Neutrals, and Dropping Gears – Explained and Fixed!
      • Kawasaki Ninja 400 dyno horsepower Kawasaki Ninja 400 Exhaust Dyno Shootout!
      • CVR_3132_Sep1519_CaliPhoto Ninja 400 Electronics and GP Bodywork Test
      • Traxxion Dynamics Omni Fork Spring Kit Yamaha R3 2015-2018 Suspension Spring Rate Chart for Kawasaki Ninja 400 / Z400
      • Braketech Vs Galfer Rotor Brake Test Rocco Landers What’s up with the Kawasaki Ninja 400 / Z400 brakes?
      • Close
    • Ohvale GP-0 / GP-2
      • Important ** Ohvale GP-0 / GP-2 Critical Issues
      • OV001 Ohvale 190 5 Speed Shift Star Cap Ohvale 190 False Neutral and Miss Shift Problems – FIXED!
      • Close
    • Yamaha R3 2015-2018
      • Important ** Yamaha R3 / MT-03 Critical IssuesJanuary 24, 2021
      • Top5 *** Top 5 Yamaha R3 / MT-03 Mods and UpgradesJanuary 24, 2021
      • Yamaha R3 Annitori Quickshifter QS Pro Annitori Quickshifter QS Pro installed and beta tested on Yamaha R3June 24, 2015
      • Yamaha R3 415 chain kit horsepower Dyno tested: 520 vs. 415 chain and sprockets – Yamaha R3February 14, 2016
      • IMG_3869 How to bleed the brakes or flush the brake fluid on the Yamaha R3 / MT-03September 7, 2015
      • IMG_3896 How to change the front brake pads on the Yamaha R3 / MT-03September 11, 2015
      • R3GPShift How to change the Yamaha R3 / MT-03 to GP ShiftSeptember 7, 2015
      • DSCN2608_zpsqza81eb3 How to do an oil and filter change on the Yamaha R3 / MT-03August 16, 2015
      • IMG_3857 How to get more dash clearance for your clipons and brake line – Yamaha R3August 28, 2015
      • IMG_3630 How to install a BMC Race Air Filter in the Yamaha R3 / MT-03August 8, 2015
      • IMG_3846 How to install a stainless steel braided front brake line on the Yamaha R3 / MT-03September 7, 2015
      • img_6102 How to install a Yoyodyne slipper clutch in the Yamaha R3 / MT-03December 10, 2016
      • topdown vortex clipons How to install aftermarket clipons on the Yamaha R3 / MT-03March 26, 2016
      • IMG_4189 How to Install Hotbodies Race Bodywork on the Yamaha R3May 7, 2016
      • IMG_3965 How to install the Traxxion Dynamics Fork Damper Rod kit with Cartridge Emulators in the Yamaha R3 2015-2018January 16, 2016
      • IMG_4511 featured How to remove the emissions systems and install a block off plate on the Yamaha R3 / MT-03August 16, 2015
      • DSCN2484_zpsuqljyccu How to remove the front wheel from the Yamaha R3 / MT-03August 2, 2015
      • How to remove the fuel tank from the yamaha R3 How to remove the gas tank from the Yamaha R3April 23, 2015
      • IMG_3927 How to remove the kickstand from the Yamaha R3May 7, 2016
      • DSCN2189_zpsg2hs8ooe How to remove the rear wheel from the Yamaha R3 / MT-03August 2, 2015
      • Remove Side Fairings Yamaha R3 How to remove the side fairings from the Yamaha R3May 23, 2015
      • IMG_0167 How to remove the tail and taillight of the Yamaha R3April 21, 2015
      • how to remove the windscreen yamaha r3 How to remove the windscreen and upper fairing from the Yamaha R3May 4, 2015
      • IMG_3985 How to replace the fork seals on the Yamaha R3January 16, 2016
      • IMG_3719 Installed: Hotbodies Color Form Race Bodywork – Yamaha R3 2015-2018August 26, 2015
      • Yamaha R3 Modified rear brake rotor, lightened machined rotor Lightweight Rear Brake Rotor for Yamaha R3October 1, 2015
      • IMG_4463 Paint is done, heading to 5zero4 Designs next weekend to install the graphicsDecember 14, 2015
      • Traxxion Dynamics Omni Fork Spring Kit Yamaha R3 2015-2018 Suspension Spring Rate Chart for Yamaha R3 / MT-03January 24, 2021
      • Yamaha R3 Woodcraft 1.5 rise clipons What are the best clipons for the Yamaha R3?March 24, 2016
      • yamahaR3_raceconcept_rearsets_gold_fitR1 What are the best rearsets for the Yamaha R3?March 26, 2016
      • Yamaha R3 Exhaust Test Superbike Dyno horsepower Norton Motorsports Yamaha R3 / MT03 Exhaust Dyno Test and Superbike BuildJune 6, 2019
      • 2015 yamaha r3 exhaust header muffler weight Yamaha R3 OEM exhaust weight, headers, muffler, slip-on, heat shieldJuly 3, 2015
      • Close
    • Close
  • Dyno Testing
    • Aprilia RS660 Dyno Testing
      • Close
    • Kawasaki Ninja 400 / Z400
      • Do you need a fuel controller with full exhaust ninja 400 Do you need a Power Commander for full exhaust on the Kawasaki Ninja 400?September 2, 2019
      • Kawasaki Ninja 400 dyno horsepower Kawasaki Ninja 400 Exhaust Dyno Shootout!September 2, 2019
      • Close
    • Yamaha R3 / MT-03
      • Yamaha R3 415 chain kit horsepower Dyno tested: 520 vs. 415 chain and sprockets – Yamaha R3February 14, 2016
      • Yamaha R3 Exhaust Test Superbike Dyno horsepower Norton Motorsports Yamaha R3 / MT03 Exhaust Dyno Test and Superbike BuildJune 6, 2019
      • Close
    • Yamaha R7 / MT-07
      • Close
    • Close
  • Other Cool Stuff
    • Power Commander vs Bazzaz vs ECU Flash vs aRacer Race ECU Power Commander vs. Bazzaz vs. ECU Flash vs. aRacer Race ECU
    • Woodcraft Toe Guard Yamaha R3 Woodcraft Shark Fin Toe Guard Modification Yamaha R3 / Kawasaki Ninja 400
    • Track_Day_TTD_2015_Thompson_8-24-15-2195-sm-300×200 5 Reasons Why Roadracers Give Up Street Riding
    • modified rear brake rotor rev a Reducing weight on a race bike and the different types of weight
    • video thumb Tire Shootout for Small Sport Bikes by Ari Henning
    • IMG_5091 Race Bike Designs, Graphics, and Paint Jobs
    • thumb Kawasaki Ninja 300 vs. KTM RC390 – Video Review
    • Close
  • Press Release
  • Race / Ride Reports
  • Race Team

Kawasaki Ninja 400 / Z400 Clutch Slipping, Poor Shifting, False Neutrals, and Dropping Gears – Explained and Fixed!

by Norton Racing / 2019, December 02 / Published in Kawasaki Ninja 400 / Z400

The Ninja 400 / Z400 is an awesome little bike with a fantastic engine. But it is no secret by now that the Kawasaki Ninja 400 / Z400 has some issues with the clutch and shifting. No matter how many Kawi dealers tell you it’s normal for your clutch to slip on a bike with only 500 miles, it isn’t. There are issues.  But don’t worry, it’s all fixable. I’m going to go show you all of the issues in the OEM clutch and shifting mechanism, and then cover installation of our Race Spec Clutch Upgrade Kit as well as the installation of the Yoyodyne 5 Spring Slipper Clutch to fix these issues for your track or street bike so you can enjoy a long lasting, reliable clutch, and focus on riding.

***UPDATE*** Click here to jump to the 2020+ model year NINJA 400 and Z400 Pull Rod and Pressure Plate Bearing update

Click HERE if you want to skip down to the How To Install the Cable Spring section of this article.

Click HERE if you want to skip down to the How To Install the Clutch Parts section of this article.

Our Ninja400R Race Spec Clutch Upgrade kit includes the following parts to correct all of the issues with the poor shifting and OEM clutch:


  1.   Clutch Cable Spring Kit
  2.   Heavy Duty Barnett Clutch Springs and Barnett Friction Plates
  3.   Blueprinted Shift Change Shaft and Protection Kit
  4.   Heavy Duty Shift Detent Spring
  5.   Race Spec Shift Star
  6.   Race Spec Modified Clutch Pull Rod 2020+ OEM Clutch Pull Rod and Pressure Plate Bearing

Additionally, for critical race applications, we recommend undercutting the transmission gears.


Problem #1, My clutch is slipping when I accelerate!

  • Solution for OEM clutch: Install Heavy Duty Barnett Clutch Springs and Friction Plates, Ninja400R Cable Spring Kit, and Ninja400R Race Spec Modified Clutch Pull Rod.
  • Solution for Yoyodyne slipper clutch: Install Yoyodyne slipper clutch w/ included heavy duty springs and friction plates and Ninja400R Cable Spring Kit.

Definitely the most common issue with the Ninja 400 is that the clutch “wears out” and starts slipping during acceleration with very low miles on the bike, typically between 500-2000 miles.  There are three problems acting together to cause this issue in essentially every Ninja 400 and Z400. First, the design of the Kawasaki Ninja 400’s slipper clutch uses two sets of ramps on the pressure plate and center boss of the basket. When you downshift and decelerate quickly, the rear wheel tries to spin the engine up, and one set of these ramps slide together, releasing pressure from the clutch plates which allows the clutch to slip. This is the intended “slipper” effect of the clutch. The amount of slip, and how easily the clutch slips, is determined by the spring pressure of the clutch springs that hold the plates together. When you try to accelerate hard, the other set of ramps slams together, holding the clutch tight so it doesn’t slip under hard acceleration.

Unfortunately, when the clutch slips on deceleration, the friction plates will wear slightly as they spin against the steel clutch plates. Kawasaki installed only 3 soft springs to allow the rear wheel to easily force the ramps to slide against each other and disengage the clutch during deceleration. This makes the bike feel very smooth for new riders as the bike decelerates with less engine braking feel than it would normally have. But this also means that the plates are constantly slipping over each other and gently wearing away. The Ninja’s clutch also only has 5 friction plates in it, and 3 of them are narrower than the other 2, with less material.  So the Ninja’s plates will wear faster than a bike with more plates or more material. Even the Yamaha R3, which has a lot less power and torque, and doesn’t have a slipper clutch constantly wearing the plates, uses 6 friction plates.

But there is another interesting byproduct of this slipper clutch design. When you pull the clutch lever and then release it to engage the clutch, as the clutch plates start to grab each other, the ramps slide together, forcing the plates together even if you are still trying to feather the clutch.  This will cause the clutch to “grab” all at once.  So even if you’re trying to be smooth, it’s very difficult to apply a lot of power during a start. This makes the bike incredibly difficult to launch in a race, and forces you to hold the clutch just before the engage point with the plates spinning across each other much longer when launching the bike than you would have to with other bikes. Again, this accelerates clutch wear. *As a side note, slipper clutches with a different design like the Yoyodyne 5 Spring Slipper clutch that we use and recommend, do not suffer from this side affect, and the bike is WAY easier to launch.

So the first part of the solution is to install stiffer Barnett springs in the clutch. Stiffer springs will hold the clutch together on deceleration until a higher force is applied by the rear wheel to slide the ramps together and compress the springs. Less clutch slip is a trade off for less clutch wear and more engine braking.  Depending on how much wear is in your clutch, we often recommend replacing the plates with heavy duty Barnett plates at the same time that you replace the springs since you already have the clutch taken apart. The OEM clutch configuration uses 5 friction plates, but 3 of them are narrower than the other 2.  The narrow friction plate in the back provides clearance for the OEM judder spring and seat.  Judder springs are used to help smooth the transition between the clutch being engaged and disengaged and reduce vibrations that can happen as the clutch engages.  They are typically not an essential part of clutch operation.  For track use, it’s reasonable to remove the judder springs and replace the narrow friction plate in the back of the clutch pack with a wide friction plate to increase your friction material.

The second half of this problem is simply a design flaw by Kawasaki. The Ninja 400’s clutch pack is roughly .899″ thick when new.

And the basket and pressure plate assembly has .836″ of clearance before it bottoms out when it is removed from the bike.

That’s roughly .063″ of clutch wear that you should have before the pressure plate will bottom out and your clutch will slip and you’ll need new plates. The problem here is that when you install the clutch in the bike with the OEM pull rod, the pull rod actually bottoms out on the input shaft long before the pressure plate bottoms out. So the pull rod bottoms out with only .875″ of clearance. That means that instead of the .063″ of clutch wear that you should have, you only get about .024″ before the pull rod bottoms out and your clutch will slip!

Kawasaki knows about this issue and supposedly the 2020 bikes will have a modified pull rod from the factory (See Below for 2020 Update!).  But if your bike is a 2018-2019 and your clutch begins to slip, you can replace the OEM pull rod with our Ninja400R Race Spec modified pull rod (which has been machined down with the necessary extra clearance) and get another .040″ of wear from your clutch plates before they will need to be replaced.


UPDATE

2020+ Kawasaki Pull Rod and Bearing Updated!

UPDATE 4/22/2020, we overlooked it before but have now confirmed exactly what Kawasaki changed for 2020. For 2020+ model year bikes, Kawasaki has replaced both the pull rod and pressure plate bearing with new part numbers.

***2020 bikes STILL have the rest of the issues and STILL benefit from fixing the rest of the issues!***

At first glance the pull rod appears the same, since the flange is the same thickness, but under closer inspection, the pull rod is shorter from the bottom of the flange to the top of the T by 1mm.  This alone doesn’t change anything, but they also changed the pressure plate bearing from an 8mm bearing to a 7mm bearing, increasing clearance by 1mm. Since the clearance issue we addressed with our modified pull rod was an interference between the input shaft, the pull rod, and the bearing, any of these 3 parts could be modified to solve the clearance.  We chose to modify the pull rod as it was a simple change to one 1 part, but Kawasaki has solved the same problem by using a thinner bearing and then shortening the pull rod by the same amount so that clutch cable adjustment isn’t affected.  Two different solutions to the same problem.  However, now that new OEM 2020 parts are available and inexpensive, we will be discontinuing our Race Spec modified pull rod and you can now purchase the updated 2020 OEM parts for your 2018-19 directly from us and save yourself some money!  There is no additional labor or tools necessary to install the 2020+ bearing since it is not pressed in.  It falls out easily when the pressure plate is removed.

Another tidbit of information regarding the clutch wear and clearance:  The OEM clutch pack uses 2.0mm thick steel plates.  There are 1 narrow and 3 wide plates in the pack.  Kawasaki also has available 1.6mm and 2.3mm thick steel plates for the 3 wide plates (which we have available for sale here).  You can increase the clutch pack thickness by replacing the 3 wide 2.0mm plates with 2.3mm thick plates, or a combination of 2.0mm and 2.3mm thick plates.  As you increase the thickness of the entire clutch pack, you also increase the amount of clutch wear that is available before the basket or pull rod will bottom out.  This can extend the life of your clutch even more, but there is a trade-off of this.  As you increase the thickness of the clutch pack, you pre-load the clutch springs more, which reduces the amount of slipper effect you will get, and you remove available adjustment from the clutch cable.  If you replace all 3 2.0mm plates with 2.3mm plates, your clutch will barely slip at all, even under hard deceleration, and your cable adjuster will likely be all the way at the end of the adjustment, so pay attention and test it out if you want to try this.

The third issue here is that with the super lightweight OEM clutch springs, there’s barely enough force in the springs to return the clutch cable all the way to allow the clutch to completely engage.  It’s very easy to have the clutch cable adjusted improperly and not know about it since there’s essentially no feel at the clutch lever.  Our Ninja400R  Clutch Cable Spring Kit includes a spring and two washers to be installed on the clutch cable to return the cable all the way.  This eliminates the chance of friction in the cable making the problem worse and provides better feel of the clutch engagement at the lever.

Problem #2, Shifting gears is clunky and sometimes my bike won’t shift at all!

  • Solution: Install Ninja400R Blueprinted Shift Change Shaft.

When you press the shift lever with your left foot, the shift change shaft contacts the shift star and rotates it to the next gear.  The problem here is that paw mechanism on the end of the shaft is poorly positioned and sloppily attached to the shaft.  Every bike is a little different, and if the alignment is bad enough and there’s enough free play in the paw, the paw can actually slip off the drive dogs on the shift star, causing the shifter to temporarily jam, or the bike to miss-shift.  This poor fitment of the OEM shift change shaft makes shifting clunky and unreliable. Shimming the OEM shift change shaft to move it to the left in the bike can  provide slightly better engagement of the shift paw and the dogs on the shift star, but the free play in the shift paw can still cause clunky shifting and depending on the position and play in your particular shift paw, shimming can actually cause the shift paw to contact the face of the shift star causing more shifting issues. The proper solution for this is to install our Ninja400R Blueprinted Shift Change Shaft.  Our Blueprinted shaft has been realigned and had clearance and spacing corrected to remove excess slop and cause the shift paw to fully engage the dogs on the shift star without shimming.

Included with our Blueprinted Shaft is our Protection Spacer for the shift shaft.  The shift change shaft is only held in place by a small snap ring and in the event of a left side tip over, can easily be forced free from the snap ring and into the engine causing damage inside the clutch and leaking oil.  Our Protection Spacer is machined from Delrin to fit over the snap ring and install between the shift arm and the engine case on the left side of the bike.  The sturdy Delrin spacer will absorb impact in the event of a crash to keep the shaft in place and protect your engine.

Problem #3, Sometimes my bike goes into “false neutral” between gears!

  • Solution: Install Heavy Duty Shift Detent Spring and Race Spec Shift Star.

A motorcycle transmission uses the shift star to force the shift drum to rotate to specific points where each gear is fully engaged, defined by the notches between each point on the shift star.  As you shift from one gear to the next, the point on the star between each gear forces the roller to fall to the next notch and fully engage the next gear.  Neutral is defined by a notch in the point of the star between 1st gear and 2nd gear.

A “false neutral” is a phenomenon that occurs when you attempt to shift gears and you press the lever and disengage the gear you are in but the shift roller stops on the point of the shift star instead of falling into the next notch.  You end up between gears with both gears disengaged. Here’s an example of a false neutral that happened to me in a race right after the start going into turn 1.  After shifting up into 4th gear, I downshift to 3rd as I enter the turn and the bike goes into a false neutral.  I blow the corner as I fumble to get it back into gear:

The Ninja 400’s OEM shift star has larger, more rounded points on the star than some bikes to give newer street riders “smoother” shifts.  But what this means is that if you aren’t very deliberate with your shifts, you can pretty easily stop the shift roller on the rounded part of a point on the star between gears and easily put the transmission into a false neutral. To virtually eliminate false neutrals with the Ninja 400, we replace the OEM shift detent spring with our Heavy Duty Shift Detent Spring and replace the OEM shift star with our machined Race Spec Shift Star.  Our Race Spec Shift Star has reshaped, smaller and sharper points between gears so that the roller cannot accidentally stop on the point and must fall into the next gear’s notch.  The heavier detent spring helps by applying more pressure on the shift arm and roller to force it past the points on the star into the next gear. oem shift star vs Ninja400R race spec shift star

Problem #4, Sometimes when accelerating, by bike drops down a gear on it’s own!

  • Solution: Install our Heavy Duty Shift Detent Spring, Race Spec Shift Star, and undercut the transmission gears.  Adjusting quickshifter kill time and sensitivity settings can also help by allowing the gears to fully engage during quickshifts before power is re-applied.

There isn’t much more annoying when driving hard out of a corner, throttle wide open, upshifting from 4th gear to 5th gear, and then the bike shifts back down to 4th gear on it’s own. What is transmission undercutting? Motorcycle transmissions operate by a series of gears with drive dogs and/or slots that are engaged or disengaged when the gears are shifted.  When a particular gear is engaged, it’s drive dogs are meshed with the gear next to it to transfer power.  With many less expensive motorcycles, including the Ninja 400, these drive dogs and receiving slots are square in shape, and can slip free under acceleration or deceleration, causing the transmission to involuntarily shift gears or find a place between gears called a “false neutral” where no gear is engaged.  “Undercutting”, or “back-cutting”, is a process where these square shaped drive dogs and slots are cut at a small angle, so that when they are meshed together, the power applied to them actually forces them together and it’s impossible for them to slip free while under load. Motorcycle Transmission Undercutting Explained If you are building a critical race bike for a national series or to challenge for a championship.  Or just a bike that you plan to keep for awhile and want reliable, consistent shifting without dropping gears, transmission undercutting may be worth the investment for you.  The engine must be removed from the bike and torn down all the way to splitting the cases to remove the transmission.  This is labor intensive, but sometimes it’s the only solution and is considered mandatory by top level race teams.  If you are having your engine torn down for rebuild, we highly recommend transmission undercutting as part of your rebuild since much or all of the labor is being done already.


How to:

In this section, I’ll go through the tear-down and installation of all of the parts of our Race Spec Clutch Upgrade Kit.

Install the Ninja400R Clutch Cable Spring Kit


How to:

Install Ninja400R Race Spec Clutch Upgrade Parts

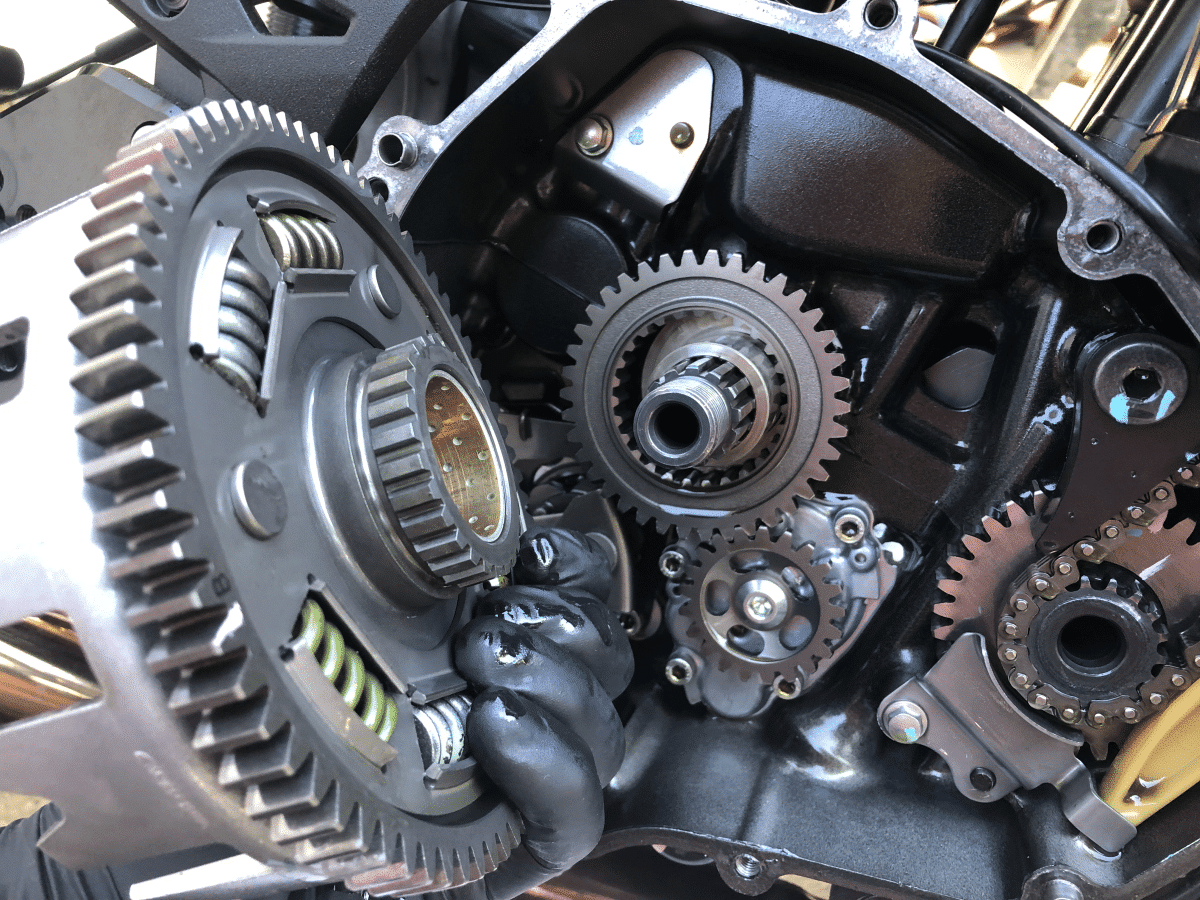
Step 1.  Remove bodywork from the right side of the bike covering the clutch cover.  See our other How To articles for directions on removing the OEM bodywork.  Then lean the bike over on the kickstand, or lean it against something sturdy if you have removed the kickstand.  This is so you can remove the clutch cover without dropping too much oil.  Place some cardboard under the engine to catch any oil drips. *If you will be installing our Blueprinted Shift Change Shaft, make sure you can access the shift lever on the left side of the bike while it is leaned over.

Step 2.  Move the O2 sensor cable free from the cable clamp, and remove the clutch cover using an 8mm socket.

Step 3.  Remove the 3 bolts securing the spring plate using a 10mm socket and then remove the clutch springs.  Loosen these bolts a little at a time since they are under spring pressure.

Step 4.  Carefully remove the pressure plate.  The clutch pull rod and some of the clutch plates may come out with it so pay attention.  Then remove the clutch plates and keep them in order so you know how they came out.

Step 5.  Gently clamp the clutch basket with a clutch basket tool to hold it in place and use a heavy duty impact gun with a 27mm socket to remove the nut in the center of the basket.  Do not attempt to break this nut loose with a breaker bar, you will likely damage the clutch basket with the basket tool.  Only use a heavy duty impact gun.  Then remove the inner clutch basket boss (there’s a washer behind it), clutch basket and primary driven gear assembly, primary drive gear, spacer and tapered washer from behind the basket.

Ninja 400 Shift Mechanism Parts:

Step 6.  To remove the OEM shift change shaft, first remove the shift knuckle/lever from the shaft on the left side of the bike with a 10mm wrench.  Then use snap ring pliers to remove the snap ring securing the shaft in place.  Remove the washer and wipe the shaft and seal clean.  Then place a rag or paper towel below the shaft to catch a little oil that will drip out when you remove the shaft.  Gently pull the shaft out from the clutch side of the bike.  Careful not to drop the spacer or washer from the shaft into the engine/oil pan!

Step 7.  Remove the two springs, spacer, and washer from the OEM shift change shaft and install them on the new Blueprinted shaft.  Do not install the new Blueprinted shaft into the engine yet.

Step 8.  Use a 6mm hex to remove the bolt holding the shift detent arm and spring in place and remove them from the bike.  Then, use a torch to heat the bolt securing the shift star in place.  Using excessive force to remove this bolt can damage the shift forks inside the transmission, so be sure to heat the bolt to release the threadlocker first.  Then use a 5mm hex to remove the bolt and carefully remove the shift star.  There is a dowel pin that locates the shift star on the end of the shift drum.  Be sure you do not drop any parts into the engine! Install the machined Race Spec Shift Star the same way the OEM shift star was removed.  Clean the bolt with brake cleaner and use high temperature thread locker on the bolt and torque to 12Nm (106 inlbs).

Step 9.  Remove the OEM shift detent spring from the shift detent arm and install the Heavy Duty Shift Detent Spring, then reinstall the arm into the engine.  Clean the bolt with brake cleaner and use a high temperature thread locker.  Torque the bolt to 9.8 Nm (87 inlbs).

Step 10.  Install the new Blueprinted Shift Change Shaft into the engine.  Make sure the shaft is correctly located with the spring and boss below the shift star, and then install the washer and snap ring/circlip on the shaft on the left side of the bike to secure the shaft in place.  Make sure the snap ring is seated completely in the groove on the shaft so it is secure.  Install the white Delrin Protection spacer on the shaft with the relief facing toward the engine so it seats over the snap ring.  Then secure the shift lever back on the shaft and tighten it in place.

Step 11.  Reinstall the tapered washer and spacer on the input shaft.  Install and mesh the primary drive gear onto the primary driven gear on the backside of the clutch basket as shown.  Install the clutch basket onto the input shaft, paying attention to mesh the teeth with the crankshaft on the right side.  Once in place,  reach your finger under the clutch basket and locate the oil pump drive gear.  Rotate this gear and gently press on the clutch basket to be sure it meshes with the oil pump gear and seats all the way in place.  See pictures below.

Step 12a (Install OEM Slipper Clutch).  Follow directions for 12a if you are using the OEM clutch.  If you are installing a Yoyodyne 5 spring clutch, scroll down to instructions 12b below. Make sure the washer is installed on the input shaft, then install the clutch basket center boss and lock washer.  Gently hold the boss with the clutch basket tool and tighten the center nut with a heavy duty impact gun.  Torque spec is 132 Nm (97.4 ftlbs), however, be careful using a torque wrench on this nut, as you may easily damage the clutch basket with the basket holding tool.  I recommend using an impact gun to torque this nut. Lubricate all clutch steels and friction plates before installation and install the clutch pack and pressure plate.  See the video below for help installing the pressure plate.  It must rotate as you seat it.

Install the Barnett Heavy Duty Clutch Springs and the spring plate and torque the spring plate bolts to 10Nm (89 inlbs) with a 10mm socket.

Step 12b (Install Yoyodyne 5 Spring Slipper Clutch).  Follow these directions for 12b if you are installing a Yoyodyne 5 spring slipper clutch. Make sure the washer is installed on the input shaft, then install the clutch basket center boss and lock washer.  Gently hold the boss with the clutch basket tool and tighten the center nut with a heavy duty impact gun.  Torque spec is 132 Nm (97.4 ftlbs), however, be careful using a torque wrench on this nut, as you may easily damage the clutch basket with the basket holding tool.  I recommend using an impact gun to torque this nut.

The Yoyodyne clutch includes a new clutch pack with 6 heavy duty friction plates and 5 new 1.6mm thick OEM steel plates.  Lubricate all plates with engine oil and install them into the clutch, alternating plates, starting with a friction plate first.

Install the OEM pull rod into the end of the input shaft and install Yoyodyne pressure plate.  Make sure the bearing is in place.

Choose which spring preload spacers you want to use, and install the springs with the spacers.  Red spacers will allow the clutch to slip more for less engine braking.  Black spacers will allow the clutch to slip less for more engine braking.  I recommend using the red spacers to start.  Torque the socket head cap screws to 10 Nm (89 inlbs).

Step 13.  Inspect the clutch cover gasket, replace if necessary, and reinstall the clutch cover. If the clutch cover gasket is damaged, torn, or peeling from removing the cover, it should be replaced with a new gasket.  If the bike has low miles, it is common for the gasket to remain stuck to the engine in excellent condition and be acceptable to reuse after this installation.

Reinstall the clutch cover.  See below for location of the one bolt that is longer than the rest.

Whew!  That was a lot huh?  Now your beloved Ninja 400 will work the way it should!  Enjoy!

  • Tweet

About Norton Racing

What you can read next

How to remove the OEM bodywork of the Kawasaki Ninja 400
How to remove the front fender and rear fender of the Kawasaki Ninja 400
How to remove the gas tank on the Kawasaki Ninja 400

12 Comments to “ Kawasaki Ninja 400 / Z400 Clutch Slipping, Poor Shifting, False Neutrals, and Dropping Gears – Explained and Fixed!”

  1. Jesse Horton says :Log in to Reply
    February 11, 2021 at 1:32 PM

    Best how to I have ever seen. Especially since you exclaim the “why”.

    1. Jesse Norton says :Log in to Reply
      February 11, 2021 at 3:10 PM

      Thank you!

  2. Érico Augusto says :Log in to Reply
    March 13, 2021 at 5:55 AM

    I would like to know how can I buy this clutch kit with 5 Springs. I’m from Brasil.

    1. Jesse Norton says :Log in to Reply
      March 16, 2021 at 8:43 AM

      Please email us at sales@norton-motorsports.com.

  3. Rodel Ricarte says :Log in to Reply
    October 31, 2021 at 5:56 AM

    Where can i buy this new type of clutch lining here in Philippines?

    1. Jesse Norton says :Log in to Reply
      November 9, 2021 at 10:09 AM

      We are happy to ship to you in the Philippines, please email us at sales@norton-motorsports.com so we can help you!
      Cheers

  4. Daniel Tolen says :Log in to Reply
    November 9, 2021 at 1:48 PM

    Do you think I could just replace the springs and add the cable spring and be alright for the long haul? I just ride street. Mostly commuting. 6-9k rpm range, shift mostly at 8k. My Ninja is a 2021 with 1900 miles, so far no clutch issues. Just want to be proactive.

    Or do you think I would need to replace all the parts?

    1. Jesse Norton says :Log in to Reply
      November 9, 2021 at 2:24 PM

      Depends if you want to improve the shifting and false neutrals also. The cable spring and clutch springs will solve the burning up clutches problem, but not the poor shifting problem.

  5. Ryan says :Log in to Reply
    December 28, 2021 at 7:18 AM

    Hi, I am having the slipping and false neutral issue on my kawasaki EX400 year 2019.
    I use the bike for hard street riding and also 400m runs occasionally.
    What will you recommend please and how much will it cost.
    Thanks.

    1. Jesse Norton says :Log in to Reply
      February 15, 2022 at 10:32 AM

      We highly recommend the kit shown in this write up: https://www.norton-motorsports.com/product/barnett-heavy-duty-clutch-springs-kawasaki-ninja-400/

  6. Robert Broussard says :Log in to Reply
    January 11, 2022 at 3:58 PM

    Jesse, on a 2020 Ninja 400, we have no known (or obvious) clutch problems. But….

    Would the addition of the Barnett HD clutch springs and the return spring help the feel of the clutch? Would the friction zone change?

    On a recent ride, I noticed my GF was hitting neutral when shifting from 1 to 2nd — no other false neutrals. Now her shift lever is slightly bent (from a drop and she refuses to fix it), but is that a common problem with a certain fix. I’m sure all of the clutch upgrades will be a benefit, but I’d like to focus on changes that she will notice and appreciate.

    Also, will the Barnett springs make the clutch harder to pull….?

    Thanks!

    1. Jesse Norton says :Log in to Reply
      February 15, 2022 at 10:30 AM

      The false neutrals is best fixed with the clutch kit. The Blueprinted shift shaft and undercut shift star in combination with the stiffer shift spring will eliminate any slop and ensure a positive engagement. The Barnett Clutch springs will only affect how much power is delivered, and how well the clutch plates clamp, and it will be more difficult to pull it. It is highly recommended for the issues you’re describing to get the full clutch kit rather than piece mailing it.

You must be logged in to post a comment.

Search All Posts

Post Category:

Kawasaki Ninja 400 / Z400
  • ** Kawasaki Ninja 400 / Z400 Critical Issues
  • *** Top 5 Kawasaki Ninja 400 / Z400 Mods and Upgrades
  • Do you need a Power Commander for full exhaust on the Kawasaki Ninja 400?
  • How to install an R6 throttle tube in the Kawasaki Ninja 400 / Z400
  • How to remove the front fender and rear fender of the Kawasaki Ninja 400
  • How to remove the gas tank on the Kawasaki Ninja 400
  • How to remove the OEM bodywork of the Kawasaki Ninja 400
  • Kawasaki Ninja 400 / Z400 Clutch Slipping, Poor Shifting, False Neutrals, and Dropping Gears – Explained and Fixed!
  • Kawasaki Ninja 400 Exhaust Dyno Shootout!
  • Ninja 400 Electronics and GP Bodywork Test
  • Suspension Spring Rate Chart for Kawasaki Ninja 400 / Z400
  • What’s up with the Kawasaki Ninja 400 / Z400 brakes?

Contact Information

Email: sales@norton-motorsports.com
Telephone: (858) 842-4595

Address

Norton Motorsports
San Diego, CA

Contact us for address before sending anything.

Thank you.

© Copyright Norton Motorsports. All rights reserved.

TOP