How to install aftermarket clipons on the Yamaha R3 / MT-03
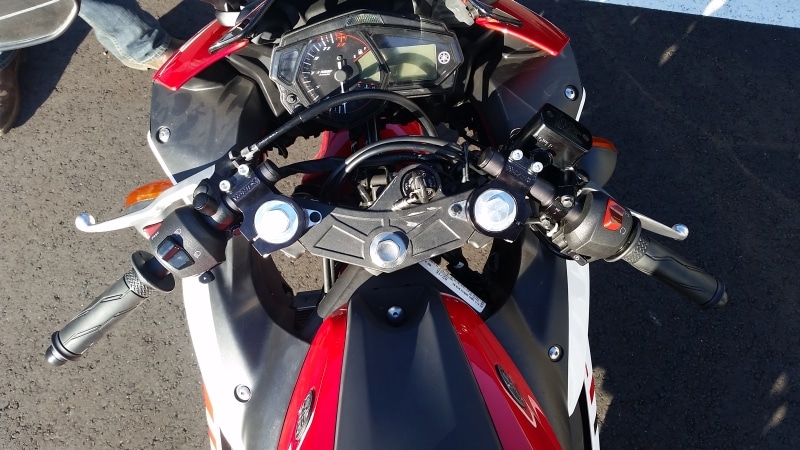
In my other post, What are the best clipons for the Yamaha R3?, I reviewed several different clipon styles and options for the R3. My conclusion is that for street riders and the occasional track day rider who are still using the stock rear shock, I recommend lowering the front of the bike 3mm and installing the Vortex clipons on top of the triple clamp. The Vortex offer a much better riding position than stock, and it really cleans up the front of the bike and covers the tops of the fork tubes nicely. For racers who will be installing aftermarket rear shocks, I recommend raising the front and rear of the bike for handling and ground clearance, and thus, I recommend installing a Graves steering stop along with the Woodcraft Universal 41mm clipons with 1.5″ rise and mounting them under the triple clamp. This offers the best bar position for racers, as far forward and as low as possible, and the steering stop prevents interference.
In this post, I will cover installation of both sets of clipons on your Yamaha R3.
Installing Vortex 41mm clipons with 7 degree drop angle above the triple clamp
***UPDATE, I used to recommend you have WD-40 and pliers handy to remove the left side grip. However, the OEM left side grip is MEGA glued on, and I’ve yet to see one come off without being destroyed and cut off with a razor blade. AND, the OEM throttle tube has a bunch of molded plastic texture on the outside, so it doesn’t easily accept standard aftermarket grips. This leaves you with no left side grip, and not an easy way to replace the right side grip to match so… Here’s what I recommend you do:
Either order a replacement OEM left side grip before you start the install, they’re only a few bucks, then just leave the left side grip on the OEM bar and install the new left side grip on the new clipons
OR, replace the OEM throttle tube with a throttle tube from a 2006-2016 Yamaha R6. Not only does the R6 throttle tube shorten the throttle throw a bit, which is great, but the outside of it is smooth and will accept all standard aftermarket grips, so you can replace both grips with whatever style you like.
Tools Needed:
5mm allen wrench
6mm allen wrench
8mm socket
10mm socket
14mm deep socket
12mm wrench
phillips screwdriver
Impact driver
rear stand
front stand or a buddy to help take weight off the front end
drill bit, #7 (0.201″), #6 (0.203″) or 13/64″ (0.203″), or a small step drill will work
tape measure
a bench vise to clamp the bars in helps but is not necessary
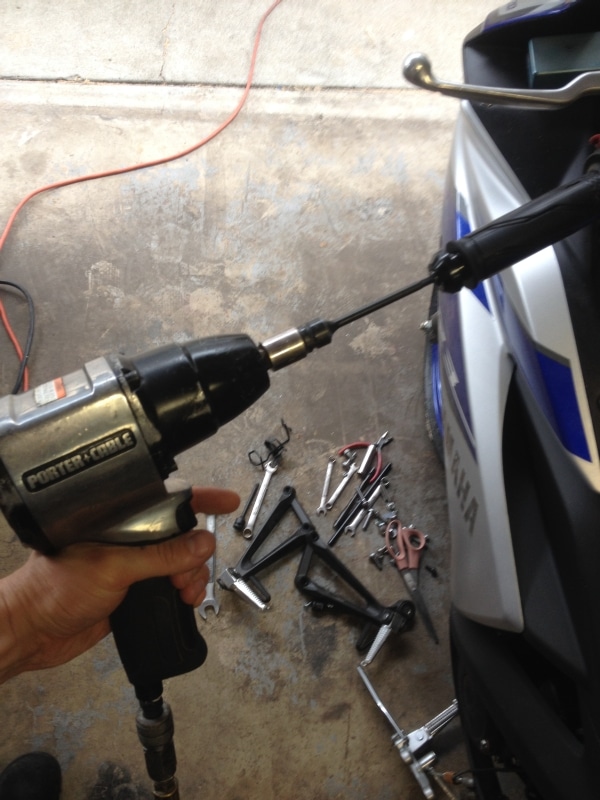
Step 1: First, use a 5mm allen wrench to remove the bar end weights. These are screwed into a rubber damper that can spin freely with enough force, so the easiest way to remove these is with a cordless or pneumatic impact wrench with a 5mm allen wrench tip such as this:
Step 2: ***Update, this step used to be, remove the left side grip from the OEM bar to reuse it. However, I have yet to see this work successfully, see my update note at the very top of this page just before the Tools Needed list. Instead of trying to remove this grip, just leave it, and buy a new left side grip to install on the new bars.
Remove the left side grip. With most grips, there is an easy technique for doing this, which I tried to make a video of, but I failed miserably. This grip was stuck on so well I had to cut it off with a razor. But generally, the trick to removing a rubber grip from a bar is to spray WD-40 on the outside of the grip, then just grab the flange with your hand or pliers and roll it back on itself so it comes off inside out. Clean it off with alcohol, turn it back right side in, and it’s ready to reuse. Here’s a couple screen shots from my failed video showing the technique I will be using standard Renthal street grips from Cycle Gear, so I wasn’t worried about saving the stock one.
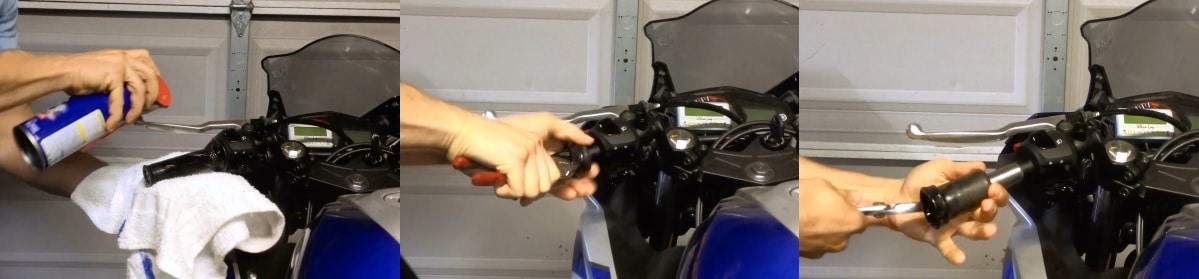
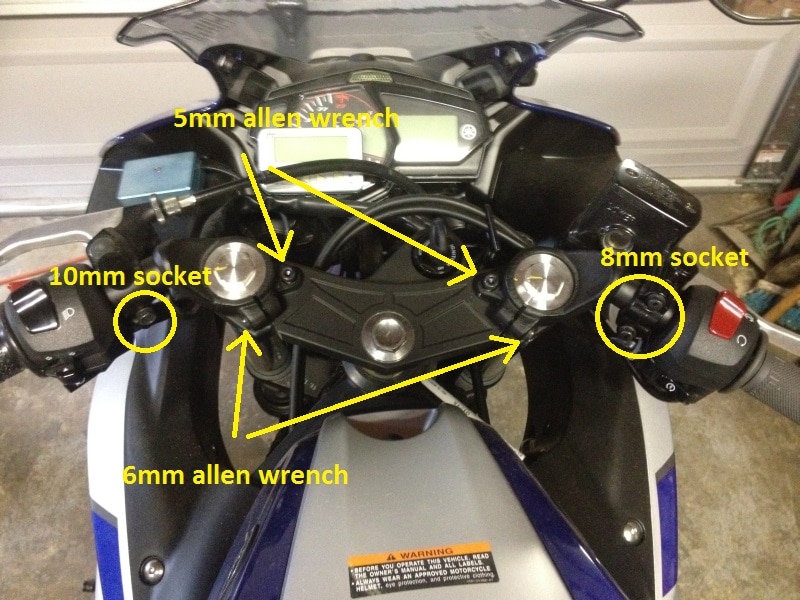
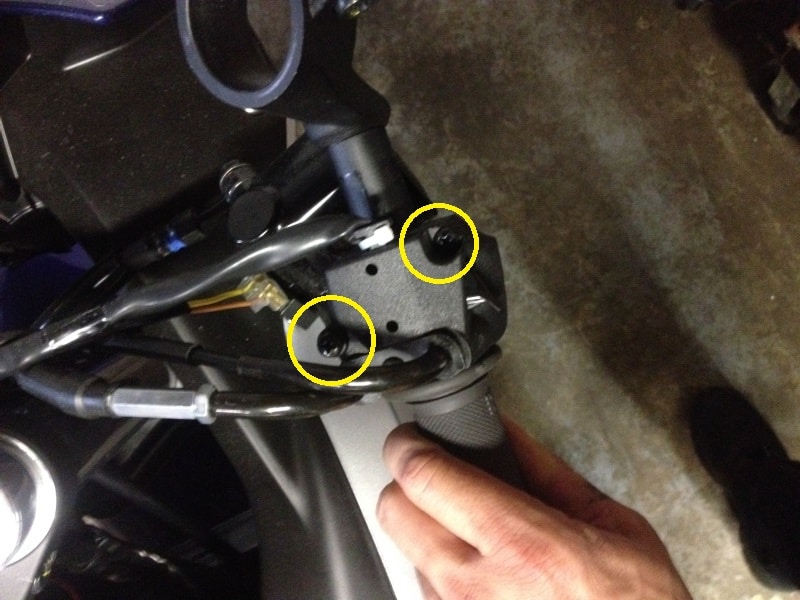
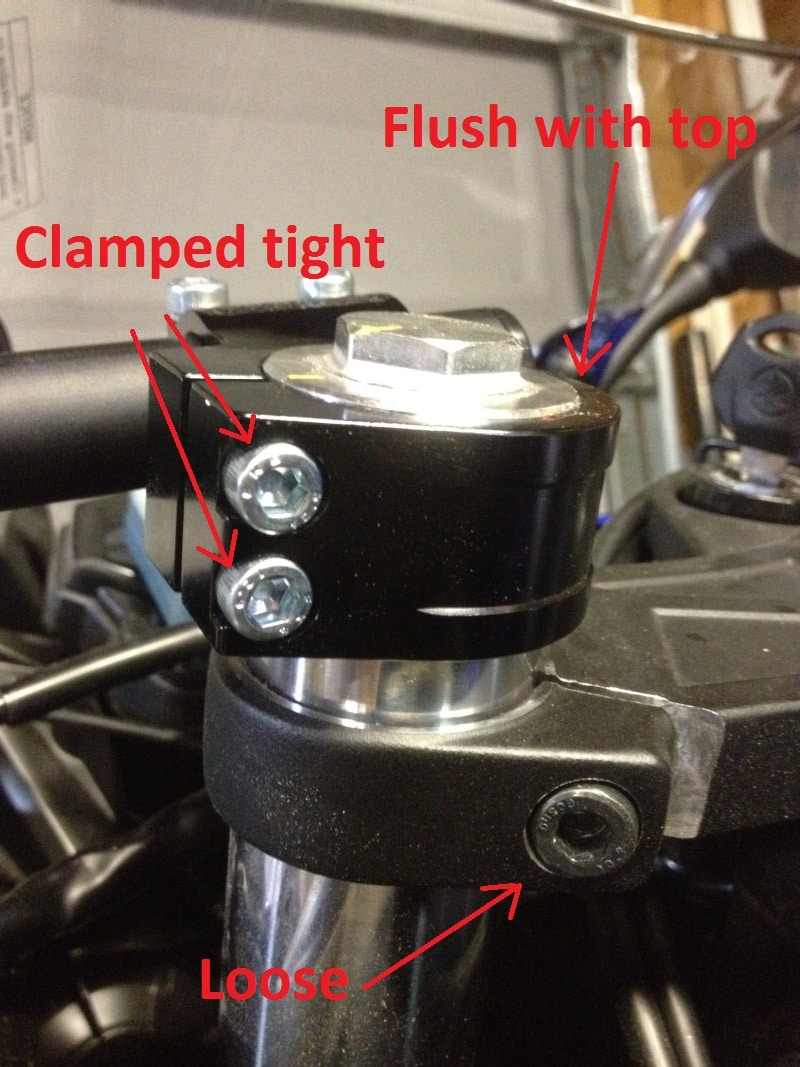
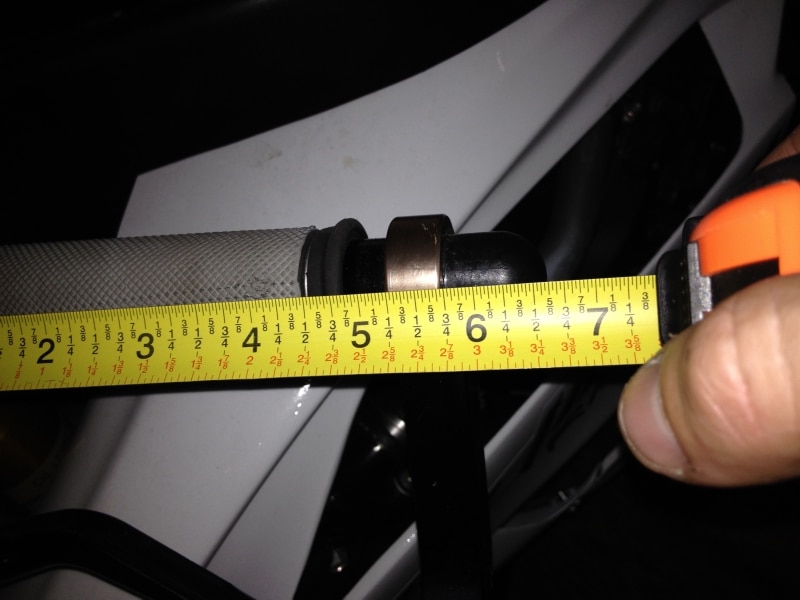
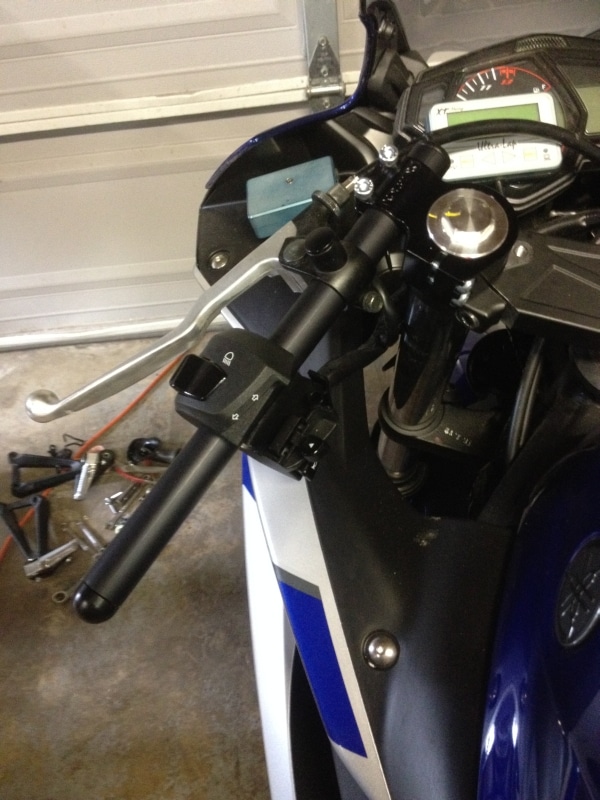
Step 3: Once the grip is off, break loose the clutch lever perch bolt with a 10mm socket and the brake lever perch bolts with an 8mm socket. Then remove the bolts on the top of the triple clamp with a 5mm allen wrench and the bolts on the outside of the top triple clamp with a 6mm allen wrench, the clipons are now free. Start with the left side and flip over the clipon and remove the 2 screws in the switch housing the remove the switch, then slide the left clipon out of the clutch lever perch clamp and free from the bike. Next, lift off the right side clipon, flip it over, and remove the 2 screws in the throttle housing. Open the throttle housing the slide the right side clipon out of the brake lever perch clamp and free from the bike.

You will immediately notice how heavy the stock bars are. They are weighted to reduce vibration. The stock bars weigh 3 lbs 9 oz with the bar ends and the Vortex clipons weigh just under 1 lb 4 oz. So you drop over 2 lbs from the highest point on the bike by changing the clipons, sweet deal!


Step 4: The next step is to slide the forks about 2mm through the triple clamp so the Vortex clipons sit flush with the tops of the fork. This small change will have a very small effect on the bike’s handling, likely unnoticeable. I’m not worried about it, I may end up moving the forks up or down later anyway once I change the suspension and start testing the bike’s geometry at race pace. This small change won’t cause any problems.
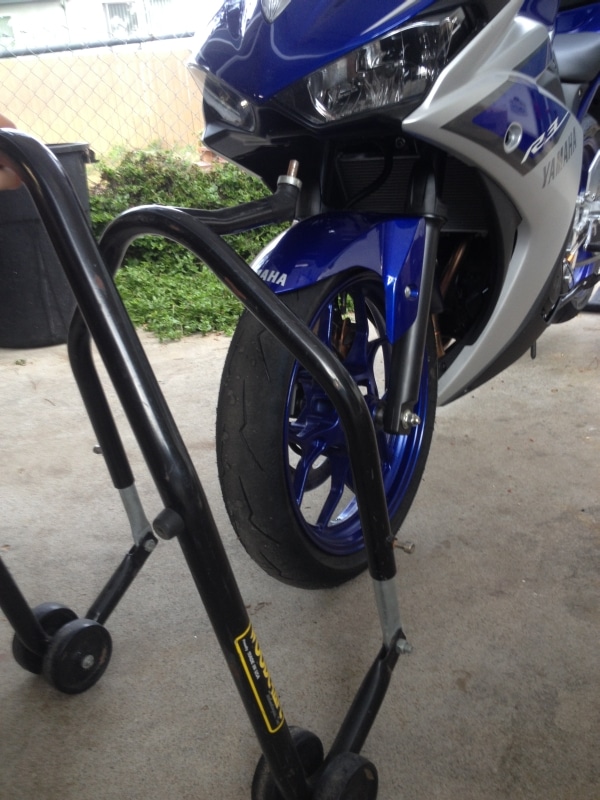
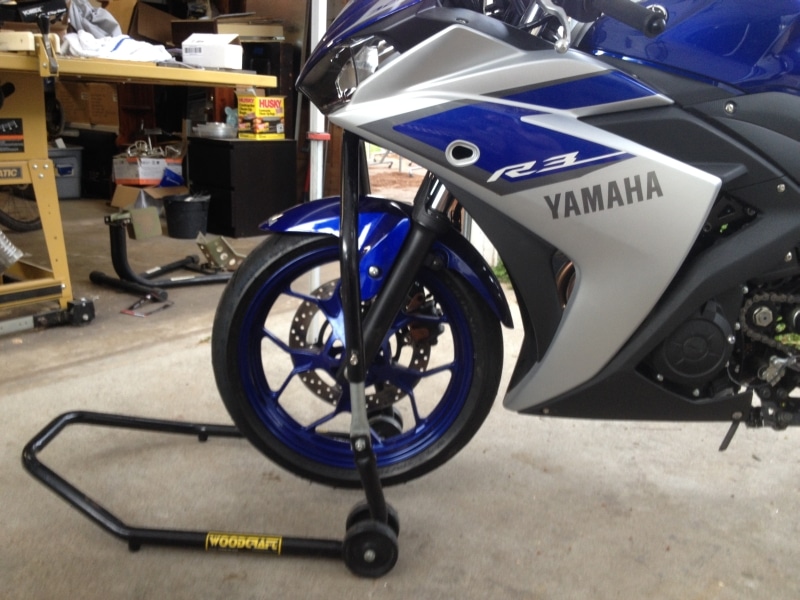
To adjust the fork height in the triple clamp, you will need the bike to be on a rear stand and have a triple tree stand or a buddy handy to lift the front of the bike a little while you clamp it. They don’t have to lift the entire bike off the ground, just help the suspension lift it, it’s pretty easy to lift, don’t worry. And there’s no risk of it falling over, you only adjust 1 fork at a time, so the bike is always standing up and supported, but I don’t recommend trying this without having the bike on a swingarm or rear spool stand.
Now, follow these steps for one fork, once complete, follow them again for the other fork. Do not try to do both forks at the same time or the bike will fall.
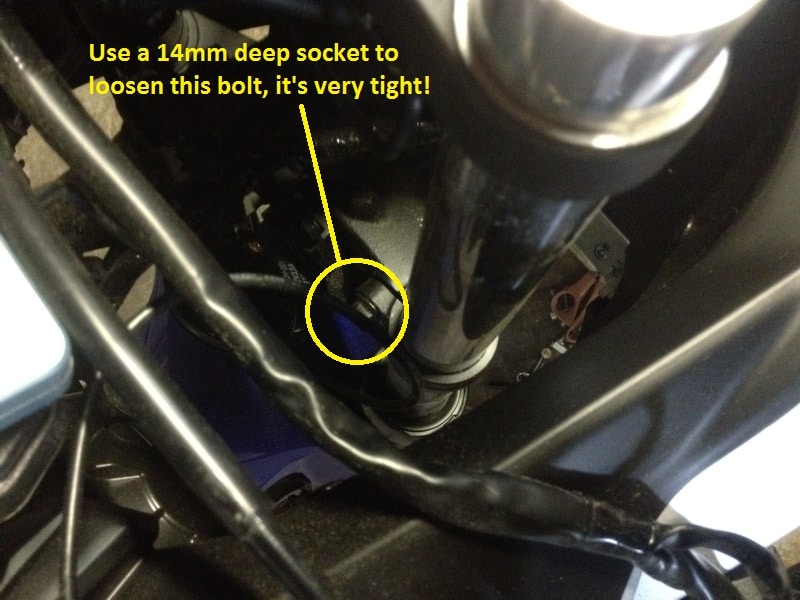
First, with the bike on a rear stand, use a 14mm deep socket to loosen the lower triple clamp bolt on one side.
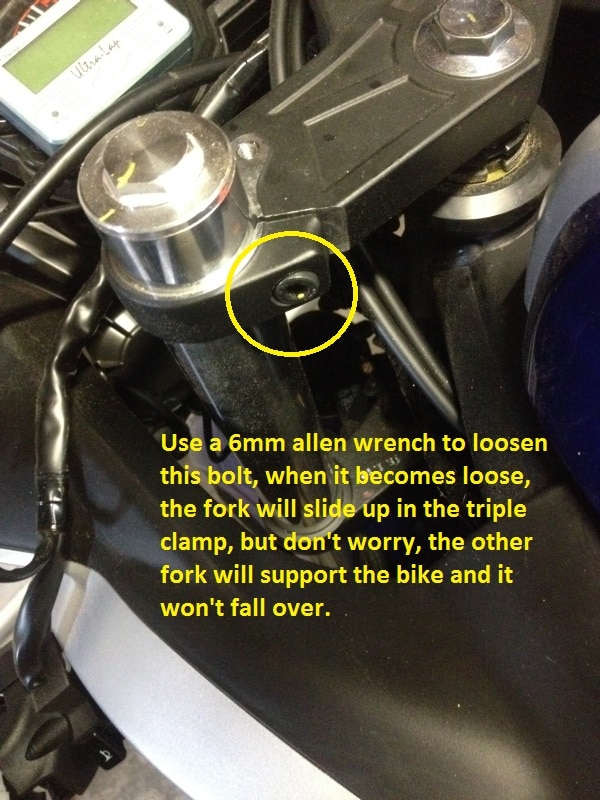
Next, use a 6mm allen wrench to loosen the upper triple clamp bolt on the same side. Once this bolt becomes loose, the bike will drop slightly as the fork slides up in the triple clamp. Don’t worry, the bike won’t fall completely because it’s still being supported by the other fork, it will only drop about a half inch.
Next, slide the Vortex clipon clamp onto the fork, and align the clamp flush with the top of the fork. Now tighten the bolts on the Vortex clipon clamp so it is clamped onto the fork flush with the top. Don’t worry about the rotation of the clamp, only worry about setting the height where you want it, flush with the top of the fork. Don’t tighten the triple clamp bolt yet.
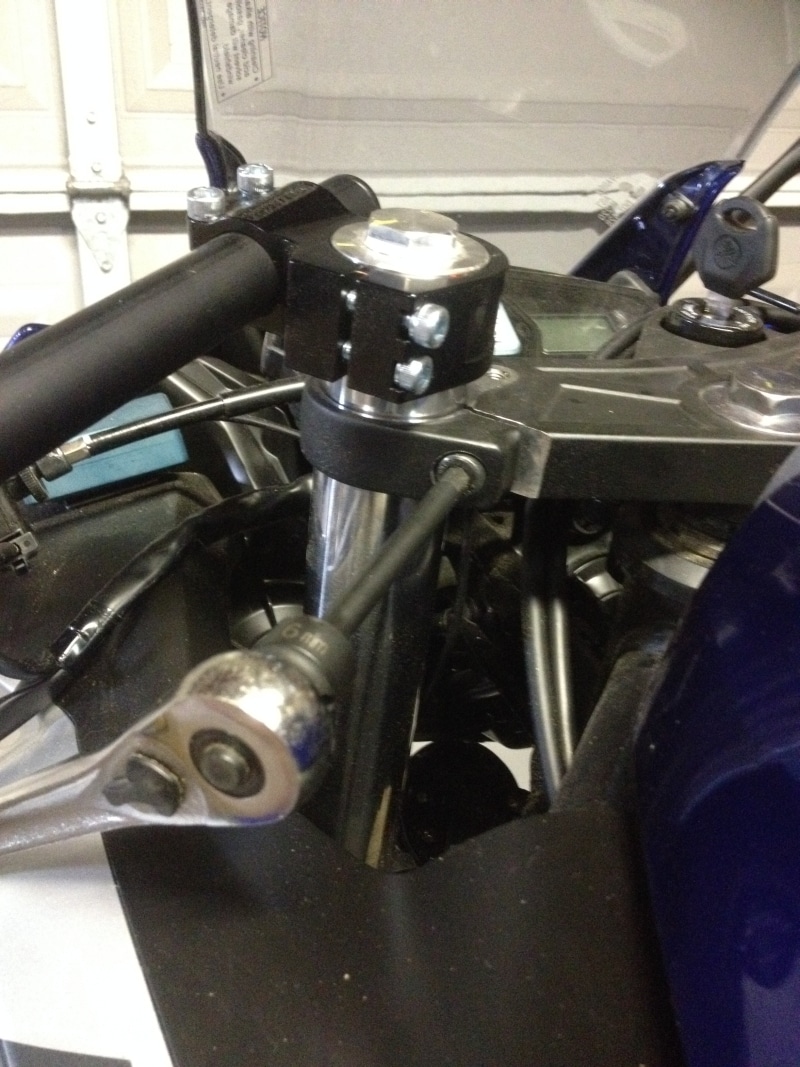
Now, use your triple tree stand to lift the front of the bike, or have your buddy lift up on the front of the bike by lifting the triple clamp or frame, not the front wheel. The triple clamp should slide up the fork and stop against the Vortex clamp, quickly clamp down the top triple clamp bolt to secure everything in place so your buddy can stop lifting  One side down, now repeat this process for the other fork.
Step 5: Once you have both forks clamped at the new position, it’s time to drill the Vortex bars for the throttle and light switch locating pins (if you plan to reinstall the light switch, if not, you can leave out the hole in the left bar).
***Do not install the plastic caps into the Vortex bars until after you drill the holes so you can dump out the drill shavings!!
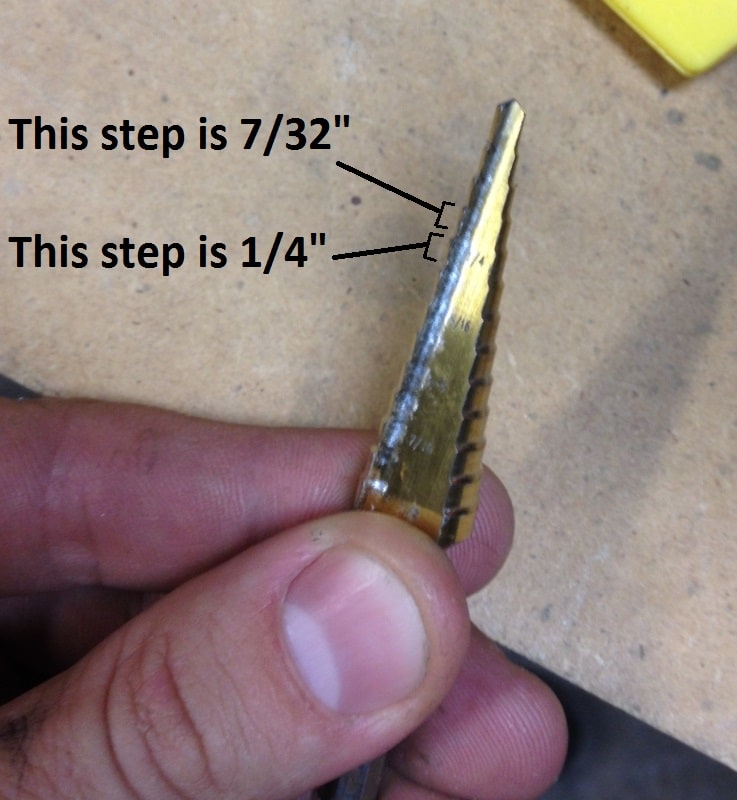
The pins in the clamps are 5mm (0.197″). The ideal drill bit to use is a #7 drill bit (0.201″), #6 (0.203″) or 13/64″ (0.203″), but if you don’t have access to those sizes, the 7/32″ (0.219″) on a small step drill will work fine also. I used a #7 drill bit.
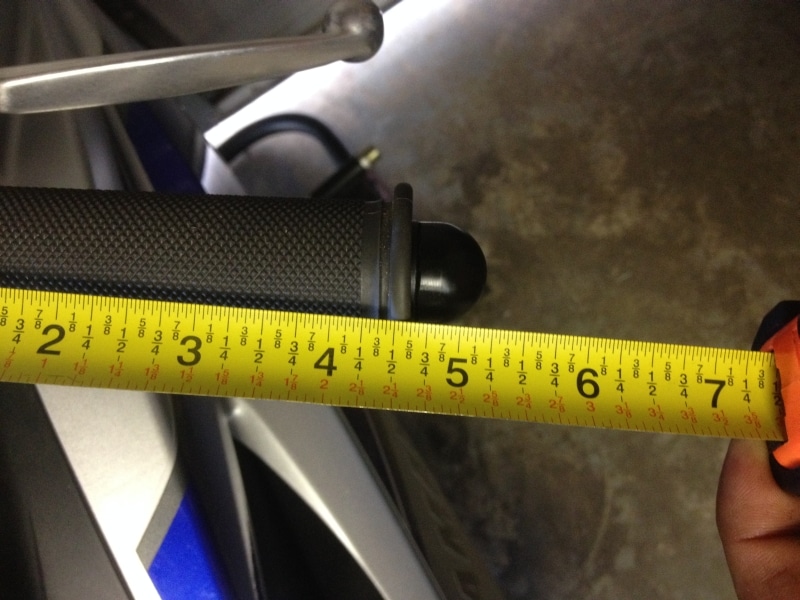
Get the grips you plan to install and measure them (the left and right sides may be different lengths, so measure them both). I generally use Renthal grips so that’s what I measured. ***Be sure to measure the grips you will actually use so you can drill the bars in the right place, the Vortex grips I was going to use are longer, but I had already measured and drilled for the Renthals, oops!
The left side Renthal grip measures 4 7/8″
and the right side measures 4 5/8″
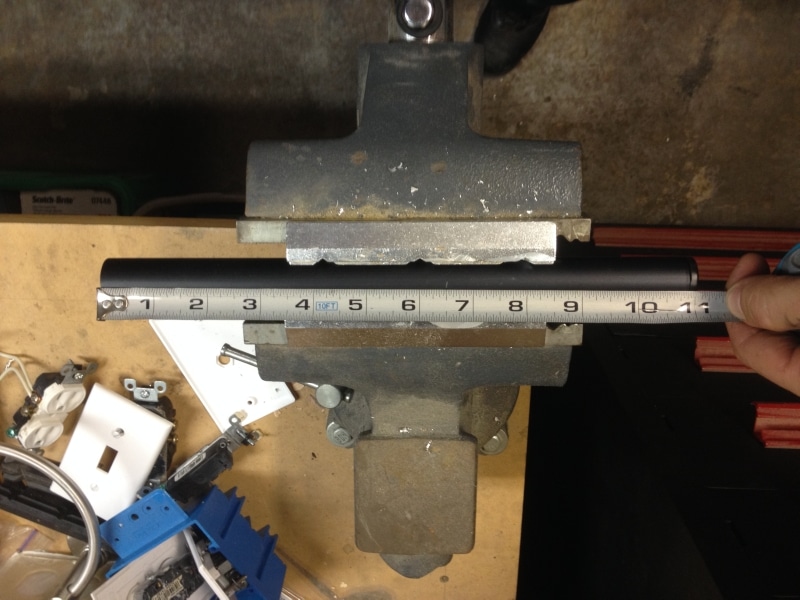
Now, to get the proper measurement to drill the left side (clutch side), add 1 1/2″ to the length of the left side grip, and make a mark on the bar. For me, that’s 4 7/8″ + 1 1/2″ = 6 3/8″. Be sure to use YOUR measurements of the grips YOU are using, these are just my numbers! Because the bars are round and your drill bit will have a tendency to wander, I recommend drilling a pilot hole first with a smaller bit such as 1/8″ or 3/32″, or if you use the step bit, that will be fine. Clean up the edges of the hole with a deburr tool or just use a larger drill bit to scrape around the outside edge and remove the burr. Then dump out the drill shavings from the inside.
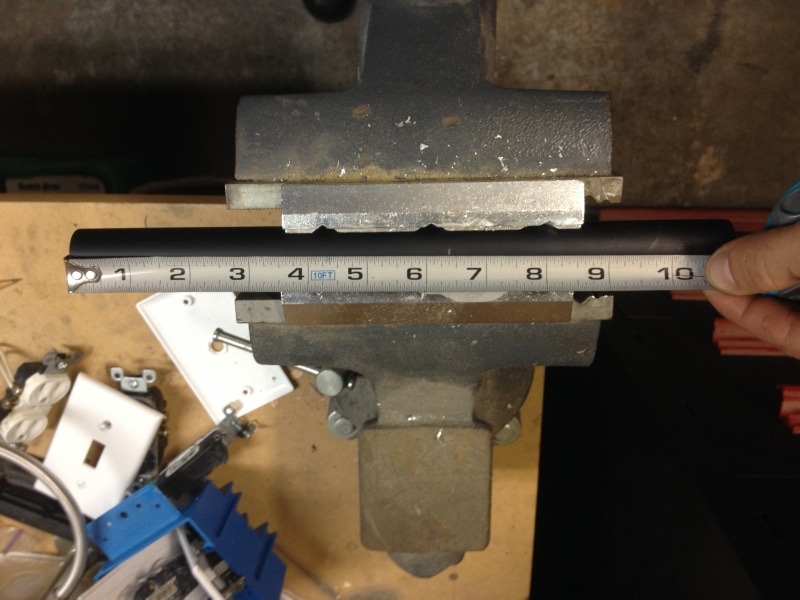

To get the proper measurement to drill the right side (throttle side), add 1 7/8″ to the length of the right side grip and make a mark on the bar. For me, that’s 4 5/8″ + 1 7/8″ = 6 1/2″. Make a mark at your measurement, then pilot drill, drill, deburr, and dump the shavings out.
Step 6: Once you have the holes drilled and shavings removed from inside the bars, use a hammer to hammer in the plastic caps. First hammer the flat cap in, then set the bar on your work bench on the flat cap, and hammer in the rounded cap. The rounded cap goes to the outside, so be sure your drilled hole is oriented correctly to the rounded cap.
Step 7: Loosen the clipon clamps from the fork. Slide the left side bar through the clutch clamp and into the clipon clamp. Attach the light switch housing first, aligning the pin into the drilled hole and tightening the scrwes, then rotate the bar around to roughly the correct orientation and snug the bolts finger tight to hold everything in place. Slide the right side bar through the throttle tube and housing, align the pin in the hole you drilled and tighten the screws in the throttle housing, then slide the bar through the clipon clamp and attach the brake lever and snug everything down finger tight to hold it in place.

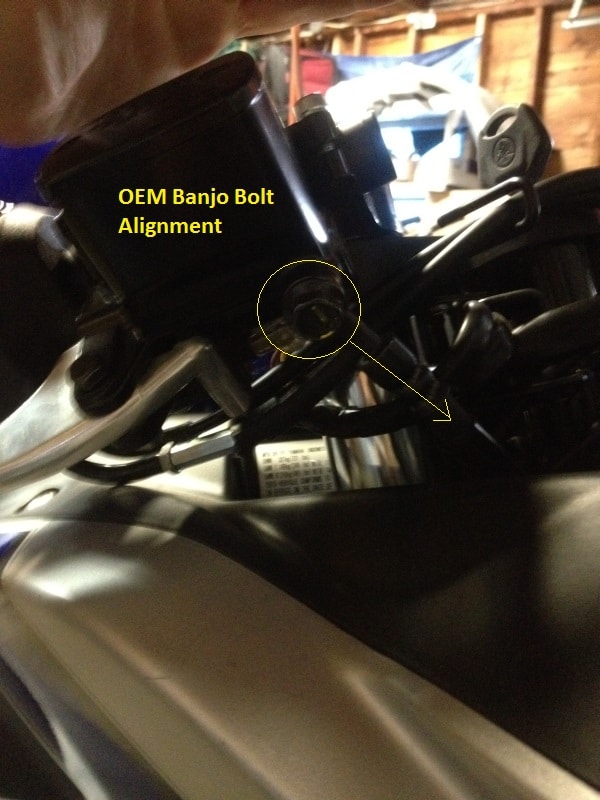
Step 8: If you encounter interference between the front brake master cylinder banjo bolt and the dash, you can rotate the banjo bolt on the front brake master cylinder so the brake line points toward the right side of the bike. This will give you a little more clearance to the dash. The stock banjo bolt looks something like this, and is pointed toward the center of the bike:
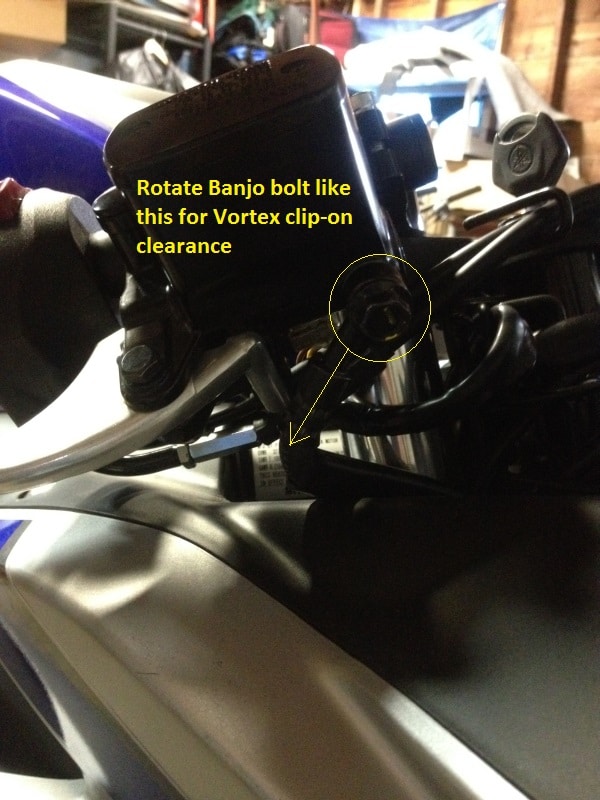
Use a 12mm wrench and carefully loosen the banjo bolt just enough so that you can rotate it, but not so much that it leaks. Rotate it so it points the other direction, like this, then tighten it down:
Step 9: The right side clipon must go in a specific place in order for the throttle cables to clear the fairing and the brake line to clear the gauge cluster. Then you just have to match that position with the left side clipon.
First, twist the bar so the throttle cables are basically directly below the clipon bar. Next, snug the clipon clamp enough so that you can turn the bars. Find the angle of the right side bar so that at full lock to the left, the brake line banjo bolt just barely contacts the gauge cluster but doesn’t impede the movement, and at full lock to the right, the throttle cables just barely touch the fairings, but movement isn’t impeded. Once you find this angle, tighten the clipon clamp on the fork. This is the starting position.
Next, find the position of the bar sliding in or out. This will probably be determined by the angle you like the brake lever to be at because the master cylinder interferes with the clipon clamp at certain positions. I prefer my brake lever to be pointed down as far as possible (this gives me more room to open the throttle without cranking my wrist). In order to position the brake lever down, I had to slide the bar out farther so that the master cylinder has more clearance to the clipon clamp. I ended up with my bars positioned with about 5/16″ of bar (not including the plastic cap) sticking to the inside. If you like your brake lever to be more level, you can slide the bars farther in because there isn’t as much interference. Once you find the position of the brake lever and bar length, tighten the bar clamp bolts and the brake lever clamp bolts and you are done with the right side.

Roughly position the length of the left side bar, and align the angle of the left side bar to match the angle of the right side bar, then tighten the clipon clamp on the fork.
Next, twist the left side bar so the switch housing is angled the way you like it and slide it in so the length matches the right side, then tighten the bar clamp.
And finally, twist and position the clutch lever where you like it and tighten the clutch lever clamp bolt. Test the fit of everything by turning the bars both directions to full lock, and test brake and clutch levers, throttle and light switches.
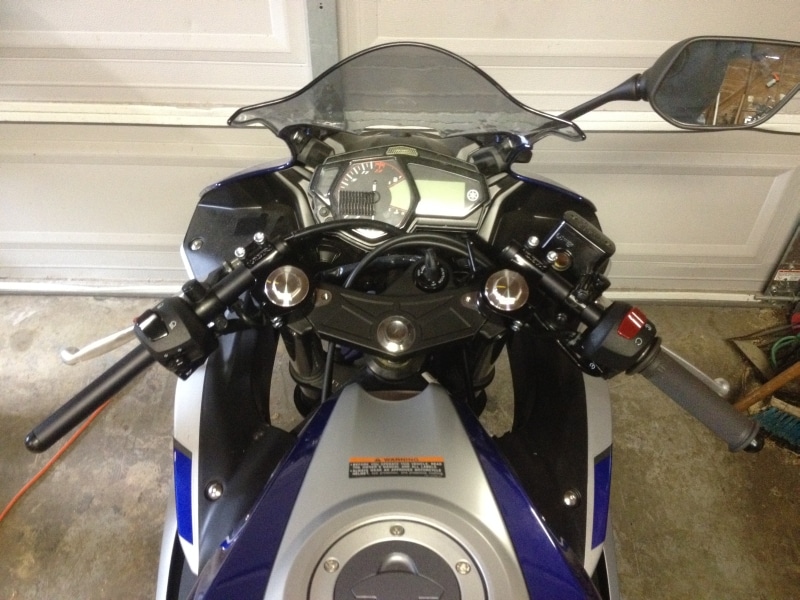
Install your grips, and you’re all done!
Coming soon:
Installing Woodcraft Universal 41mm clipons with 1.5″ rise below the triple clamp
Tools Needed:
5mm allen wrench
6mm allen wrench
8mm socket
10mm socket
14mm deep socket
12mm wrench
phillips screwdriver
Impact driver
WD-40 and possible pliers to remove the grip, last resort is a razor blade
rear stand
front stand or a buddy to help take weight off the front end
drill bit, #7 (0.201″), #6 (0.203″) or 13/64″ (0.203″), or a small step drill will work
tape measure
a bench vise to clamp the bars in helps but is not necessary
Step 1:


9 Comments to “ How to install aftermarket clipons on the Yamaha R3 / MT-03”
You must be logged in to post a comment.
Great write-up !!
Thanks for the information!! I will try it.
Hi…is it possible to put standard clip-ons under the triple clamp???
Most clipons won’t fit under the triple clamp without major bodywork modifications. The OEM riser clipons or Woodcraft’s 1.5″ rise clipons are the best fit.
Will the WOODCRAFT 41mm CLIP-ONS WITH 1.5″ RISE mounted under the triple fit the stock brake line length?
Yes it will
Hi Jesse, I see that it says “coming soon” for installing the woodcraft 41mm clipons. Just wondering if you ever finished a write up for that. Only thing I was unsure about is you mention raising front and rear of the bike. My bike came with a YSS shock when I bought it, so not the OEM suspension. But I don’t know much about it yet. Pretty new to the track, but this bike is for track days only, and maybe some club racing eventually. I don’t street ride with it.
Hey Owen! At this time we’re not planning on a write up for the clip-ons any longer. They’re pretty straight forward installation wise however we always recommend for all parts that they be installed by a licensed professional. As for the height of the bike, we’re not as familiar with YSS, and depending on the model it seems it comes in 5mm lower, stock, and 5mm higher. For the front, we recommend stock heigh, and then a full fork cartridge kit with the correct spring rate. Any further adjustments, especially at the track are best done by your local suspension specialist to set the bike up to you personally. Stock height is a good baseline though for most riders.
Thanks for the feedback Jesse, always appreciate your expertise! I wish I knew more about which YSS was on the bike but I will be taking it to the suspension guys for a setup at my first track day this year. I’m sure they can sort me out. prob go with the Ohlins front cartridge kit once i get around to it. thanks again!