SIGN IN YOUR ACCOUNT TO HAVE ACCESS TO DIFFERENT FEATURES

FORGOT YOUR PASSWORD?

FORGOT YOUR DETAILS?

AAH, WAIT, I REMEMBER NOW!
(858) 842-4595
  • Policies
  • My Account
  • LOGIN

Norton Motorsports

  • Shop by Bike
    • Aprilia
      • Tuono 660 2021+
      • RS 660 2021+
      • Close
    • KTM
      • RC390 / Duke 390
      • Close
    • Kawasaki
      • Ninja 500 2024+
      • Ninja 250 / 300
      • Ninja 400 2018+
      • Ninja ZX-4RR 2023+
      • Z400 2019+
      • Close
    • Ohvale
      • GP-0
      • GP-2
      • Close
    • Yamaha
      • MT-03 2020+
      • MT-07 / FZ-07 2015-2017
      • MT-07 2018-2020
      • MT-07 2021+
      • R3 2015-2018
      • R3 2019+
      • R7 2021+
      • Close
    • Suzuki
      • Suzuki GSX-8R
      • Close

    • View All
    • Close
  • Norton Built Motorcycles
    • Norton Racing Hotbodies GP Spec Race Bodywork Kit - Kawasaki Ninja 400 Z400 Ninja400R main Norton Motorsports GP Spec Kawasaki Ninja400R
    • 2019-04-28 18_00_05-2018 Ninja 400 Race Motorcycle from Ninja400R.com Norton Motorsports Kawasaki Ninja400R
    • 2019 yamaha yzf-r3 race bodywork Hotbodies Racing Norton Motorsports Norton Motorsports Race Spec Yamaha R3
    • IMG 2548 Edit Norton Motorsports Kawasaki Ninja ZX4RR Race Motorcycle
    • Close
  • Apparel, Gear, & Tools
    • Apparel
    • Riding Gear
    • Tools
    • Close
  • MY CART
    No products in cart.
  • Bike Build Write-ups
    • Aprilia RS 660 2021-
    • Kawasaki Ninja 400 2018- / Z400 2019-
      • Important ** Kawasaki Ninja 400 / Z400 Critical Issues
      • Top5 *** Top 5 Kawasaki Ninja 400 / Z400 Mods and Upgrades
      • Do you need a fuel controller with full exhaust ninja 400 Do you need a Power Commander for full exhaust on the Kawasaki Ninja 400?
      • featured image How to install an R6 throttle tube in the Kawasaki Ninja 400 / Z400
      • 49899087_301487663905591_4918556926305894400_n How to remove the front fender and rear fender of the Kawasaki Ninja 400
      • 2019-02-07 10_57_46-Clipboard How to remove the gas tank on the Kawasaki Ninja 400
      • IMG_4330_2 How to remove the OEM bodywork of the Kawasaki Ninja 400
      • open clutch Kawasaki Ninja 400 / Z400 (Ninja 500 / Z500) Clutch Slipping, Poor Shifting, False Neutrals, and Dropping Gears – Explained and Fixed!
      • Kawasaki Ninja 400 dyno horsepower Kawasaki Ninja 400 Exhaust Dyno Shootout!
      • CVR_3132_Sep1519_CaliPhoto Ninja 400 Electronics and GP Bodywork Test
      • Traxxion Dynamics Omni Fork Spring Kit Yamaha R3 2015-2018 Suspension Spring Rate Chart for Kawasaki Ninja 400 / Z400
      • Braketech Vs Galfer Rotor Brake Test Rocco Landers What’s up with the Kawasaki Ninja 400 / Z400 brakes?
      • Close
    • Ohvale GP-0 / GP-2
      • Important ** Ohvale GP-0 / GP-2 Critical Issues
      • OV001 Ohvale 190 5 Speed Shift Star Cap Ohvale 190 False Neutral and Miss Shift Problems – FIXED!
      • Close
    • Yamaha R3 2015-2018
      • Important ** Yamaha R3 / MT-03 Critical IssuesJanuary 24, 2021
      • Top5 *** Top 5 Yamaha R3 / MT-03 Mods and UpgradesJanuary 24, 2021
      • Yamaha R3 Annitori Quickshifter QS Pro Annitori Quickshifter QS Pro installed and beta tested on Yamaha R3June 24, 2015
      • Yamaha R3 415 chain kit horsepower Dyno tested: 520 vs. 415 chain and sprockets – Yamaha R3February 14, 2016
      • IMG_3869 How to bleed the brakes or flush the brake fluid on the Yamaha R3 / MT-03September 7, 2015
      • IMG_3896 How to change the front brake pads on the Yamaha R3 / MT-03September 11, 2015
      • R3GPShift How to change the Yamaha R3 / MT-03 to GP ShiftSeptember 7, 2015
      • DSCN2608_zpsqza81eb3 How to do an oil and filter change on the Yamaha R3 / MT-03August 16, 2015
      • IMG_3857 How to get more dash clearance for your clipons and brake line – Yamaha R3August 28, 2015
      • IMG_3630 How to install a BMC Race Air Filter in the Yamaha R3 / MT-03August 8, 2015
      • IMG_3846 How to install a stainless steel braided front brake line on the Yamaha R3 / MT-03September 7, 2015
      • img_6102 How to install a Yoyodyne slipper clutch in the Yamaha R3 / MT-03December 10, 2016
      • topdown vortex clipons How to install aftermarket clipons on the Yamaha R3 / MT-03March 26, 2016
      • IMG_4189 How to Install Hotbodies Race Bodywork on the Yamaha R3May 7, 2016
      • IMG_3965 How to install the Traxxion Dynamics Fork Damper Rod kit with Cartridge Emulators in the Yamaha R3 2015-2018January 16, 2016
      • IMG_4511 featured How to remove the emissions systems and install a block off plate on the Yamaha R3 / MT-03August 16, 2015
      • DSCN2484_zpsuqljyccu How to remove the front wheel from the Yamaha R3 / MT-03August 2, 2015
      • How to remove the fuel tank from the yamaha R3 How to remove the gas tank from the Yamaha R3April 23, 2015
      • IMG_3927 How to remove the kickstand from the Yamaha R3May 7, 2016
      • DSCN2189_zpsg2hs8ooe How to remove the rear wheel from the Yamaha R3 / MT-03August 2, 2015
      • Remove Side Fairings Yamaha R3 How to remove the side fairings from the Yamaha R3May 23, 2015
      • IMG_0167 How to remove the tail and taillight of the Yamaha R3April 21, 2015
      • how to remove the windscreen yamaha r3 How to remove the windscreen and upper fairing from the Yamaha R3May 4, 2015
      • IMG_3985 How to replace the fork seals on the Yamaha R3January 16, 2016
      • IMG_3719 Installed: Hotbodies Color Form Race Bodywork – Yamaha R3 2015-2018August 26, 2015
      • Yamaha R3 Modified rear brake rotor, lightened machined rotor Lightweight Rear Brake Rotor for Yamaha R3October 1, 2015
      • IMG_4463 Paint is done, heading to 5zero4 Designs next weekend to install the graphicsDecember 14, 2015
      • Traxxion Dynamics Omni Fork Spring Kit Yamaha R3 2015-2018 Suspension Spring Rate Chart for Yamaha R3 / MT-03January 24, 2021
      • Yamaha R3 Woodcraft 1.5 rise clipons What are the best clipons for the Yamaha R3?March 24, 2016
      • yamahaR3_raceconcept_rearsets_gold_fitR1 What are the best rearsets for the Yamaha R3?March 26, 2016
      • Yamaha R3 Exhaust Test Superbike Dyno horsepower Norton Motorsports Yamaha R3 / MT03 Exhaust Dyno Test and Superbike BuildJune 6, 2019
      • 2015 yamaha r3 exhaust header muffler weight Yamaha R3 OEM exhaust weight, headers, muffler, slip-on, heat shieldJuly 3, 2015
      • Close
    • Close
  • Dyno Testing
    • Aprilia RS660 Dyno Testing
    • Kawasaki Ninja 400 / Z400
      • Kawasaki Ninja 400 dyno horsepower Kawasaki Ninja 400 Exhaust Dyno Shootout!September 2, 2019
      • Do you need a fuel controller with full exhaust ninja 400 Do you need a Power Commander for full exhaust on the Kawasaki Ninja 400?September 2, 2019
      • Close
    • Yamaha R3 / MT-03
      • Yamaha R3 415 chain kit horsepower Dyno tested: 520 vs. 415 chain and sprockets – Yamaha R3February 14, 2016
      • Yamaha R3 Exhaust Test Superbike Dyno horsepower Norton Motorsports Yamaha R3 / MT03 Exhaust Dyno Test and Superbike BuildJune 6, 2019
      • Close
    • Yamaha R7 / MT-07
    • Close
  • Other Cool Stuff
    • Power Commander vs Bazzaz vs ECU Flash vs aRacer Race ECU Power Commander vs. Bazzaz vs. ECU Flash vs. aRacer Race ECU
    • Woodcraft Toe Guard Yamaha R3 Woodcraft Shark Fin Toe Guard Modification Yamaha R3 / Kawasaki Ninja 400
    • Track_Day_TTD_2015_Thompson_8-24-15-2195-sm-300×200 5 Reasons Why Roadracers Give Up Street Riding
    • modified rear brake rotor rev a Reducing weight on a race bike and the different types of weight
    • video thumb Tire Shootout for Small Sport Bikes by Ari Henning
    • IMG_5091 Race Bike Designs, Graphics, and Paint Jobs
    • thumb Kawasaki Ninja 300 vs. KTM RC390 – Video Review
    • Close
  • Press Release
  • Race / Ride Reports
  • Race Team

How to remove the front wheel from the Yamaha R3 / MT-03

by Norton Racing / 2015, August 02 / Published in Yamaha R3 / MT-03

This post was written by mfgchapin from R3-Forums and I only added a couple extra notes, thank you mfgchapin!

Tools needed:
19mm socket
17mm socket or wrench
Torx size 50
Rear stand
Front stand
Torque wrench
Possibly a flat blade screwdriver to spread the brake pads

The front has a few more steps than the rear, but it’s actually a lot easier since there’s no chain and the brake will be out of the way on reassembly.

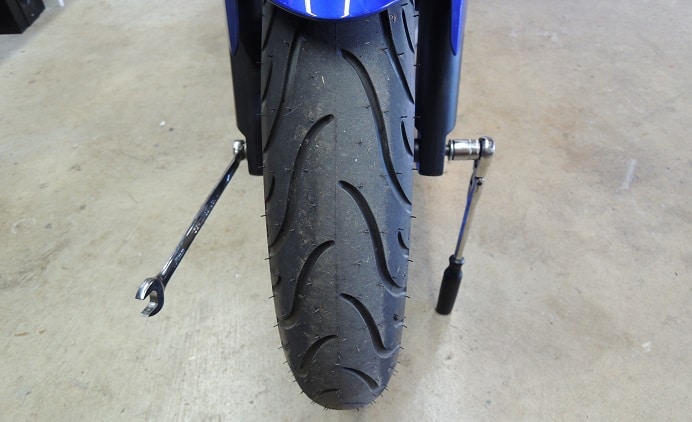
Step 1:  Put your bike on the rear stand and loosen the front axle a turn or two with the 19mm and 17mm, and loosen the two Torx bolts holding the brake caliper. Never loosen the axle nut while the bike is on a front stand, since it can either break the pin on a triple tree stand, or pull the bike off a fork stand.  And, it’s much easier to break the Torx bolts loose while the front wheel is still on the ground and can’t spin.

DSCN2484_zpsuqljyccu

DSCN2485_zps1eypmnle


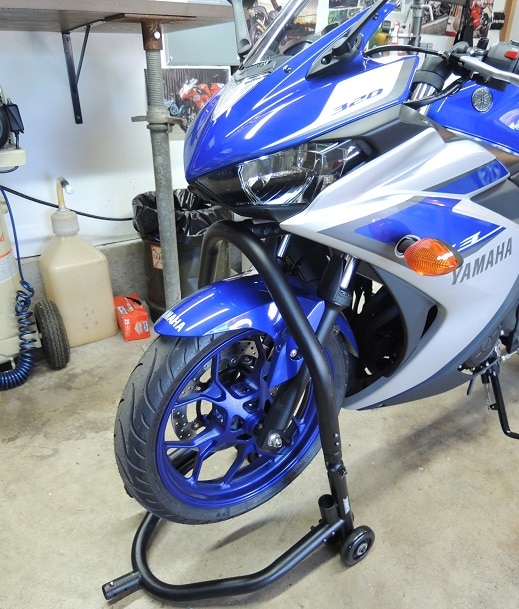
Step 2:  Put the bike up on a front stand.  Always have the bike on a rear stand first, then put it on the front stand.  Never use a front stand by itself.

DSCN2482_zps04dhb3ec


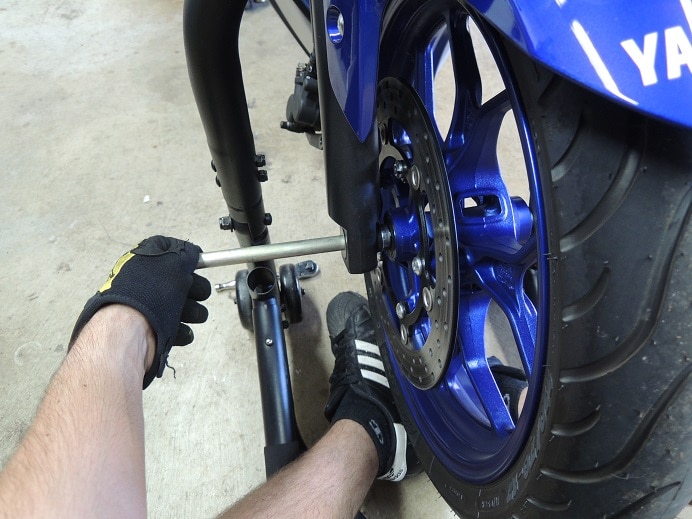
Step 3:  Take the caliper bolts all the way out and pull the caliper back off of the disc and to the side. Loosen the axle all the way and the 19mm bolt will come out of the left-hand side of the bike. Place your foot or a wedge under the wheel and pull the axle all the way out of the right-hand side of the bike.

DSCN2486_zpstexxodev


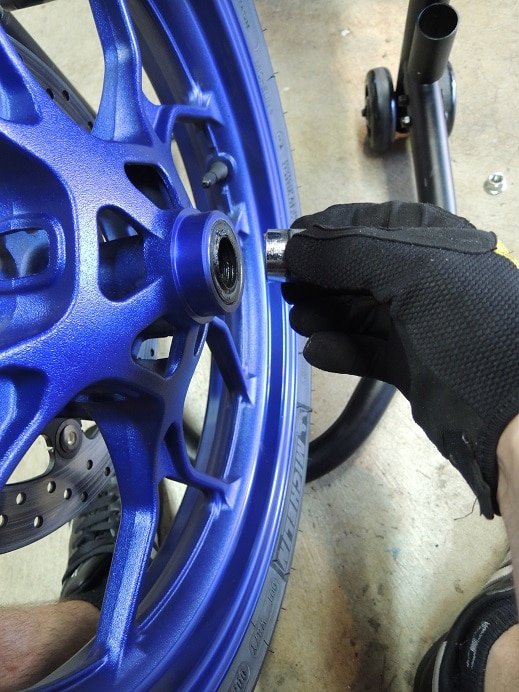
Step 4:  Roll the wheel forward and remove the spacers, one on each side.

DSCN2487_zpsyz74p0ir


It’s never a good idea to let calipers dangle for very long, especially with rubber brake lines, so put the caliper back in place with the two Torx bolts. No need to crank them down, they’re just to hold it in place while the wheel is off. Don’t squeeze the front brake lever or you’ll have to pry the pads apart to get the wheel back in!  If you do need to pry the pads apart to reinstall the caliper, GENTLY use a flat blade screwdriver.  Keep in mind, spreading the pads will force brake fluid back into the reservoir, so if your reservoir is full, or you have removed the oem reservoir, be careful about overflowing or drain some fluid out first. Also, if has been awhile since you changed your pads, the pistons may be very dirty.  If so, it’s not a good idea to force the dirty pistons back into the caliper by spreading the brake pads.  You may want to clean the pistons first.  See Step 3 of my post here on changing brake pads.

The wheel is ready for a new tire; leave the brake disc on for balancing.

I usually take this opportunity to make sure the axle is well-greased and I put a dab of anti-seize on the axle threads and caliper bolt threads.

Reassembly is the reverse. Take the caliper off again, put the spacers back in the wheel and roll it between the forks. Lift it up with your foot so the spacers line up with the axle holes in the forks. Slide the axle through and spin the nut on until it seats lightly. Slide the caliper onto the brake disc and thread the bolts in a few turns.

With the axle installed finger tight but not torqued down, take the bike off the front stand (leave it on the rear stand), and bounce down on the front end a couple of times.  This helps align the forks before you tighten everything down.  This is more critical with bikes that use pinch bolts to locate the axle, but it’s still a good idea with the R3.  Finally, torque the axle nut to 52 nm (38 ft lbs) and the brake caliper bolts to 35 nm (26 ft lbs).  Pump the front brake lever to be sure the brakes are seated against the rotor before you ride.

***note by Jesse Norton: I had the interesting experience of having an incredibly difficult time removing the front axle, and and even more difficult time reinstalling it.  It turned out that one of my forks was clamped slightly higher in the triple clamp than the other from the factory.  This caused the holes for the axle to not quite be in line unless one of the forks was slightly compressed.  Once I leveled the forks, the problem was gone.  Something to keep in mind if any of you have the same issue.

  • Tweet

About Norton Racing

What you can read next

How to remove the tail and taillight of the Yamaha R3
How to remove the fuel tank from the yamaha R3
How to remove the gas tank from the Yamaha R3
how to remove the windscreen yamaha r3
How to remove the windscreen and upper fairing from the Yamaha R3

You must be logged in to post a comment.

Search All Posts

Post Category:

Yamaha R3 / MT-03
  • ** Yamaha R3 / MT-03 Critical Issues
  • *** Top 5 Yamaha R3 / MT-03 Mods and Upgrades
  • Annitori Quickshifter QS Pro installed and beta tested on Yamaha R3
  • Dyno tested: 520 vs. 415 chain and sprockets – Yamaha R3
  • How to bleed the brakes or flush the brake fluid on the Yamaha R3 / MT-03
  • How to change the front brake pads on the Yamaha R3 / MT-03
  • How to change the Yamaha R3 / MT-03 to GP Shift
  • How to do an oil and filter change on the Yamaha R3 / MT-03
  • How to get more dash clearance for your clipons and brake line – Yamaha R3
  • How to install a BMC Race Air Filter in the Yamaha R3 / MT-03
  • How to install a stainless steel braided front brake line on the Yamaha R3 / MT-03
  • How to install a Yoyodyne slipper clutch in the Yamaha R3 / MT-03
  • How to install aftermarket clipons on the Yamaha R3 / MT-03
  • How to Install Hotbodies Race Bodywork on the Yamaha R3
  • How to install the Traxxion Dynamics Fork Damper Rod kit with Cartridge Emulators in the Yamaha R3 2015-2018
  • How to remove the emissions systems and install a block off plate on the Yamaha R3 / MT-03
  • How to remove the front wheel from the Yamaha R3 / MT-03
  • How to remove the gas tank from the Yamaha R3
  • How to remove the kickstand from the Yamaha R3
  • How to remove the rear wheel from the Yamaha R3 / MT-03
  • How to remove the side fairings from the Yamaha R3
  • How to remove the tail and taillight of the Yamaha R3
  • How to remove the windscreen and upper fairing from the Yamaha R3
  • How to replace the fork seals on the Yamaha R3
  • Installed: Hotbodies Color Form Race Bodywork – Yamaha R3 2015-2018
  • Lightweight Rear Brake Rotor for Yamaha R3
  • Paint is done, heading to 5zero4 Designs next weekend to install the graphics
  • Suspension Spring Rate Chart for Yamaha R3 / MT-03
  • What are the best clipons for the Yamaha R3?
  • What are the best rearsets for the Yamaha R3?
  • Yamaha R3 / MT03 Exhaust Dyno Test and Superbike Build
  • Yamaha R3 OEM exhaust weight, headers, muffler, slip-on, heat shield

Contact Information

Email: sales@norton-motorsports.com
Telephone: (858) 842-4595

Address

Norton Motorsports
San Diego, CA

Contact us for address before sending anything.

Thank you.

© Copyright Norton Motorsports. All rights reserved.

TOP