Track Ride Review from September 6 Socal Trackdays, lots of new parts installed!

It’s been a busy few weeks around here, but I was able to get most of my new parts installed on the bike before the Socal Trackdays event last weekend and I got some good seat time testing all of this stuff. The last time I took the bike out was in June and it was almost stock, just had new tires, the Bazzaz Z-Fi and exhaust installed and an R6 throttle tube. Since then, I’ve installed an Annitori quickshifter pro, Vortex clipons, my own rearset risers (which I positioned at the lower row middle position to start), a Motion Pro Rev2 throttle with the largest cam (50mm), Bazzaz Z-AFM auto tuner, stainless steel superbike front brake line, Vesrah RJL front brake pads, a keyless gas cap, Woodcraft left side case cover and lever guard, Traxxion Dynamics fork damper rod kit w/ cartridge emulators, and Hotbodies race bodywork with a Catalyst Composites tank cover (I’m working with Hotbodies to design a 1 piece tank cover/superbike seat that will be taller than the stock seat), as well as removed a ton of heavy OEM parts. Wow! Totally different bike now!
If you recall from my first test ride post, the R3’s stock suspension leaves a lot to be desired when pushed on the race track, especially the forks. I was running lap times in the mid 2:20s the first time out, and though I wasn’t pushing everything to the max, it was fast enough to make the bike dance all over mid corner when the suspension was compressed a little.
This time out, I started with my front tire pressure at 32, roughly where I found to work well last time, and my rear pressure to 28.5. About half way through my first lap, it already felt like a different bike. Between the higher rearsets, lower bars, better brakes, and better front suspension, the R3 felt like a sport bike now, not a beginner bike. I rode a few laps, not pushing hard at all, but just getting a feel for the new bike. How did the rearsets feel? Were they positioned correctly? How is the throttle throw with the Rev2? Is the quickshifter changing gears smoothly? These are all the things I was thinking about while getting warmed up.
The shifts from the Annitori were smooth (except 1st to 2nd, which I only use entering the track), but once or twice I got an extra kill. I had the sensitivity set at 45 and the kill time at 70 milliseconds. I would press the shifter down, it would kill the ignition and shift smoothly, but then the lever would rebound against my foot just hard enough to cause another ignition kill (not another shift, just a split second ignition kill). This only happened a couple times, but I’d have to make some adjustments to try to eliminate it.
The Vortex clipons felt great, actually, I don’t remember even thinking about them at all, which is good, that means they were comfortable and pretty well placed.
I expected the front brakes to be weak for most of the day, thinking I would have to ride them awhile to bed them in, but this wasn’t the case. They immediately felt better than the stock brakes. The mushy lever feel is totally gone, and you barely have to touch them with the Versah pads to get a good bite and change your speed, which makes it very easy to control your braking.
Unfortunately, I immediately felt like the throttle still wasn’t short enough. I’m a little extreme about this and I like a really short throttle so it’s very easy to reach full throttle. I feel like this is even more important on a small bike like the R3, where you basically pin it as soon as you hit the apex. I still found myself constantly regripping the throttle, and cranking my wrist hard to get it wide open…not good. It actually didn’t feel much different with the Rev2 throttle than it did with the R6 throttle tube. So for me, it definitely wasn’t worth it. You can get an R6 throttle tube for like $30 that will drop right in to the stock housing and make a big change, the Rev2 costs around $170 and you have to remove the gas tank and change the throttle cables, plus you have to cut the stock harness and wire in a separate kill switch, all for what felt like an almost unnoticeable change. I’m definitely planning on building my own super short race throttle specific to the R3 sometime this fall when I get some spare time, but this will have to do for the the first few race weekends.
The biggest change to the feel of the bike was the higher rearsets, it made the bike much more reminiscent of my R6. But when I slid to the edge of the seat in my normal way with the higher pegs, it would drop my weight into the corner and the bike would turn so fast and easily I’d have to fight it a little to keep it from going off the inside of the track. I would have to work on this a little to get comfortable again, as it was causing me to put unnecessary pressure on the bars mid corner, which is bad. When I came back in after the warm up, I moved the rearsets back one place to the lower row back position. I also changed the sensitivity of the quickshifter to 55, making it more sensitive, hoping that it would then require less foot pressure, thus be less likely to bounce back into my foot and cause the extra ignition kill.
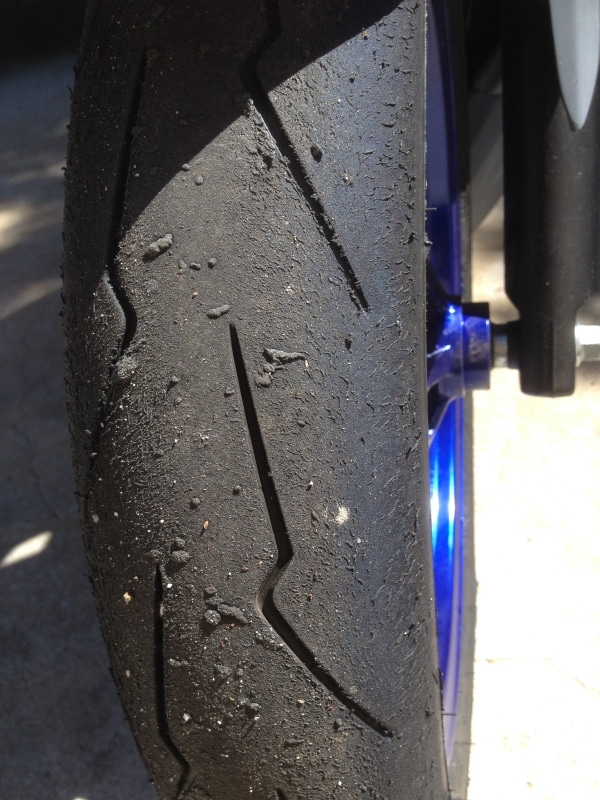
The day was heating up quickly and my front tire showed some hot tearing so I added a little more pressure up to 32.5 in the front. I forgot to take a picture during the day but my tire still showed some hot tearing when I got home so I took a photo so you could see what that looks like (it was much more pronounced before I corrected the pressure and rode a couple more times). If you see hot tearing, where you get the fine beads of melting tire arcing toward the middle of the tire, it means there’s not enough air in the tire and the surface is getting too hot and melting. Centrifugal force causes the melted rubber to run toward the center of the tire in small arcs. That’s the tell-tale sign of a hot tear.
I setup my lap timer and beacon and went back out with the changes made and put in about 10 laps. The bike felt good and I was starting to pick up my pace. The quickshifter gave me a few more double kills than before, so I guess I adjusted the wrong way. My lap times were in the 2:16-2:18 range, already significantly faster than my last time out with stock suspension, and I didn’t feel like I was pushing the bike at all. The changes to the forks were definitely noticeable. The farther back rearset position seemed to help my riding comfort, but as I tried to go faster, I still felt like I was fighting myself, and my body position was awkward. If I leaned off the bike mid corner like I’m used to, I would have to press on the bars to hold the bike up, and you don’t ever want to be pushing on the bars with the bike leaned over. After fighting with the bike for a few laps, adjusting my body position multiple times, I decided to come in and rest.
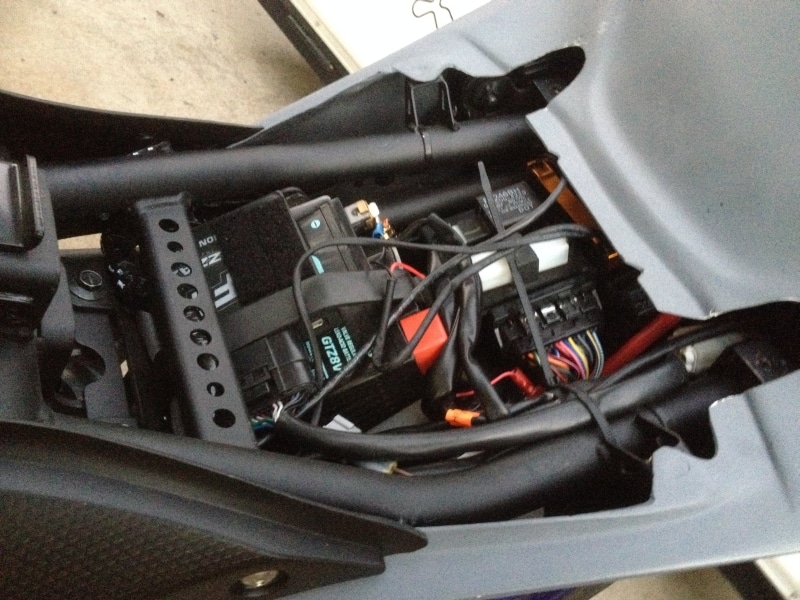
I remembered I still hadn’t turned on my Bazzaz Z-AFM to start recording my air/fuel ratio so I pulled the seat and tail to get to the Z-AFM. Because the tail on the R3 race bodywork is such a pain in the butt to remove, I decided to move my Bazzaz Z-Fi from the back of the subframe, to the under the seat on top of the battery. This would make it much easier to access for future USB connections. I also changed the quickshifter sensitivity to 35. I’ll have to do some better cable management when I have more time since I had to move the annitori quickshifter, but here’s what I ended up with, the Bazzaz Z-Fi is on top of the battery, the Annitori Quickshifter is tucked in between the regulator and some other crap, and I left the Z-AFM module in the tail:
I had been struggling to get comfortable and relaxed while cornering, so I decided to forget about my riding position that I was used to on my R6, and start over from my days of training with Jason Pridmore. The R3 is a different bike, and I would relearn to ride it with good habits. I went back out again and slowed my pace a little. I sat nearly upright on the seat, only shifting my butt slightly to each side to corner, and keeping my upper body upright. I just rode the bike through the corner, so all of my weight was on the seat and in my legs. Finally I felt relaxed, with no weight being forced into the bars, the bike completely stabilized mid corner. This is how it was supposed to feel. I started to speed up again, careful not to fall into my old habit and lean my body into the corner so much that I would have to correct the bars. Now the bike became easy to ride again. It felt planted, stable, and responsive. I picked up my pace a bit more and the faster I went, the better the bike felt. The quickshifter still had some double kills, but the shifting wasn’t quite as smooth now with the setting at 35. I dropped by times back to 2:16, no problem, 2:15 barely pushing the bike at all, but now it was easy and I wasn’t straining to hold my line in the corner. I came back to the paddock to rest for a bit and eat, but I couldn’t wait to get back on the track and get some more seat time with my new found riding style.
This first picture is from earlier in the morning, trying to ride the R3 the way I rode my R6. Notice my low upper body position and much of my body off the side of the bike:

This second picture is from a couple hours later, after I had reset my riding position. I stayed more upright and more on the seat, I was more relaxed, more comfortable, and going faster:
The track closed for lunch for an hour. My front tire looked a little better and some of the hot tearing had reduced, but the temperature was in the 90s now so I checked my tire pressure again and readjusted to 33 psi on the front and 28.5 psi on the rear. I changed the quickshifter sensitivity back to 45 where I started and it seemed to work best. I’ll have to get ahold of Annitori and see what they think about the double kills.
After lunch I suited up again for probably my last session of the day, it was really getting hot and the breeze was had slowed making it pretty uncomfortable. This time out, everything felt good. I was still adjusting to my more upright riding position, but I wasn’t fighting with the bike anymore and cornering was smooth. I started rolling on the throttle a bit harder mid corner and it really stabilized the bike. I’m probably used to the amount of throttle I can apply with a 600cc bike, but with 1/3 the power, it makes sense I need to give the R3 a lot more gas on the exit drive. I started rolling on harder and harder with each corner, and a little earlier. I found that the bike really came alive and whipped through the corner when I opened the throttle a significant amount long before the apex, and nearly pinned it coming past the apex. The R3 just started begging me for more corner speed. Compared to when I rode the bike on stock suspension, it was on rails. I put in a 2:13 and I didn’t feel like I was pushing the lean angle in half the corners. I also spent the whole morning studying the shifter, my riding position, my lean angle, and completely neglecting my brakes. I was just coasting into most of the corners, so I know there’s tons of time to make up staying on the gas longer and trail braking into the corners, but I was getting tired, and the heat was overwhelming. It had to be 100 by now. I came back to the paddock and we started to pack up. Another successful day at the track. Rubber side down, and everyone safe.
I had planned on testing the damper rod kit with the emulators for a day, then installing the Penske shock before the races coming up on September 19-20. But now that I’ve ridden the bike with the fork kit and the stock shock, I’m nowhere near the limits of this setup yet, so I’m going to stick with it for Friday practice and at least Saturday’s races and see how it goes. It feels good enough to race, the bike is planted, predictable, and smooth, and I haven’t had a single hint of reduced traction yet. But I’m well off the race pace at Chuckwalla, the fastest guys are in the 1:59-2:00 range, with the lap record being 1:58.9, and the next group of guys are in the 2:00-2:05 range, then it goes up from there to about 2:15 for the back of the pack. I want to feel the limit of this setup before I change it so I can provide better feedback about the changes.
Also, a side note, after I got home, I spent a lot of time studying photos and videos of the faster guys around CA and I noticed a common theme with the more upright riding position on the smaller bikes. I guess it just doesn’t take as much to make them turn, or I’ll just have to adjust again when I get faster. I’m excited to get the hang of this ultra lightweight racing and have a fun race season 


8 Comments to “ Track Ride Review from September 6 Socal Trackdays, lots of new parts installed!”
You must be logged in to post a comment.
what, no skeletonized rear rotor test?
No, sorry, I haven’t modified my rotor yet.
Meant to add, nice write-up. 1:58 is the track record for a 300cc bike?
Yeah, Ari Henning, Honda CBR250R bored out to a 300
What degree did you get with those vortex clip ons? I noticed they have 0 and 7 degrees.
I use the 7 degree Vortex clipons and they work very well.
I was wondering if these tests were using your 1st or 2nd Gen custom rearset risers. I am looking at picking up a set of Gen 1 risers from a WERA forum member and wanted to get your honest opinion about what the major differences/pros/cons of both sets would be.
Thanks in advance!
– Sean
I did tests with the upper and lower positions of the Gen 1 risers and I concluded that the lower position of the Gen 1 riser (which is identical to the higher position of the Gen 2 riser) was ideal for track riding with a taller seat, like the Hotbodies race seat, or my taller Supersport seat, and could be used just fine with the stock seat, but it can be a little cramped if you are tall or don’t like high rearsets. The upper position on the Gen 1 riser is too high for most people. The lower position on the Gen 2 riser is ideal for use with the stock seat, or if you don’t like your rearsets super high.